Showing posts with label sepia. Show all posts
Showing posts with label sepia. Show all posts
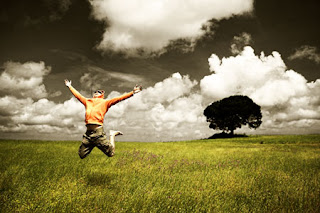
Learn how to use Photoshop to create selectively add a dramatic sepia effect a photo. This Photoshop effect works best when used with Photoshop CS3 but will also work with Photoshop CS2 or older using an alternative method.
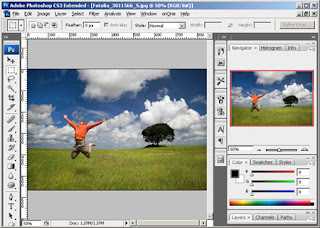
Step 1: Open an image into Photoshop
Open the File menu and select Open. Browse for the photo you would like to add a selective sepia effect to and click OK.
Step 2: Create a Hue/Saturation adjustment layer
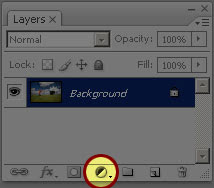
In the Layers pallet, click on the New Adjustment Layer icon and select Hue/Saturation.
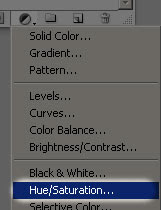
A Hue/Saturation window should appear. With this tool, well specify where the sepia effect will appear. Decide if you want to select the sepia toned areas according to the color of the image or by manually painting the areas where you would like the sepia tone.
Choose one of the following:
A) Select by color
Selecting the sepia areas based on color will give the most natural effect.
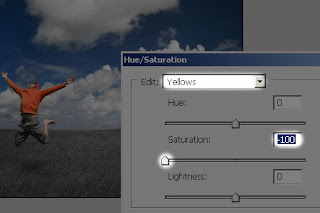
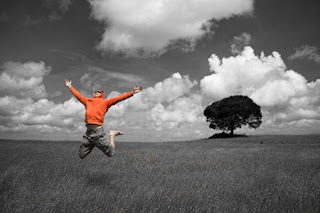
First, decide which color in the photo that you want to keep. Then, select from the edit drop down menu the each color in the list except for the colors you want to keep and reduce the saturation to -100. For example, to keep the reds in the photo use the following settings:
Reds: 0 Saturation
Yellows: -100 Saturation
Greens: -100 Saturation
Cyans: -100 Saturation
Blues: -100 Saturation
Magenta : -100 Saturation
B) Select manually
Manually selecting the sepia toned areas will let you specify precisely the area that you would like toned.
Set the master saturation to -100 and click OK. Your image should now appear grayscale.
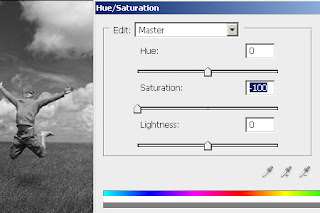
Activate the layer mask by clicking on the layer mask thumbnail in the Layers pallet. Select the Eraser tool and erase the areas where you dont want the sepia tone to be applied to.
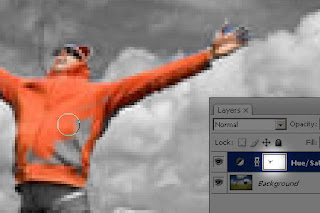
Step 3: Add a Black & White adjustment layer
In the Layers pallet, click on the New Adjustment Layer icon and select Black & White. If you are using Photoshop CS2 or older, select Hue/Saturation instead.
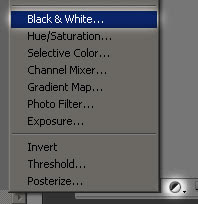
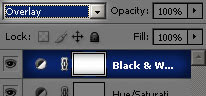
A Black & White (or Hue/Saturation if youre using Photoshop CS2 or older) adjustment layer should appear. Simply click OK without editing the settings. Then, change the blend mode of the top adjustment layer to Overlay. Double click back on the icon of the layer to bring back the tool.
Photoshop CS2 or older:
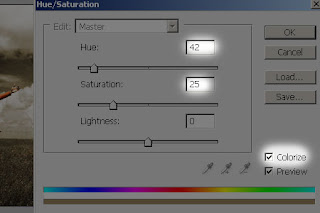
You will be using the Hue/Saturation tool to add a sepia tone. Checkmark "Colorize" and apply the settings below:
Photoshop CS3:
If youre using Photoshop CS3, you can use the Black and White adjustment to add a sepia tone. This will give you more adjustable settings compared to using the Hue/Saturation adjustment.
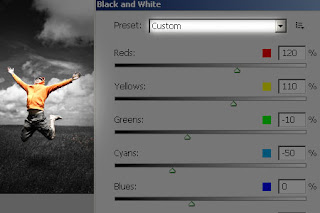
First, adjust the settings to get the black and white look that you like. Or, you can scroll through the presets menu to select one of your own. I chose the Red Filter preset to bring up the reds and darken the sky.
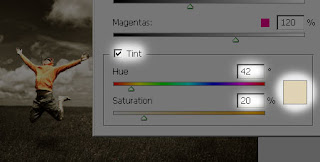
Checkmark the Tint and adjust the tone to create a sepia effect. Click OK when done.
Original Image:
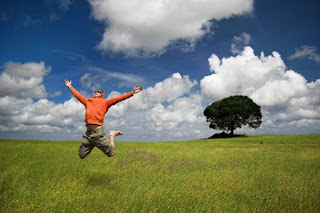
Final Result: with Red
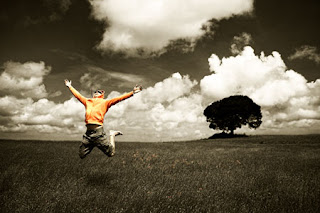
Final Result: with Blue and Cyan
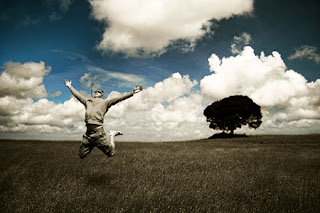
Final Result: with Yellow and Green
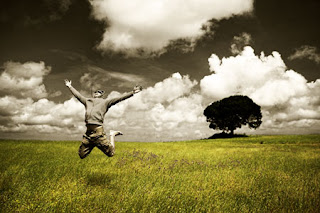
Final Result: with Red, Yellow and Green
Read more »
Step 1: Open an image into Photoshop
Open the File menu and select Open. Browse for the photo you would like to add a selective sepia effect to and click OK.
Step 2: Create a Hue/Saturation adjustment layer
In the Layers pallet, click on the New Adjustment Layer icon and select Hue/Saturation.
A Hue/Saturation window should appear. With this tool, well specify where the sepia effect will appear. Decide if you want to select the sepia toned areas according to the color of the image or by manually painting the areas where you would like the sepia tone.
Choose one of the following:
A) Select by color
Selecting the sepia areas based on color will give the most natural effect.
First, decide which color in the photo that you want to keep. Then, select from the edit drop down menu the each color in the list except for the colors you want to keep and reduce the saturation to -100. For example, to keep the reds in the photo use the following settings:
Reds: 0 Saturation
Yellows: -100 Saturation
Greens: -100 Saturation
Cyans: -100 Saturation
Blues: -100 Saturation
Magenta : -100 Saturation
B) Select manually
Manually selecting the sepia toned areas will let you specify precisely the area that you would like toned.
Set the master saturation to -100 and click OK. Your image should now appear grayscale.
Activate the layer mask by clicking on the layer mask thumbnail in the Layers pallet. Select the Eraser tool and erase the areas where you dont want the sepia tone to be applied to.
Step 3: Add a Black & White adjustment layer
In the Layers pallet, click on the New Adjustment Layer icon and select Black & White. If you are using Photoshop CS2 or older, select Hue/Saturation instead.
A Black & White (or Hue/Saturation if youre using Photoshop CS2 or older) adjustment layer should appear. Simply click OK without editing the settings. Then, change the blend mode of the top adjustment layer to Overlay. Double click back on the icon of the layer to bring back the tool.
Photoshop CS2 or older:
You will be using the Hue/Saturation tool to add a sepia tone. Checkmark "Colorize" and apply the settings below:
Photoshop CS3:
If youre using Photoshop CS3, you can use the Black and White adjustment to add a sepia tone. This will give you more adjustable settings compared to using the Hue/Saturation adjustment.
First, adjust the settings to get the black and white look that you like. Or, you can scroll through the presets menu to select one of your own. I chose the Red Filter preset to bring up the reds and darken the sky.
Checkmark the Tint and adjust the tone to create a sepia effect. Click OK when done.
Original Image:
Final Result: with Red
Final Result: with Blue and Cyan
Final Result: with Yellow and Green
Final Result: with Red, Yellow and Green

This version of the half sepia photo effect has higher contrast and works better for more photos.
Step 1:
Open a photo inside Photoshop. The half sepia photo effect works on most photos but is most useful for images with high saturation.
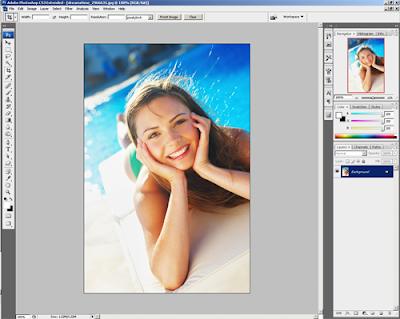
Step 2:
In the Layers palette, click on the Adjustment Layer Icon and select Hue/Saturation
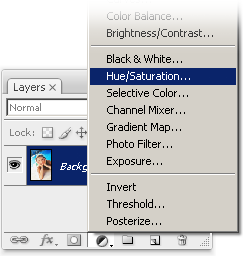
The Hue/Saturation tool will appear. First, checkmark the Colorize option near the bottom right corner. Copy the settings from the image below then click OK.
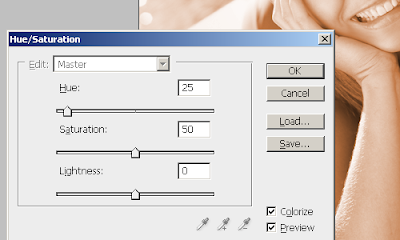
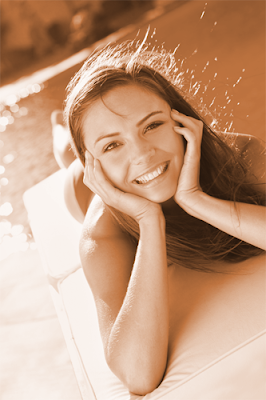
Your image should now have a bright sepia tone.
Step 3:
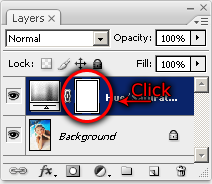
We will now work on the layer mask of the Hue/Saturation adjustment layer. Make sure that you have the layer mask selected by clicking on the layer mask thumbnail in the Layers palette.
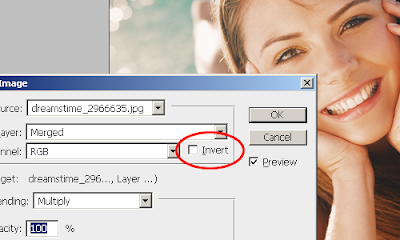
Choose Image > Apply Image and use the default settings. The only setting that you may need to adjust is the Invert setting. If you leave the Invert option unchecked, the sepia tone effect will only be visible in the brighter areas of your image. If you enable the Invert option, the sepia tone will be visible only in the darker areas of the image.
Step 4:
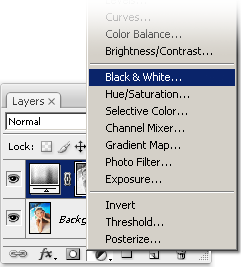
Now well add a black and white adjustment layer.In the layers palette, click on the Adjustment Layer Icon and choose Black & White. If you are using Photoshop CS2 or older, you will not have the Black & White menu option. Instead, choose Channel Mixer.
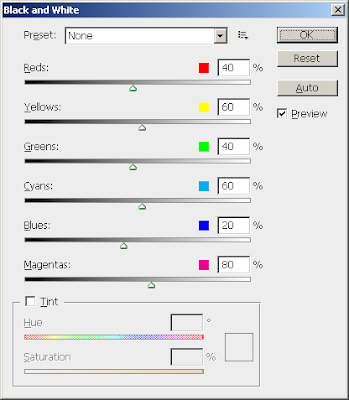
The Black and White or Channel Mixer (If youre using Photoshop CS2 or older) settings will appear. Simply click OK with any settings. Well go back to edit the settings later.
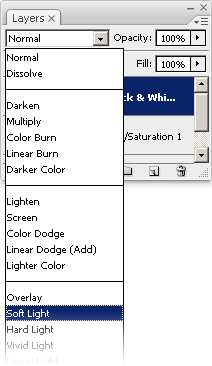
Change the blending mode of the new Black & White or Channel Mixer adjustment layer to Soft Light.
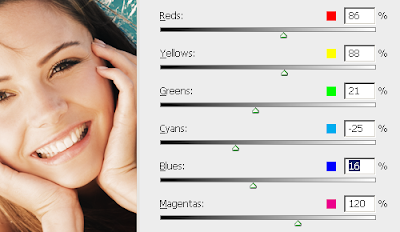
Double click on the Black & White or Channel Mixer adjustment layer thumbnail to bring back the settings. Adjust the settings while looking at the preview to get the results that you desire. If you are using the Channel Mixer tool, checkmark the monochrome option.
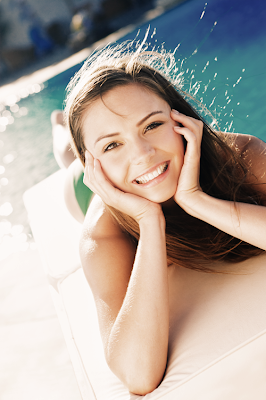
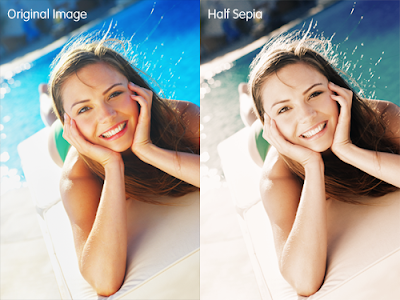
Half Sepia Final Results
Read more »
Step 1:
Open a photo inside Photoshop. The half sepia photo effect works on most photos but is most useful for images with high saturation.
Step 2:
In the Layers palette, click on the Adjustment Layer Icon and select Hue/Saturation
The Hue/Saturation tool will appear. First, checkmark the Colorize option near the bottom right corner. Copy the settings from the image below then click OK.
Your image should now have a bright sepia tone.
Step 3:
We will now work on the layer mask of the Hue/Saturation adjustment layer. Make sure that you have the layer mask selected by clicking on the layer mask thumbnail in the Layers palette.
Choose Image > Apply Image and use the default settings. The only setting that you may need to adjust is the Invert setting. If you leave the Invert option unchecked, the sepia tone effect will only be visible in the brighter areas of your image. If you enable the Invert option, the sepia tone will be visible only in the darker areas of the image.
Step 4:
Now well add a black and white adjustment layer.In the layers palette, click on the Adjustment Layer Icon and choose Black & White. If you are using Photoshop CS2 or older, you will not have the Black & White menu option. Instead, choose Channel Mixer.
The Black and White or Channel Mixer (If youre using Photoshop CS2 or older) settings will appear. Simply click OK with any settings. Well go back to edit the settings later.
Change the blending mode of the new Black & White or Channel Mixer adjustment layer to Soft Light.
Double click on the Black & White or Channel Mixer adjustment layer thumbnail to bring back the settings. Adjust the settings while looking at the preview to get the results that you desire. If you are using the Channel Mixer tool, checkmark the monochrome option.
Half Sepia Final Results
Subscribe to:
Posts (Atom)


- Follow Us on Twitter!
- "Join Us on Facebook!
- RSS
Contact