Showing posts with label photo. Show all posts
Showing posts with label photo. Show all posts
Saturday, June 20, 2015
add,
any,
effect,
film,
how,
photo,
pse9,
saturated,
to,
using
0
comments
How to add Saturated Film Effect to any photo using PSE9
1. Open an image in PSE Editor.
2. Go to Guided Edits and click on Saturated Slide Film Effect under Photographic Effects.

3. Click on Apply button. It can be applied multiple times depending on the extent of the effect you are looking for.
Here are my initial and final images:
 |
| Initial image |
 |
| Final Image |

Wednesday, April 29, 2015
cs6,
illustrator,
in,
photo,
tracing,
tutorial
0
comments
Tracing Photo in Illustrator Cs6 Tutorial
Full detailed tutorial on how to draw and trace people from a photo. Learn how to create realistic illustration with just simple gradient fill. No massive Gradient Mesh!
Download Source File
Required: Illustrator 9+

 Use the Pen Tool and start tracing the basic features of the girl. While you are tracing, there are couple shortcut keys you should know in order to work more faster.
These shortcuts are:

 Use the same technique from previous step and make all shadow paths for the overall illustration. You don’t have to get into the details yet, one simple shadow path of each part is good enough (ie. eye, lips, shirt, body, etc). Remember to use Ctrl+C for copy; and Ctrl+F to paste object in front. Trust me, this will save you a lot of time!


 Select the other shadow paths and use the Eyedropper Tool to copy the gradient fill of the main shadow path.
 For the lip and eye shadow, use the Eyedropper to copy the base fill and select Multiply Blending Mode.


Read more »
Download Source File
Required: Illustrator 9+
1. Place a photo Illustrator Cs6 Tutorial
First place a photo in Layer 1 by File > Place or Copy & Paste from clip board. Double click on Layer 1 to change the Layer Options. Set Dim Images to: 30% and lock layer.2. Start tracing
Make a new layer (Layer 2). Hold down Ctrl key and click on the eye icon of Layer 2 to view Layer 2 in Outline mode.These shortcuts are:
- Ctrl+[ = Send Backward (This will send object back 1 step)
- Ctrl+] = Bring Forward (This will bring object front 1 step)
- Ctrl+Shift+[ = Send to Back (This will send object all the way to the back)
- Ctrl+Shift+] = Bring to Front (This will bring object all the way to the front)
- Ctrl+F = Paste in Front (This will paste object in front with same position)
3. Make shadow Illustrator Cs6 Tutorial
Draw a new path as shown (top). Then Copy the base path of the face and Paste in Front. Select the copied base path and the new path, open your Pathfinder, Alt-click on Intersect shape areas.4. Fill in base color Illustrator Cs6 Tutorial
Now fill in the base color for the face, eye, lips, and eyebrow.5. Shadow gradient Illustrator Cs6 Tutorial
Fill the shadow path of the face with a Gradient (white-skin tone) and select Multiply for Blending Mode.6. Body Illustrator Cs6 Tutorial
Use the same technique, copy the gradient fill for the body. Note you might to adjust the gradient of each shadow path to blend in with the overall illustration.7. Hair Illustrator Cs6 Tutorial
Pretty much the same, fill 1 path with the gradient, then use the Eyedropper Tool to copy the fill.8. Shirt
Same technique as the previous steps.9. Skirt
Fill the skirt with a blue gradient, then use the Eyedropper Tool to copy the fill for the shadow.10. Hair details
Now you can add more details to the hair. Make shadow effect by adding Multiply paths. Add some highlights by using lighter gradient color. If you want, you can add more details to the clothes, lips, or add a cool tattoo on her body.Final
After you get used to this tracing technique, you can basically trace anything!More Samples Illustrator Cs6 Tutorial
Here are some samples that I traced from photo using the same technique.
Thursday, April 2, 2015
clarify,
filter,
high,
pass,
photo,
using
0
comments
Clarify Photo Using High Pass Filter
Clarify Photo Using High Pass Filter
Final view
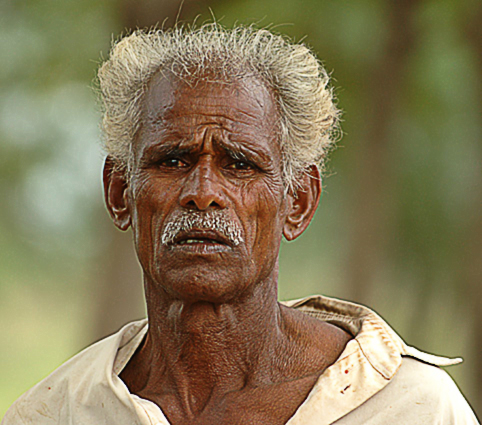
Step 1:
Take Photo to clarify.
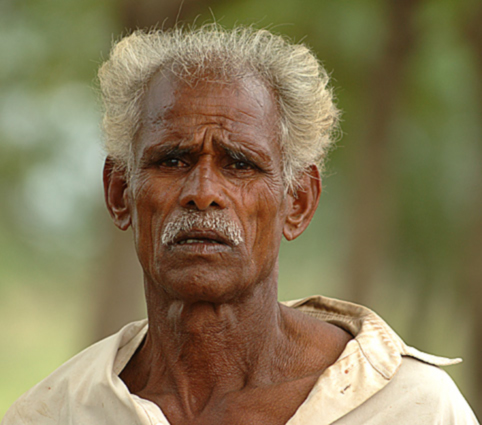
Make a duplicate layer of this layer by pressing Ctrl+J.
Take Photo to clarify.
Step 2:
Go to Filter ---> Other ---> High Pass.
Set radius to 1.5 pixels. and hit OK.
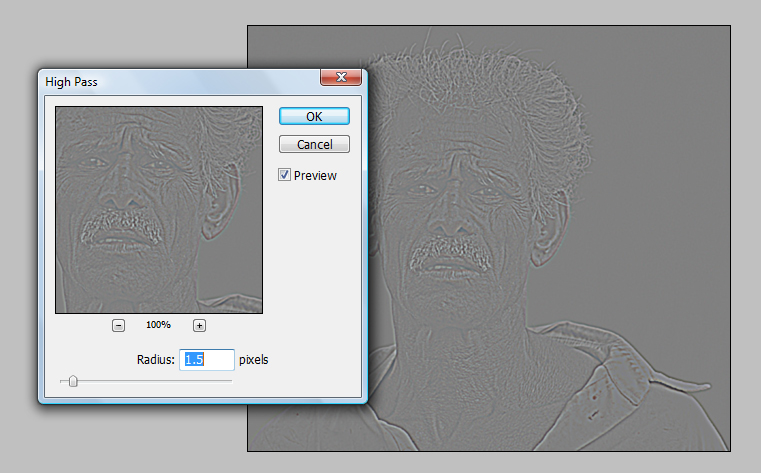
And set the mode of this layer to Overlay.
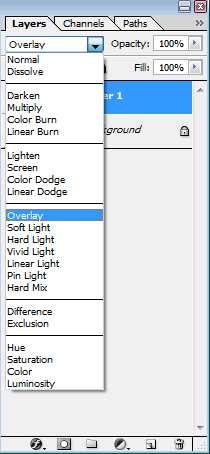
For even Better clarify the image you can just make a duplicate layer of this layer by pressing Ctrl+J.
Done..!!
an,
create,
digital,
dreamscape,
emotional,
manipulation,
photo
0
comments
Create an Emotional Dreamscape Digital Photo Manipulation
Photoshop Tutorials
Step 1
Let us start by preparing the objects of the scene we are going to create. Firstly, we will creating a castle. Make sure we have downloaded all the stock images needed. Create a new document in photoshop with size of 1600 px wide and 1800 px high. Open the castle stock image in the document.

Open the tree stock image in the document, place the image behind the tree. Scale the size of it accordingly. Give the tree layer a layer mask by clicking the mask icon located in the layer panel. Mask unneeded part of the tree image.

Duplicate (Ctrl+J) the tree image, scale its size down a bit and place the duplication behind the castle. Arrange its position as the result below:

Step 2
Create a new document (Ctrl+N) with size of 1600px wide and 1808px high.

Open the grass land stock picture and extract the land from its background. Use pen magic wand tool to select the background and when the backround is selected, hit Del to clean it out

Place the extracted grass land to the new document. With free transform tool (T), scale its size to fit the canvas. Then, go to filter > blur > surface blur. Follow the screenshot below for the setting of the blur:

Then, mask the unwanted part and top most edges of the grass land. Make sure to use spatter brush for this purpose. Please see the screenshot to find out the parts to be masked (marked in red arrows).

Step 3
Next, crop some part of the grass land. Use lasso tool to select the part and then hit Ctrl+J to duplicate the selection into a new single layer.

Place the cropped in front of the original layer. Scale the sizes and arrange their positions like the one shown in the screenshot:

Mask the unneeded part of the duplication layer to make it well blended:

Step 4
We will add background to the scene. Open the mountain stock image. Hit Ctrl+T to activate free transform tool. Scale the size of the image by press Shift key on the keyboard while clicking, holding and dragging one of the dragging point.

The result should look like the one here:

We will mask the background of the mountain image to hide it and just the mountain part is just revealed. Click the layer mask icon in the layer panel to give the mountain layer a layer mask marked by a white thumbnail next to the layer. Mask the entire sky background of the image by stroking black color to the background.

Duplicate (Ctrl+J) the masked mountain layer and place the duplicate to the other side of the scene. Arrange its size a bit and position so it does not look uniform.

Finally, reduce the opacity of each mountain layer to just 10%.

Step 5
In this step we will add cloud texture to the background. Open the stock image. Activate the rectungular marquee tool and select the cloud part of the image by clicking, holding and dragging the tool on the cloud part. Then, hit Ctrl+J to duplicate the selection into a new single layer.

Add the cloud texture to the background of the scene. Scale its size to fit the background.

Step 6
Create a new layer (Shift+Ctrl+N) above the cloud texture layer. Activate gradient tool and create a gradient color on this new layer. Set the color of the gradient as the ones shown in the screenshot. Fill the new layer with gradient by clicking the top of the document, holding and dragging down to the bottom.

Set the gradient layer to soft light blending with opacity of 68%.

Give this gradient layer a layer mask and mask the red marked part of the gradient as shown in the screenshot:

Step 7
Add another stock cloud image to the document to add more cloud texture.

Set the blending of this cloud layer to screen at 35% opacity.

Step 8
Next, add the castle image we have created to the sceen. Scale its size and place it in the center between the two mountain.

Reduce the opacity of the castle layer to 30%

Step 9
Create another new layer behind the two mountain layers. Take the brush tool and choose the one of the moon brush in the brush preset picker. With white color paint the moon on the new layer with size of about 200 pixel.

Mask the part of the moon that is visible on the wall of the castle.

With the moon layer still selected, go to layer > layer style > outer glow:

Step 10
In this step we will give some highlight on the castle on which the light of the moon is strongly casted. Go again to the castle layer. Hit Ctrl on the keyboard and point the cursor to the castle layer thumbnail. When the cursor change into a pointing finger icon, click the thumbnail to load the castle a selection. When it is selected, hit Ctrl+J to duplicate the selection into a new single layer layer and give this duplication layer a clipping mask. Fill (Shift+F5) the duplicate with 50% grey. Now, activate the brush tool and choose a very soft round brush. With white color, stroke the brush on the edges of the castle.

Then, set the duplication layer to overlay at 100% opacity.

Step 11
Create another new layer and make sure to give this new layer a clipping mask. Choose again a very soft round brush with opacity of 10-20%. With white color, stroke the brush on the edges of the castle to define more highlight. The blue arrows in the screenshot will guide us where to stroke the brush.

Step 12
We will give a new adjustment layer and some highlight to the grounds as well. Go select the ground layer and then hit layer > new adjustment layers > hue/saturation. Make sure to give this adjustment layer a clipping mask. Finally, create a new layer above the adjustment layer and give this new layer a clipping mask. Give some highlight to the ground as the same way we have created in the previous step 11.

Do the same as well to the other ground layer:

Here is the result should look so far:

Step 13
We need to complete the composition of the background by add more castles in the distance. To do this purpose, we will just simply duplicate the castle and add the duplicates in the distance. Scale down their sizes and reduce the opacities to 10-20%

Step 14
Open the path stock image in the document. Place the image behind the ground layers.

Scale down the size of the image and place it on the right side of the scene. Mask almost the entire image and only the fence is revealed. We can see the result as shown in the screenshot:

Duplicate the path image and place the duplicate where needed. With the same way as in the previous step, add more fences to the scene:

Step 15
In this step we will add path on the ground. Duplicate the path image and place the duplicate above the ground layer.

Mask the unneeded part of the path image to reveal just the path and set the opacity of this layer to 50% in normal blending.

Step 16
Now we will prepare the trees to be added to the scene. We will paint the trees. Firatly, create a new document (Ctrl+N) with size of 1600px wide and 1800px high. To get idea of what the tree should look like, take a look the tree stock image as reference. Then, with color #211e15, paint the tree as the one shown in the screenshot.

Activate dodge tool and set the tool as shown below:

Start define the highlight of the tree by stroking and clicking the dodge tool on the tree.

Give the tree more highlight where needed:

Keep on stroking and clicking the tool to define more highlight. Try to vary the size of the brush and range of the tool by switching to shadow > midtones > highlight. Use the burn tool as well to give parts of the tree some shading.

Step 17
This is the tree I have created:

Then, open the texture stock image on the tree document. Scale the size of this image (1). Create a clipping mask for this texture layer (2). Finally, set the blending of this layer to soft light at 68% opacity.

Create a new layer and give this new layer a clipping mask. Take a very soft round brush and set the brush at 10-20% opacity. With white color, stroke the brush on the edges of the tree to give more highlight. There, we have a new tree now. Select all the tree layer and hit Ctrl+G to group them.

Step 18
Finally, add the tree group to the main document.

With the same ways as in the previous step on how to create a tree, create another tree and add the tree to the right side of the scene.

Step 19
Create the other tree from the tree brush. Make sure we have downloaded and installed the brush. Paint again the other tree.

SAdd some more distant trees to the scene.

Step 20
In this step we will add foregrounds for the scene. Go to the cropped grass land layer again. Duplicate the layer two times. Then, place the duplicates above the main tree group layers. The screenshot below will guide us where the duplicates should be placed:

Step 21
Now we will add a model to the scene. Firstly, open the model stock image. Take the pen tool, and with the tool, start tracing the model by clicking the edges of the model to create anchor points (I started the anchor point on the head). Keep on tracing until the path is closed which indicated by a thin line around the model.

Right click on the path to show path command options. Choose make path selection to change the path into a seletion. Hit Shift+Ctrl+I to inverse the selection and hit Dell to clean the background:

Step 22
Scale the model to the size needed:

Step 23
In this step we will add ties to the model’s swing. Firstly, cut out the part of the swing’s rope.

Place the cut out on the branch of the tree on which the rope should be tied. Activate free transform tool and warp the rope to bend it a bit.
Cut out again the rope of the swing into a small piece. Duplicate the cut out some times as needed. Place each duplication above one to another to create the tie:
Cut out again the rope of the swing into a small piece. Duplicate the cut out some times as needed. Place each duplication above one to another to create the tie:

Finally, add more ropes to complete the swing:

Step 24
In this step we will paint more cloud to the scene. Take brush tool and set the brush preset as the ones below:

Set the opacity of the brush between 20-30% . Then, on a new layer paint white cloud for the scene.

Step 25
Now we will add new adjustment layers to the scene. Go to layer > new adjustment layer > color balance. Set this adjustment layer to normal blending at 100% opacity

Then, give another adjustment layer: curves. Set this adjustment layer to normal at 60% opacity.

This is the result should look like after adding the adjustments:

Step 26
Select the curves layer in the layer panel. Mask some areas (indicated by the red mark in the screenshot). Use a very soft round brush to mask the areas.

This is the result should look like:

Step 27
Create a new layer above the two adjustment layers. Activate the brush tool. Choose a very soft round brush with opacity about 20-30%opacity. On the new layer, paint black transparent color to the edges of the scene. Then, to complete the composition, add some birds to the trees. Place the bird layers below the adjustment layers.

Step 28
Now create again a new layer above all the other layers. Fill the new layer with black. Set this layer to color dodge blending with 100% opacity. Take the brush tool. Set the opacity of the brush to 5-10% and choose a very soft round brush. With white color, paint the windows of the castle to give them light and give some highlight to the grounds as well. Here is the layer should look like in normal blending:

And here is the result will look like when the layer set to color dodge:

Step 29
Next, we will give another new adjustment layer to the scene. Go to layer > new adjustment layers > curve. For this curves layer, give it normal blending at 90% opacity.

Step 30
Hit Shift+Ctrl+Alt+E to stamp all the visible layers. This will create a new single layer of the scene we have created. Right click the stamp layer to show the layer command options. Choose convert to smart object. This will convert the layer into a smart object layer.

Then, go to filter > others > high pass. This will give the smart object layer a smart filter: high pass.

Point the cursor to the visible high pass filter in the layer panel, right click on it to show the filter command options. Choose Edit Smart Filter Blending Option…

Then set the blending to multiply at 100% opacity.

This is the result will look like:

Step 31
Click the filter mask thumbnail to mask the effect of the filter. Mask on the red marked areas. Use a very soft round brush to mask the areas.

The result should look like this now:

And We’re Done!
You can view the final outcome below. I hope that you enjoyed this tutorial and would love to hear your feedback on the techniques and outcome.

Subscribe to:
Posts (Atom)


- Follow Us on Twitter!
- "Join Us on Facebook!
- RSS
Contact