Showing posts with label sketch. Show all posts
Showing posts with label sketch. Show all posts
Wednesday, March 18, 2015
and,
new,
painting,
photo,
sketch,
to,
way
0
comments
Photo to sketch and painting New way
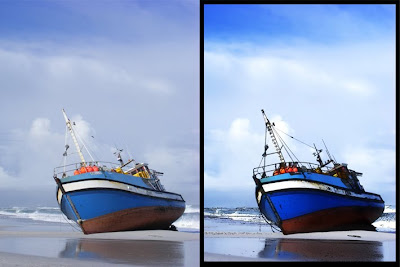
In this tutorial Ill show you a new technique I use for making different photos to look like paintings or just to turn them to sketch.
1.Step. First open a new photo, it can be whatever you like. I have tried it on different photos and it worked very well. There was just some minor differences in the settings I was using.
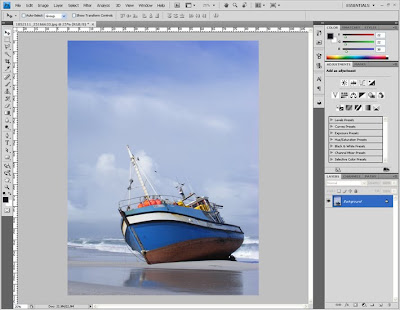
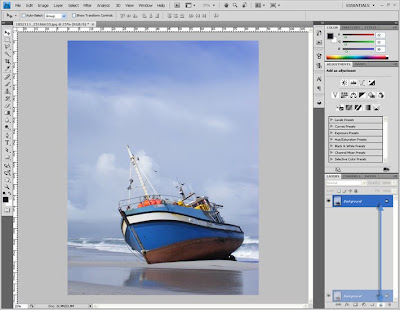
Step 2. Duplicate the layer once. I dont like working on the original very often.
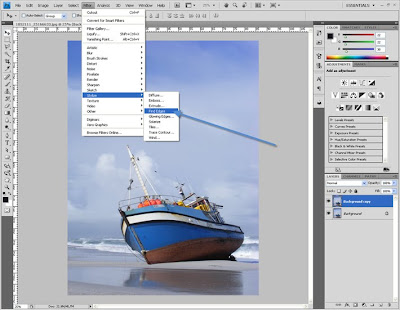
Step 3. Next I use Filter - > Stylize - > Finde edges
Step 4. After I use this filter, I use desaturate image. CRTL+SHIFT +U
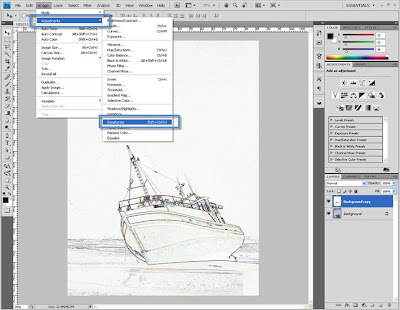
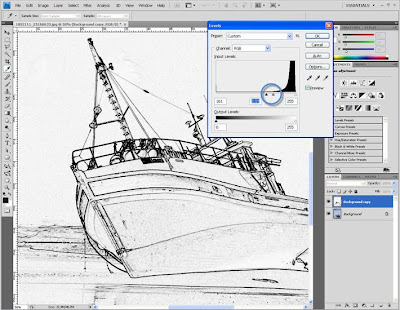
Step 5. Next I use Levels (CTRL+L) and here the settings for every photo will be a little different. But just a little, every black and white photo with more white and less black have a simmiliar look like in the image below:
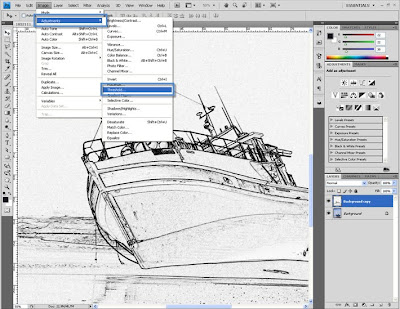
Step 6. Image - Adjustment - Threshold
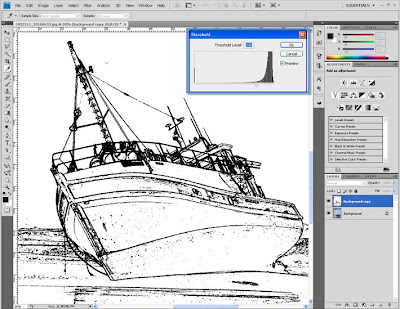
Step 7. The settings for every photo wil lbe little different again, but not that much, simmiliar to mine:
Step 8. Use filter - Blur - Gausian blur to smooth this lines a little.
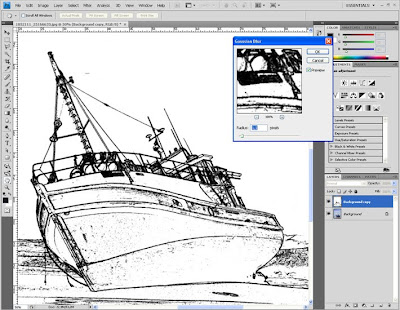
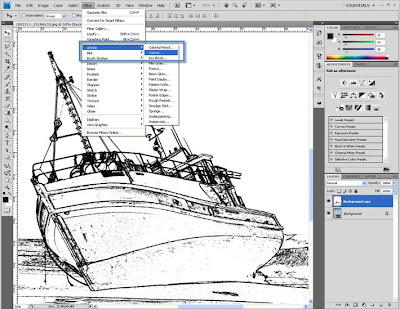
Step 10. Here you can use the eraser tool and remove some of the black spots you dont like, but this is if you like. Ill leave them like this and next Ill use the filter FIlter - > Artistic - > Cutout
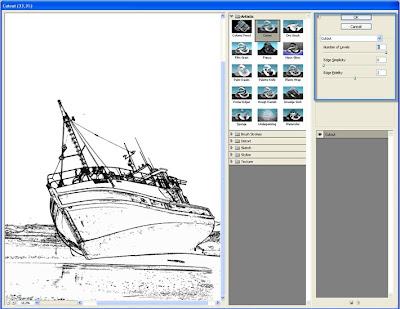
Step 11. Here the settings I use:
Step 12. So the sketch version is ready now. On the next few steps Ill show you how I turn it to look like a painting. Duplicate the first layer again.
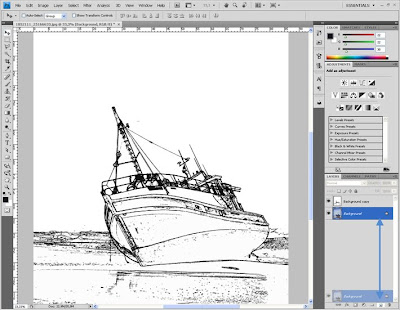
Step 13. Move the duplicate layer on top and change the layer mode to Multiply
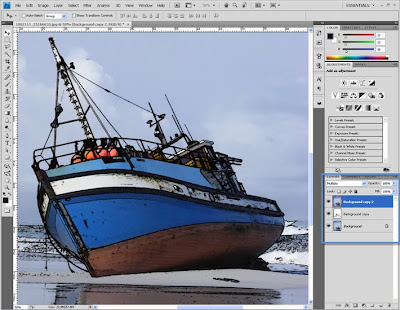
I want to show you 2 different methods for different results.
1. From step 14 to 17 I will show you how to make it look like an unfinished painting.
2. And after step 18 Ill show you how to turn the whole image to look like its a painting using some filters again.
Step 14. Heres the first way: For example I want to delete the sky and leave the boat like it is. Ill hide the new layer and on the sketch layer Ill select the white area where the sky is.
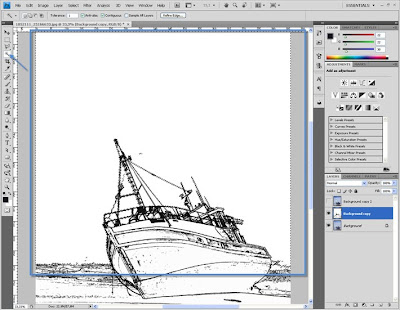
Step 15. Using quick mask tool Ill add some Gausian blur. I know I can use Select - Refine edges. But this is my preffered way in this tutorial.
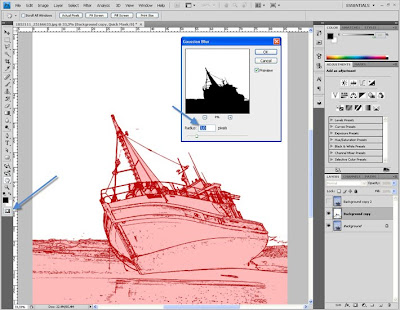
Here 2 ways again:
1. Delete the white area on sketch in step 16. or
2. Delete the sky on the new layer in step 17.
Step 16. Hit delete. I thing the effect in the next image also looks interesting thats why I am showing it to you.
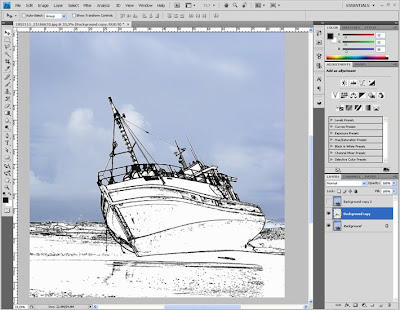
Step 17. Another thing you can do here is not to delete the white layer of the sketch. Instead un-hide the last layer and while its selected hit delete. Youll have then something like this:
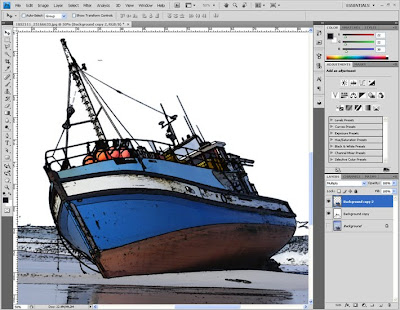
I thing this too looks good, its interesting an you can experimetn a lot now. In this way you can add for example another sky beyond or some other background. I thing this open a lot of different possibilities. You can expeiment.
Now lets get back to Step 13 and continue from there. I hope I did not confuse you with this extra steps but I wanted to show this. I was having just the new duplicated background layer and its layer style was set to multiply.
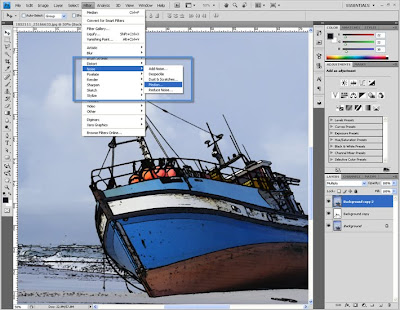
Step 18. Use Filter - Noise - Median on this layer.
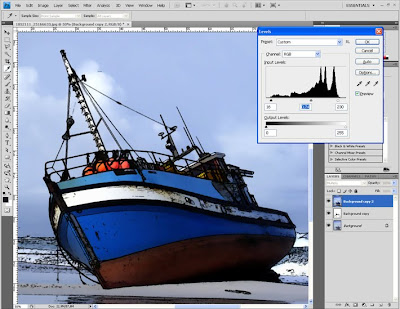
Step 19. And Ill use some levels adjustment on this layer.
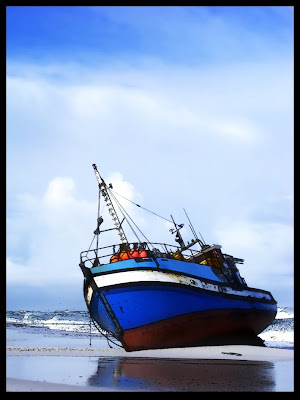
Step 20. THe last thing I do is to duplicate this layer once. use filter blur and set the layer style to overlay, reduce the opcaity to 50. Then duplicate it once again use the Filter - Blur - Radial blur andchange the layer style to screen, reduce the opacity to 50.
FInal result:
Read more »
1.Step. First open a new photo, it can be whatever you like. I have tried it on different photos and it worked very well. There was just some minor differences in the settings I was using.
Step 2. Duplicate the layer once. I dont like working on the original very often.
Step 3. Next I use Filter - > Stylize - > Finde edges
Step 4. After I use this filter, I use desaturate image. CRTL+SHIFT +U
Step 5. Next I use Levels (CTRL+L) and here the settings for every photo will be a little different. But just a little, every black and white photo with more white and less black have a simmiliar look like in the image below:
Step 6. Image - Adjustment - Threshold
Step 7. The settings for every photo wil lbe little different again, but not that much, simmiliar to mine:
Step 8. Use filter - Blur - Gausian blur to smooth this lines a little.
Step 10. Here you can use the eraser tool and remove some of the black spots you dont like, but this is if you like. Ill leave them like this and next Ill use the filter FIlter - > Artistic - > Cutout
Step 11. Here the settings I use:
Step 12. So the sketch version is ready now. On the next few steps Ill show you how I turn it to look like a painting. Duplicate the first layer again.
Step 13. Move the duplicate layer on top and change the layer mode to Multiply
I want to show you 2 different methods for different results.
1. From step 14 to 17 I will show you how to make it look like an unfinished painting.
2. And after step 18 Ill show you how to turn the whole image to look like its a painting using some filters again.
Step 14. Heres the first way: For example I want to delete the sky and leave the boat like it is. Ill hide the new layer and on the sketch layer Ill select the white area where the sky is.
Step 15. Using quick mask tool Ill add some Gausian blur. I know I can use Select - Refine edges. But this is my preffered way in this tutorial.
Here 2 ways again:
1. Delete the white area on sketch in step 16. or
2. Delete the sky on the new layer in step 17.
Step 16. Hit delete. I thing the effect in the next image also looks interesting thats why I am showing it to you.
Step 17. Another thing you can do here is not to delete the white layer of the sketch. Instead un-hide the last layer and while its selected hit delete. Youll have then something like this:
I thing this too looks good, its interesting an you can experimetn a lot now. In this way you can add for example another sky beyond or some other background. I thing this open a lot of different possibilities. You can expeiment.
Now lets get back to Step 13 and continue from there. I hope I did not confuse you with this extra steps but I wanted to show this. I was having just the new duplicated background layer and its layer style was set to multiply.
Step 18. Use Filter - Noise - Median on this layer.
Step 19. And Ill use some levels adjustment on this layer.
Step 20. THe last thing I do is to duplicate this layer once. use filter blur and set the layer style to overlay, reduce the opcaity to 50. Then duplicate it once again use the Filter - Blur - Radial blur andchange the layer style to screen, reduce the opacity to 50.
FInal result:

Tuesday, March 17, 2015
akvis,
quicktime,
sketch,
transition
0
comments
AKVIS Sketch Quicktime Transition
In this tutorial, we are going to use AKVIS Sketch with Photoshop (CS4+) to easily create a QuickTime movie that starts out with a sketch and transitions to a full-color photo!
Materials needed:
- Photoshop CS4+;
- AKVIS Sketch (This tutorial assumes you have installed as a plug-in);
- QuickTime plug-in;
- A model photo.

Original
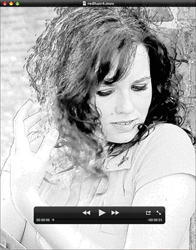
Result
Step 1. Start with a model photo.
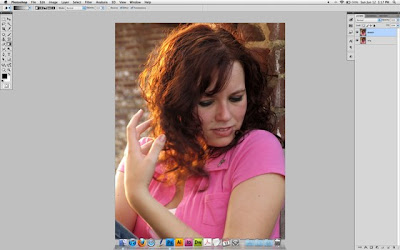
Step 2. With that layer active, press Ctrl + J (Windows) to quickly make a duplicate. Name the duplicate layer “Sketch.”
Step 3. With the “Sketch” layer still active, go to Filter -> AKVIS -> Sketch.
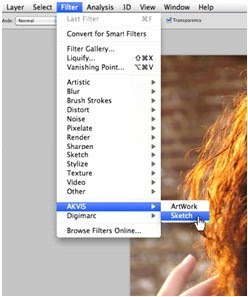
Call AKVIS Sketch plug-in
Step 4. You will now be taken to the AKVIS Sketch interface. Use the handy presets drop-down to select some nice pre-configured settings. Don’t be afraid to fine-tune the settings. I chose AKVIS Default.
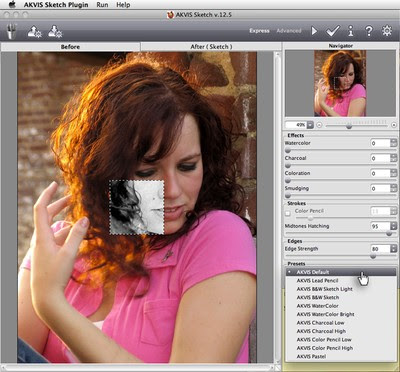
AKVIS Sketch window
Step 5. Click the After tab. Aftera few moments of rendering, you will see how the image will look after the current settings are applied. If you are satisfied, click OK Sign, If not, continue to tweak the settings.
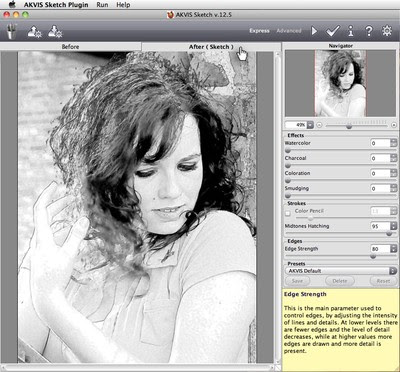
Processed image
Step 6. You will now be back in Photoshop, and the AKVIS Sketch filter will be applied to the “Sketch” layer.
Step 7. Let’s open up the Animation panel. Go to Window -> Animation.
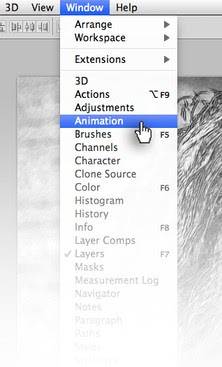
Open up Animation panel
Step 8. If the Animation is in Timeline mode, open up the panel menu and choose Convert to Frame Animation. You will see one frame, and the thumbnail should reflect the active “Sketch” layer.
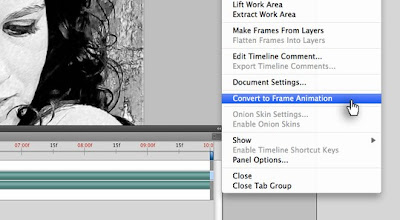
Panel menu
Step 9. You will see a time delay setting below the frame. Make sure that is set to 0.1 sec. Also, on the bottom left of the Animation panel, the Loop setting should be set to Once.
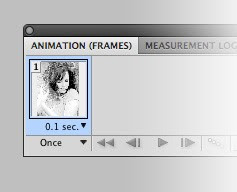
Frame settings
Step 10. Click Duplicate Selected Frame to make your second frame. Toggle off the visibility icon to the left of the “Sketch” layer in the Layers panel. The second frame in the Animations panel should now reflect the original photo layer.
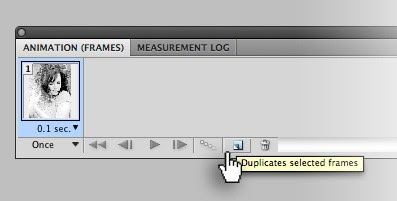
Duplicate Selected Frame
Step 11. With the second frame still selected, click the Tween icon at the bottom of the Animation panel.
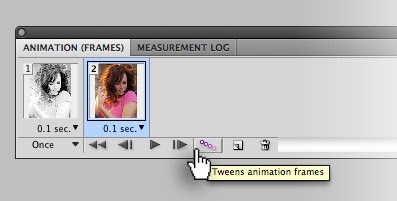
Tween icon
Step 12. A window will appear. Make sure to Tween With: Previous Frame. Set the Frames to Add: 10.
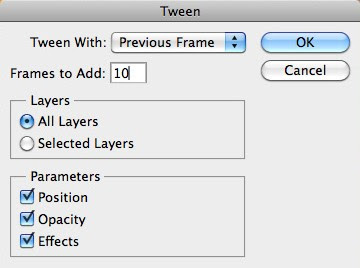
Tweening
Step 13. You will see that 10 frames will be added in between the two initial frames, for a total of 12 frames.
Step 14. Go to File -> Export -> Render Video.
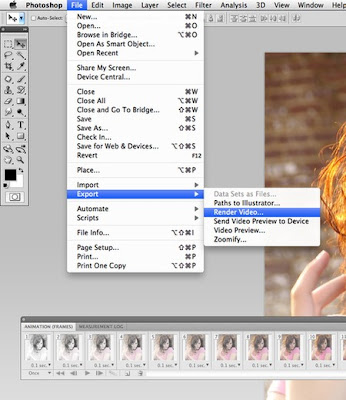
Export
Step 15. Name your video, choose your save destination, leave the settings to default (unless you are an expert), and click Render.
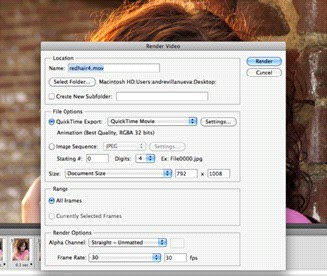
Render video
Step 16. You will now have a QuickTime movie that shows your AKVIS Sketch blooming to full photographic beauty!
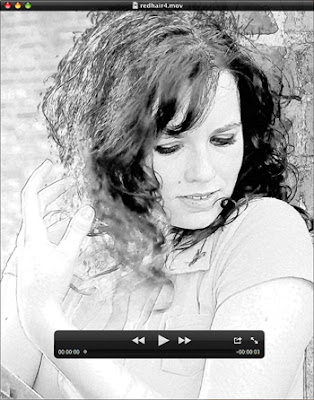
Final Result
The author of this tutorial is Andre Villanueva.
Subscribe to:
Posts (Atom)


- Follow Us on Twitter!
- "Join Us on Facebook!
- RSS
Contact