Showing posts with label and. Show all posts
Showing posts with label and. Show all posts
Thursday, June 18, 2015
a,
an,
and,
background,
content,
create,
fill,
from,
hole,
how,
object,
pse9,
remove,
scene,
the,
to,
using
0
comments
How to remove an object from a scene and create background content to fill the hole using PSE9
Is there a tool in PSE which can help you remove an object or a person from foreground of an image by filling it with the background content?
So in my source image above, I wanted to remove the girl from the temple and have just the building.
It may be achievable with clone tool, however it would really be a big time task.
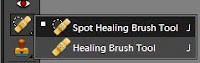
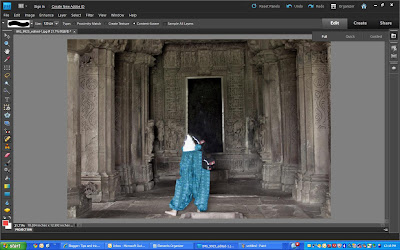
Yes, there is one which was introduced in PSE 9. So here are my initial and final images to show what this tutorial will help you achieve through this tutorial:
 |
| Initial image |
 |
| Final image |
So in my source image above, I wanted to remove the girl from the temple and have just the building.
It may be achievable with clone tool, however it would really be a big time task.
For non-complex images, it may just take seconds to fix that photo using content aware spot healing by doing just a couple of dabs
.
However, I choose an image which is complex as we need to remove a person whose background is not consistent throughout. It has the dark area inside the gate, the gate boundaries, the sculptured wall, the ground with variations in textures and colors. And spot healing from previous versions of PSE might not work since it does not have that intelligence to create content from background and fill it with it.
.
However, I choose an image which is complex as we need to remove a person whose background is not consistent throughout. It has the dark area inside the gate, the gate boundaries, the sculptured wall, the ground with variations in textures and colors. And spot healing from previous versions of PSE might not work since it does not have that intelligence to create content from background and fill it with it.
1. Open the image in Editor.
2. Select Spot healing tool from the left tool bar.
 |
| The spot healing brush properties in top properties bar |
3. Now keeping "Content-Aware" option selected in Properties panel, a keeping brugh size of the area not very big(which can be incremented and decremented using ],[ keys), start brushing(dabbing) over the object you want to remove.
So here are some tips which I have learnt on using this tool again and again :
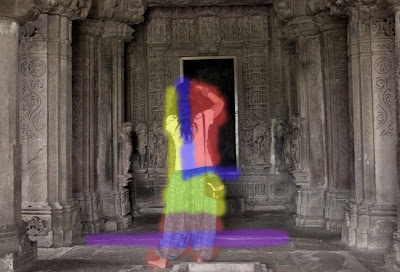
1. In the image above, for areas marked in red, I could use a bigger brush size without worrying much as the background behind the red mark is not very complex and is consistent, and I am not worried much as there are change in colors, no linear planes changing etc. So I can do this part quickly.
2. The areas marked in yellow are bit complicated as they have carvings on the wall. So would be good to start dabbing the brush with small size from the area near to the yellow area boundary in a linear manner. So if you see the carvings on the wall, they are horizontally linear. So it would be good if I start from the left near the boundary of the yellow area towards right horizonally.
3. The areas marked in blue(In L shape) is the area which should be taken care alittle meticulously since it has the frame of the door which has straight lines which need to be content created. So for this I reduced the brush size so that it did not cover the breadth of the frame and started from left such that the brush area includes the area of the existing frame(white frame area). However, this decision making may vary from image to image which would come to you as you try this tool a few times. For non-complex images, it may just take seconds to fix that photo using content aware spot healing and you may not have to do any such decision making. But for complex images, you might need a little thinking to get the best results.
4. For the area in purple, I used clone tool as it was quicker for that scenario. Spot healing content aware brushcould also have been used.
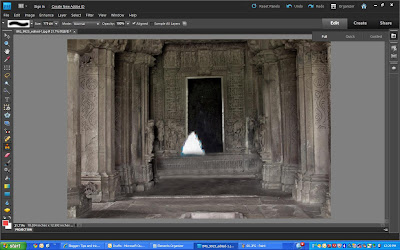
Here is my final result :
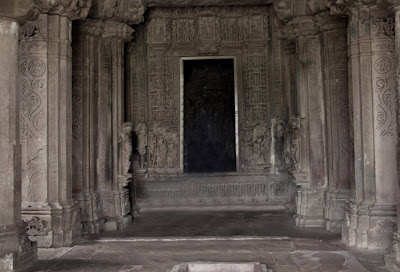
Hope this tutorial helps!!!
So here are some tips which I have learnt on using this tool again and again :
1. In the image above, for areas marked in red, I could use a bigger brush size without worrying much as the background behind the red mark is not very complex and is consistent, and I am not worried much as there are change in colors, no linear planes changing etc. So I can do this part quickly.
3. The areas marked in blue(In L shape) is the area which should be taken care alittle meticulously since it has the frame of the door which has straight lines which need to be content created. So for this I reduced the brush size so that it did not cover the breadth of the frame and started from left such that the brush area includes the area of the existing frame(white frame area). However, this decision making may vary from image to image which would come to you as you try this tool a few times. For non-complex images, it may just take seconds to fix that photo using content aware spot healing and you may not have to do any such decision making. But for complex images, you might need a little thinking to get the best results.
4. For the area in purple, I used clone tool as it was quicker for that scenario. Spot healing content aware brushcould also have been used.
Here is my final result :
Hope this tutorial helps!!!

Thursday, June 11, 2015
2014,
6,
and,
fixes,
photoshop,
tips,
tricks,
vol
0
comments
Photoshop Tips Tricks and Fixes Vol 6 2014
Photoshop Tips, Tricks and Fixes - Vol.6, 2014
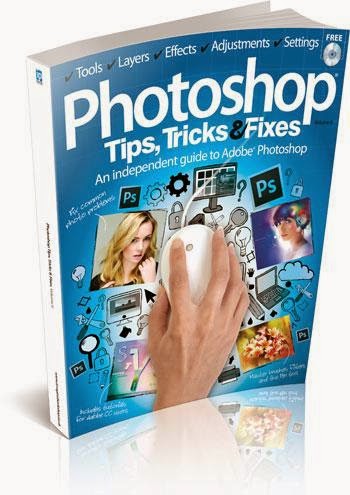
Product Description
In this bookazine...
An independent guide to Adobe Photoshop
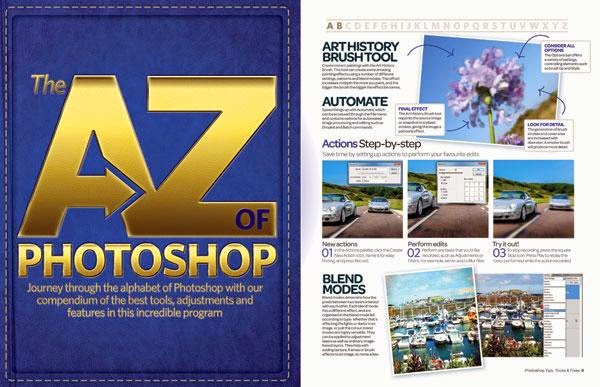
A-Z of Photoshop
- Journey through the alphabet of Photoshop with our compendium of the best tools, adjustments and
features in this incredible program.
Tips
- Bitesize information and detailed tutorials on getting more out of Photoshop
Tricks
- In-depth tutorials helping you to get more creative with your photo projects
Fixes
- Restore photos, enhance colours, retouch portraits and much more
Also inside...
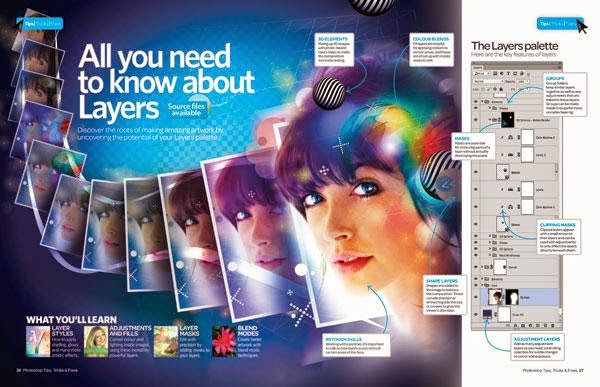
- All you need to know about Layers
- Use levels & curves histograms
- Use Refine Edge for perfect selections
- Understand Quick edits
- Master Content-Aware options
- Match colour in different images
- Understand image resolution
- The Magic Wand
- Understand 3D essentials
- Use Wet Media brushes
- Get to grips with the Pen Tool
- How to use textures
- Use the Sponge tool
- 5 Fantastic projects for filters
- Conquer layers and masks
- Build a new landscape
- Use Warp for creative edits
- Recreate long exposure
- Create your own jigsaw
- Get the oil-pastel look
- Learn to retouch any image
- Restore old photos
- Boost your colours
- Improve your exposures
- Whiten teeth and eyes
- Fix your smartphone photos

Wednesday, May 13, 2015
and,
content,
create,
have,
how,
in,
own,
panels,
pse,
templates,
them,
theme,
to,
using,
your
0
comments
How to create your own theme templates using PSE and have them in your content panels
You can create your own custom themes for the different creations like Greeting card, Photo book, CD/DVD jacket etc and have them placed in your content panel of Photoshop Elements Editor.
Here are the steps with which I created my own theme "Mothers Day" for Mothers day and had it placed in my content panel.
1. Create a blank file from File>New>Blank File. Select default size of the file.
2. Now paint it with the color you like. I painted pink and used gradient tool to give non monotonous effect of the background.
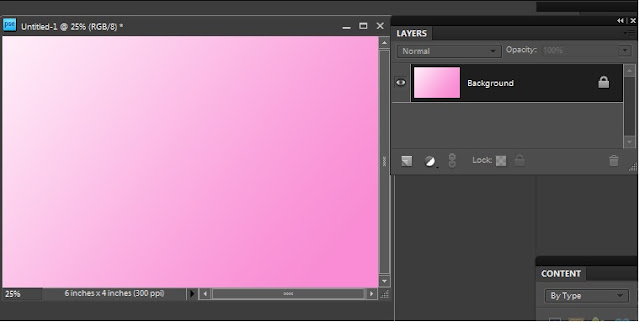
3. Save this as a jpeg on your hard drive. This step is workaround for PSE8 where there is no way of creating a smart object from a leyer as we had in PSE7. Once you have saved the jpeg, click on close widget of the file you were previously working with. It will ask you to save the untitled file. Say No. This will bring back the file you were working till step 2.
4. Now select the background layer from layers pallette and File>Place and select the jpeg saved at step 3. Click on the green checkmark shown shown over the image.
As soon as you do this, you would notice that there is a layer created as a smart object with a tiny icon on the layer thumbnail as shown below. And this layer is exactly as your background layer.
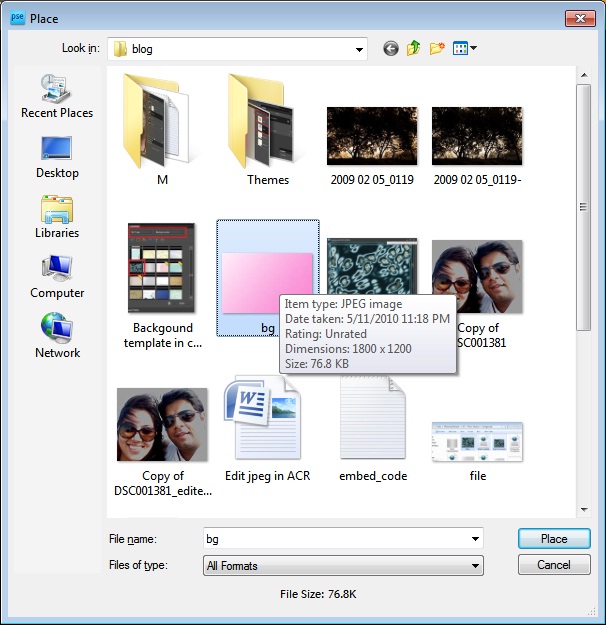
So by now, you would have understood why we saved the background as a separate jpeg in step3. The reason is, in PSE8, we can create smart objects using File>Place. In PSE 7, we do not need the step 3 as we can directly create the background layer as a smart object. This is a workaround in PSE8.
5. Now you can create a duplicate of this smart object layer by pressing Control+J and delete the original background layer.
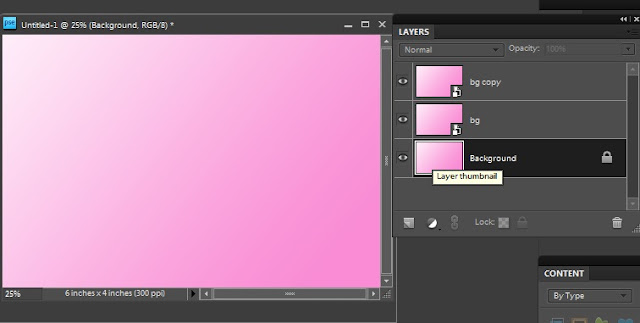
6. From Window meniu, select Content. This will result in Content pane appear in right hand panel.
7. Select "By Type" from Category and "Frames" in sub category.
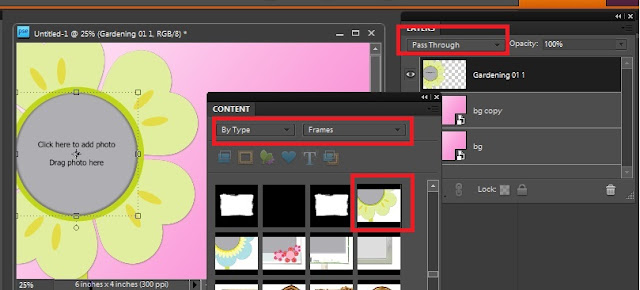
8. Drag a frame from the frames shown in the content bin to the image. Once you do this, you will notice that the blending mode for the frame dropped is "Pass through".
9. Add text layer and put some text to your theme. I am creating a Mothers day greeting card template in this example. So I added the text as shown below.
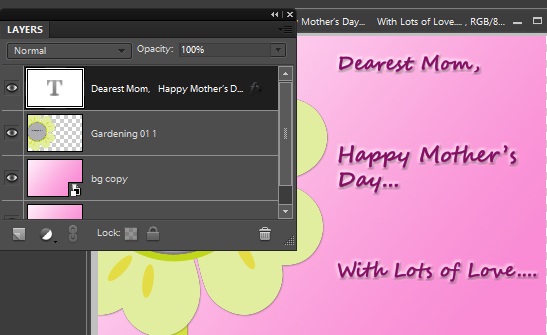
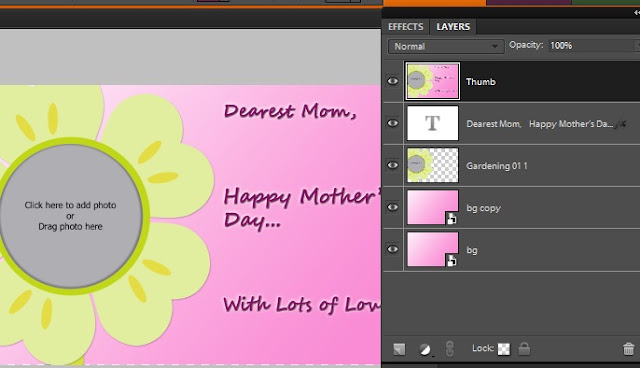
11. Save this file as a psd. I saved it as "Mothers day.psd"
12. Create a template file with name "<filename>.metadata.xml". I created "Mothers day.metadata.xml"
13. Copy the following into your xml file :
**************************************************************************
Also note that you can edit the categories and sub categories as per your needs. For example my above theme will appear under category Event and sub category Celebration. Similarly in category Color and sub category Pink.
You can customize these as per your needs.
14. Now place your jpeg and your metadata xml file at location :
On XP : C:Documents and SettingsAll UsersApplication DataAdobePhotoshop Elements8.0Photo Creations hemes
On Win 7 : C:ProgramDataAdobePhotoshop Elements8.0Photo Creations hemes
Please make sure that your Editor is closed and you relaunch it to see the background created in your content pane.
If you still do not find it in the content pane in Background category, close Editor and rename the file : "C:Documents and SettingsAll UsersApplication DataAdobePhotoshop Elements8.0Localeen_USMediaDatabase.db3" followed by application relaunch. The launch may take sometime as application creates thumbnails for your background at the location where you have created your jpeg.
After relaunch, here is where I see my Mothers day theme in Content Panel from Create Pane>Photo Book or Greeting Card :
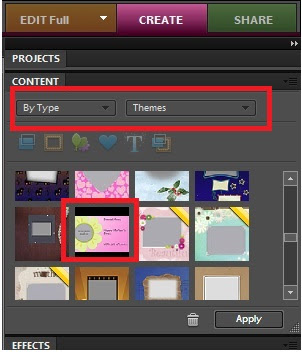
I hope you find this tutorial useful!
Read more »
Here are the steps with which I created my own theme "Mothers Day" for Mothers day and had it placed in my content panel.
1. Create a blank file from File>New>Blank File. Select default size of the file.
2. Now paint it with the color you like. I painted pink and used gradient tool to give non monotonous effect of the background.
3. Save this as a jpeg on your hard drive. This step is workaround for PSE8 where there is no way of creating a smart object from a leyer as we had in PSE7. Once you have saved the jpeg, click on close widget of the file you were previously working with. It will ask you to save the untitled file. Say No. This will bring back the file you were working till step 2.
4. Now select the background layer from layers pallette and File>Place and select the jpeg saved at step 3. Click on the green checkmark shown shown over the image.
As soon as you do this, you would notice that there is a layer created as a smart object with a tiny icon on the layer thumbnail as shown below. And this layer is exactly as your background layer.
So by now, you would have understood why we saved the background as a separate jpeg in step3. The reason is, in PSE8, we can create smart objects using File>Place. In PSE 7, we do not need the step 3 as we can directly create the background layer as a smart object. This is a workaround in PSE8.
5. Now you can create a duplicate of this smart object layer by pressing Control+J and delete the original background layer.
6. From Window meniu, select Content. This will result in Content pane appear in right hand panel.
7. Select "By Type" from Category and "Frames" in sub category.
8. Drag a frame from the frames shown in the content bin to the image. Once you do this, you will notice that the blending mode for the frame dropped is "Pass through".
9. Add text layer and put some text to your theme. I am creating a Mothers day greeting card template in this example. So I added the text as shown below.
10. Now select all the layers in the palette and right click>Duplicate. This will create duplicate of all layers. Right click again and Merge. name this layer as thumb.
12. Create a template file with name "<filename>.metadata.xml". I created "Mothers day.metadata.xml"
13. Copy the following into your xml file :
**************************************************************************
<?xml version="1.0" encoding="UTF-8"?><PSEContent xmlns="http://ns.adobe.com/PSEContent/2.0/"><name value="$$$/content/themes/Mothers Day=Mothers Day" /><type value="theme" /><creation value="1x1" /><creation value="2x3" /><creation value="3x4" /><creation value="cddvdlabel" /><creation value="cdjacket" /><creation value="dvdjacket" /><creation value="photobook" /><creation value="1x1photobook" /><creation value="3x4photobook" /><category value="$$$/content/category/Event=Event"><subcategory value="$$$/content/category/Event/Celebration=Celebration" /></category><category value="$$$/content/category/Color=Color"><subcategory value="$$$/content/category/Color/Pink=Pink" /></category><category value="$$$/content/category/Style=Style"><subcategory value="$$$/content/category/Style/Cute=Cute" /></category><category value="$$$/content/category/Object=Object" /><category value="$$$/content/category/Mood=Mood"><subcategory value="$$$/content/category/Mood/Fun=Fun" /></category><keyword value="$$$/content/keyword/Toys=Toys" /></PSEContent>
**************************************************************************
Replace the text in the tag with your filename : <name value="$$$/content/themes/<filename>=<filename>" />Also note that you can edit the categories and sub categories as per your needs. For example my above theme will appear under category Event and sub category Celebration. Similarly in category Color and sub category Pink.
You can customize these as per your needs.
14. Now place your jpeg and your metadata xml file at location :
On XP : C:Documents and SettingsAll UsersApplication DataAdobePhotoshop Elements8.0Photo Creations hemes
On Win 7 : C:ProgramDataAdobePhotoshop Elements8.0Photo Creations hemes
Please make sure that your Editor is closed and you relaunch it to see the background created in your content pane.
If you still do not find it in the content pane in Background category, close Editor and rename the file : "C:Documents and SettingsAll UsersApplication DataAdobePhotoshop Elements8.0Localeen_USMediaDatabase.db3" followed by application relaunch. The launch may take sometime as application creates thumbnails for your background at the location where you have created your jpeg.
After relaunch, here is where I see my Mothers day theme in Content Panel from Create Pane>Photo Book or Greeting Card :
I hope you find this tutorial useful!
Thursday, April 30, 2015
and,
artboards,
copying,
creating,
cs6,
illustrator,
in
0
comments
Creating and copying artboards in Illustrator CS6
In this movie, Ill show you a couple ways to create new artboards, and Ill also introduce

you to some artboard editing tricks that hinge on pressing the Shift and the Alt and Option keys.
Ive once again restored my 8-page newsletter.ai file.
I am going to switch over here to the Artboard tool.
One way to create an artboard is just to drag somewhere in an empty portion of the pasteboard,
like so. And lets say I want to create an artboard that completely encompasses all of the other artboards.
So Ive got a new artboard thats coming in automatically called Artboard 2.
I am going to click on the Name item up there in the Options bar, and Ill change this guy
to Uberboard lets say, and then press the Enter key or the Return key on a Mac.And we can now see that its artboard number 09, up here in the upper left-hand corner,
because after all, its the ninth artboard Ive created.
And we can see its named Uberboard as well.
Now lets say I want this big artboard to exactly encompass all the other ones with In this movie, Ill show you a couple ways to create new artboards, and Ill also introduce
you to some artboard editing tricks that hinge on pressing the Shift and the Alt and Option keys. Ive once again restored my 8-page newsletter.ai file.
I am going to switch over here to the Artboard tool. One way to create an artboard is just to drag somewhere in an empty portion of the pasteboard,
like so. And lets say I want to create an artboard that completely encompasses all of the other artboards.
So Ive got a new artboard thats coming in automatically called Artboard 2. I am going to click on the Name item up there in the Options bar, and Ill change this guy
to Uberboard lets say, and then press the Enter key or the Return key on a Mac. And we can now see that its artboard number 09, up here in the upper left-hand corner, because after all, its the ninth artboard Ive created. And we can see its named Uberboard as well.
Now lets say I want this big artboard to exactly encompass all the other ones with
a margin of an inch all the way around.
Id start by reducing the size of the artboard, so Im dragging the corner handles until they
snap into alignment with the top left corner of page 1, and the bottom right corner of page 8.
Then Ill go up here to be Options bar, and Ill set the Reference Point back to the center,
Ill expand both the Width and Height values by clicking first on the far right side of
that Width value, and then I will enter + 1in, which will give me an additional inch.
But thats not really what I want, if I want an inch all the way around, I need two inches,
so Ill go and change that value from 1 to 2, like so, and then press the Tab key.
So the remarkable thing is I can not only do simple math in Illustrator, but I can also
do that math using different units of measure.
So in this case, for example, with the H value, Im adding 1212 points to 2 inches, and then
I press the Enter key or the Return key on the Mac, to accept that change.
Illustrator CS6 Tutorial Video,
The difficulty when youre working this way is getting to the other artboards, because
Illustrator considers artboard 09 to be in front of 1 through 8.
If I try to click on 1 to select it, I wont end up selecting it.
Instead, Ill create a new artboard. It just comes in at this arbitrary size.
You can see the Width value is 312.
27 points, where is this coming from? I have no idea, but obviously its not what we want.
Two ways to get rid of this artboard or any other existing artboard, when its selected
you can just press the Backspace key here on the PC, or the Delete key on the Mac, or
notice that theres this little closed box right there.
If you click on the X in the upper right- hand corner, then you close the artboard, which
is to say you delete it.
All right, what I want to do though as I was saying is select Artboard 01.
So here is how that works.
To cycle through artboards that are on top of each other, you press the Alt key or the
Option key on the Mac, and you click.
And thatll go ahead and select Artboard 01 instead.
What if I want to create a new artboard inside of an existing artboard, like I want to create
this little tiny artboard inside of Artboard 2? If I were to just start dragging in order
to draw a new artboard, I wouldnt draw the artboard, instead I would move the existing artboard.
So Ill press Ctrl+Z, or Command+Z on the Mac, to undo that movement.
Heres what you do instead, you press the Shift key, and you drag.
Now notice, as long as I have the Shift key down, I go ahead and create an artboard with
the proportions of the other artboards inside this image.
If I dont want to constrain the proportions, then I would release the Shift key as I am drawing the artboard.
So you just need to press it right at the outset of the drag in order to create that
new artboard, like so.
What if you want to duplicate an artboard? Well, if I want to move it of course, I just drag.
If I want to duplicate it, I press and hold the Alt key or the Option key on a Mac.
Notice that gives me that little clone cursor there, because Im seeing two arrow heads,
one on top of another.
Then you drag while the Alt or Option key is down, and you go ahead and create a duplicate of that artboard.
You may ask, didnt I just say a moment ago that when you press the Alt key or the Option
key on the Mac, and you click on an existing artboard you cycle back to one of the other
ones, and thats true, if I were to Alt+Option-click, Id go and select Artboard 2 right through Artboards 09 and 11.
However, if you Alt drag, then you make a copy.
Finally, I want to show you how to copy not only the artboard, but the art thats inside
of it as well, and Ill demonstrate that using Artboard 04.
I want to select the artboard right away without selecting the bigger one, so Ill just Alt-click
or Option-click on it so that I cycle right to it.
Then you go up to the Options bar, and you click on this icon Move/Copy Artwork with
artboard to turn it back on, and now you go ahead and Alt-drag or Option-drag that artboard,
and youll copy both the Artboard, and the number 04 inside of it, along with.
And that friends is how you create and copy artboards with the help of the Shift as well
as the Alt and Option key. Illustrator CS6
Read more »
Illustrator CS6 Tutorial Video
you to some artboard editing tricks that hinge on pressing the Shift and the Alt and Option keys.
Ive once again restored my 8-page newsletter.ai file.
I am going to switch over here to the Artboard tool.
One way to create an artboard is just to drag somewhere in an empty portion of the pasteboard,
like so. And lets say I want to create an artboard that completely encompasses all of the other artboards.
So Ive got a new artboard thats coming in automatically called Artboard 2.
I am going to click on the Name item up there in the Options bar, and Ill change this guy
to Uberboard lets say, and then press the Enter key or the Return key on a Mac.And we can now see that its artboard number 09, up here in the upper left-hand corner,
because after all, its the ninth artboard Ive created.
And we can see its named Uberboard as well.
Now lets say I want this big artboard to exactly encompass all the other ones with In this movie, Ill show you a couple ways to create new artboards, and Ill also introduce
you to some artboard editing tricks that hinge on pressing the Shift and the Alt and Option keys. Ive once again restored my 8-page newsletter.ai file.
I am going to switch over here to the Artboard tool. One way to create an artboard is just to drag somewhere in an empty portion of the pasteboard,
like so. And lets say I want to create an artboard that completely encompasses all of the other artboards.
So Ive got a new artboard thats coming in automatically called Artboard 2. I am going to click on the Name item up there in the Options bar, and Ill change this guy
to Uberboard lets say, and then press the Enter key or the Return key on a Mac. And we can now see that its artboard number 09, up here in the upper left-hand corner, because after all, its the ninth artboard Ive created. And we can see its named Uberboard as well.
Now lets say I want this big artboard to exactly encompass all the other ones with
Illustrator CS6 Tutorial Video
a margin of an inch all the way around.
Id start by reducing the size of the artboard, so Im dragging the corner handles until they
snap into alignment with the top left corner of page 1, and the bottom right corner of page 8.
Then Ill go up here to be Options bar, and Ill set the Reference Point back to the center,
Ill expand both the Width and Height values by clicking first on the far right side of
that Width value, and then I will enter + 1in, which will give me an additional inch.
But thats not really what I want, if I want an inch all the way around, I need two inches,
so Ill go and change that value from 1 to 2, like so, and then press the Tab key.
So the remarkable thing is I can not only do simple math in Illustrator, but I can also
do that math using different units of measure.
So in this case, for example, with the H value, Im adding 1212 points to 2 inches, and then
I press the Enter key or the Return key on the Mac, to accept that change.
Illustrator CS6 Tutorial Video,
The difficulty when youre working this way is getting to the other artboards, because
Illustrator considers artboard 09 to be in front of 1 through 8.
If I try to click on 1 to select it, I wont end up selecting it.
Instead, Ill create a new artboard. It just comes in at this arbitrary size.
You can see the Width value is 312.
27 points, where is this coming from? I have no idea, but obviously its not what we want.
Two ways to get rid of this artboard or any other existing artboard, when its selected
you can just press the Backspace key here on the PC, or the Delete key on the Mac, or
notice that theres this little closed box right there.
If you click on the X in the upper right- hand corner, then you close the artboard, which
is to say you delete it.
All right, what I want to do though as I was saying is select Artboard 01.
So here is how that works.
To cycle through artboards that are on top of each other, you press the Alt key or the
Option key on the Mac, and you click.
And thatll go ahead and select Artboard 01 instead.
What if I want to create a new artboard inside of an existing artboard, like I want to create
Illustrator CS6 Tutorial Video
this little tiny artboard inside of Artboard 2? If I were to just start dragging in order
to draw a new artboard, I wouldnt draw the artboard, instead I would move the existing artboard.
So Ill press Ctrl+Z, or Command+Z on the Mac, to undo that movement.
Heres what you do instead, you press the Shift key, and you drag.
Now notice, as long as I have the Shift key down, I go ahead and create an artboard with
the proportions of the other artboards inside this image.
If I dont want to constrain the proportions, then I would release the Shift key as I am drawing the artboard.
So you just need to press it right at the outset of the drag in order to create that
new artboard, like so.
What if you want to duplicate an artboard? Well, if I want to move it of course, I just drag.
If I want to duplicate it, I press and hold the Alt key or the Option key on a Mac.
Notice that gives me that little clone cursor there, because Im seeing two arrow heads,
one on top of another.
Then you drag while the Alt or Option key is down, and you go ahead and create a duplicate of that artboard.
Illustrator CS6 Tutorial Video
You may ask, didnt I just say a moment ago that when you press the Alt key or the Option
key on the Mac, and you click on an existing artboard you cycle back to one of the other
ones, and thats true, if I were to Alt+Option-click, Id go and select Artboard 2 right through Artboards 09 and 11.
However, if you Alt drag, then you make a copy.
Finally, I want to show you how to copy not only the artboard, but the art thats inside
of it as well, and Ill demonstrate that using Artboard 04.
I want to select the artboard right away without selecting the bigger one, so Ill just Alt-click
or Option-click on it so that I cycle right to it.
Then you go up to the Options bar, and you click on this icon Move/Copy Artwork with
artboard to turn it back on, and now you go ahead and Alt-drag or Option-drag that artboard,
and youll copy both the Artboard, and the number 04 inside of it, along with.
And that friends is how you create and copy artboards with the help of the Shift as well
as the Alt and Option key. Illustrator CS6
a,
adobe,
and,
cs6,
from,
illustrator,
navigating,
numerically,
panel
0
comments
Adobe Illustrator CS6 Navigating numerically and from a panel
Now lets say you want to magnify your illustration on screen, but none of the standard zoom increments
 are really working for you.
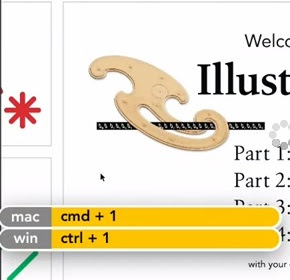
For example, here I am taken in the illustration wide and if I press Ctrl+Plus, or Command+Plus on the Mac, then Ill zoom to 100%.
And if I do it again, Ill zoom to 150% and then 200% and then 300% and so on.
So weve got some pretty big increments going on and these are the exact same increments we get with the Zoom tool and with the other zooming techniques.
Im going to go ahead and press Ctrl+1, or Command+1 on the Mac, to zoom out to 100%.Illustrator cs6
If you want to dial in a custom zoom value then you can drop down here to this zoom option thats listed in the very bottom left corner of the document window.
Click on it, and then instead of entering a value, which you can do if you like, but my preferred method of working here is to press the Up arrow key in order to zoom in increments of one so you have very tight control.
You can also press the Shift Up arrow to move in 10% increments.
Illustrator CS6 Tutorial
And so at 120%, Im thinking Im zoomed in a little bit too far, Ill go ahead and take that down by pressing the Down arrow key until I reduce that value to 116% and that looks good to me.Now as I say, the other option of course is to dial in your own value.
For example, I could go ahead and zoom in to 2400%.
Now the problem becomes when youre this far zoomed into an illustration its difficult to get your bearings, you may not necessarily know where you are.
In that case, you want to bring up the Navigator panel, and you do that by going up to the Window menu and choosing the Navigator command, and then youll see this panel thats showing you your entire Illustrator cs6 and a tiny red thing right there that shows you the portion of theIllustrator cs6 that youre seeing right now.
All right, Im going to go ahead and expand this panel, like so so that I can see my Illustrator cs6 in a little more detail.
And by the way, working this way is great if you have two monitors, so you can go ahead and throw the Navigator panel on one monitor and of course have your document window open up in another.
Illustrator CS6 Tutorial
Anyway at this point, I could scroll inside the Illustrator cs6 by dragging this guy to a different location, or if I prefer I can just click somewhere in the illustration.You also have these zoom controls right here, so you can click on the little mountain to zoom out incrementally, or you can click on the big mountain to zoom in, you can also drag this zoom slider.
The only problem with this slider from my vantage point is it doesnt really show you a dynamic zoom, so you have to pause while youre dragging in order to update the screen.
It is a final way to work.
You can press and hold the Ctrl key or the Command key on the Mac, that will change your cursor to a little magnifying glass, and then you can drag around the portion of the Illustrator cs6 that you want to zoom.
As soon as you release Illustrator cs6 will show you that region on screen.
And then of course if the Navigator panel is getting too big for you, you can go ahead and drag a quarter or one of the sides in order to make it smaller.
And thats how you zoom to any degree you desire as well as get around using the Navigator panel here in Illustrator cs6 .
and,
artboards,
changing,
cs6,
illustrator,
in,
of,
shape,
size,
the
0
comments
Changing the size and shape of artboards in Illustrator CS6
Changing the size and shape of artboards in Illustrator CS6
 In this movie, I will show you how to change the change the shape and size of your artboards.
Now the first thing I would like you to do, just to make sure that you and I are on the same page, is to go up to the View menu, and make sure that the Smart Guides command is turned on.
If you see a check mark everythings good, if not go ahead and choose the command, you also have the keyboard shortcut of Ctrl+U and Command+U on a Mac.
What Smart Guides do is they allow you to align objects inside of your illustrationsas well as artboards on the fly.
Next step, of course, is to switch to Artboard tool, you can get by pressing Shift+O, or you can just click on it here inside the toolbox.
But before I do that, I want you to notice something.
At this point, you can see that page 1 is active because it has a black outline, whereas page 2 or Artboard 2 if you prefer is not selected nor or any of the others, because they have gray outlines.
If you click on lets say Artboard 4, you can see that it gets the black outline because
its now active and the others are inactive.
Youll also see a number 4 down here in the bottom left corner of the window.
Illustrator goes ahead and numbers Artboards automatically, in the order you create them.
You can override that however that I will show you in a later movie.
Now I will go ahead and switch to the Artboard tool and notice that Artboard 4 is highlighted.
So I just want you to see that artboard thats selected in a standard mode also become selected here inside Artboard mode.
I am going to go ahead and switch back to Artboard 1 by clicking on it and notice that
you have these handles that are surrounding the Artboard.
If you drag one of the handles then you will resize Artboard on the fly and see those green lines, those are the Smart Guides.
So I have got one Smart Guide on the far right side of artboard and another down there at
the bottom thats showing me that I have a center intersection.
So I know that Im exactly aligned to the right side of pages 2 and 6 as well as the
Now, I am going to drag this bottom handle down until I get alignment with the bottom
of those artboards, and I now have this large artboard that includes 1, 2, 5, and 6 and
has independent artboards inside of it for 2, 5, and 6, which can be a very useful way
to work if you want to have one larger artboard that includes all the artwork inside of a
document, for example, as well as independent artboards for each item.
Its a great way to organize and control the output of your artboard.
You also have some options that are available to you up here in the Options bar.
Notice that I have these orientation icon, so I can switch from Portrait to Landscape
just by clicking on it.
You can also select from preset artboard sizes, such as the popular page sizes letter here
Illustrator CS6in States and A4 in Europe and elsewhere.
Ill go ahead and select A4 for now.
You also have numerical control over the size and location of your artboard.
Lets say, I want to go ahead and switch mine back to 6x8 inches.
I would go ahead and highlight Width value, and you can do that, by the way just by clicking
on the letter next to it.
So Ill click on the W, and Ill change it to 6 in, and then press the tab key, and Ill
change the Height value which is now active to 8 in order to reset the size of that page.
Notice however, that Illustrator went ahead and resized the artboard with respect to its
center, and thats because the center reference point is selected up here in the Options bar.
If I want to position the artboard with respect to its upper left corner, I go ahead and click
on the upper left point inside of that reference matrix, and now Ill change the X value to 0,
and then Ill tab to the Y value and change it to 0 as well, and that gos ahead and restores
the original location of the page. In order to accept the work just press the Escape key
in order to return to the Black Arrow tool.
Read more »
Illustrator CS6 Tutorial Video,
I have gone ahead and restored the saved version of 8-page newsletter.ai found inside the 02_artboards folder.Now the first thing I would like you to do, just to make sure that you and I are on the same page, is to go up to the View menu, and make sure that the Smart Guides command is turned on.
If you see a check mark everythings good, if not go ahead and choose the command, you also have the keyboard shortcut of Ctrl+U and Command+U on a Mac.
What Smart Guides do is they allow you to align objects inside of your illustrationsas well as artboards on the fly.
Next step, of course, is to switch to Artboard tool, you can get by pressing Shift+O, or you can just click on it here inside the toolbox.
But before I do that, I want you to notice something.
At this point, you can see that page 1 is active because it has a black outline, whereas page 2 or Artboard 2 if you prefer is not selected nor or any of the others, because they have gray outlines.
If you click on lets say Artboard 4, you can see that it gets the black outline because
its now active and the others are inactive.
Youll also see a number 4 down here in the bottom left corner of the window.
Illustrator goes ahead and numbers Artboards automatically, in the order you create them.
You can override that however that I will show you in a later movie.
Now I will go ahead and switch to the Artboard tool and notice that Artboard 4 is highlighted.
So I just want you to see that artboard thats selected in a standard mode also become selected here inside Artboard mode.
I am going to go ahead and switch back to Artboard 1 by clicking on it and notice that
you have these handles that are surrounding the Artboard.
If you drag one of the handles then you will resize Artboard on the fly and see those green lines, those are the Smart Guides.
So I have got one Smart Guide on the far right side of artboard and another down there at
the bottom thats showing me that I have a center intersection.
So I know that Im exactly aligned to the right side of pages 2 and 6 as well as the
Illustrator CS6 Tutorial Video,
center of the bottom row of artboards.Now, I am going to drag this bottom handle down until I get alignment with the bottom
of those artboards, and I now have this large artboard that includes 1, 2, 5, and 6 and
has independent artboards inside of it for 2, 5, and 6, which can be a very useful way
to work if you want to have one larger artboard that includes all the artwork inside of a
document, for example, as well as independent artboards for each item.
Its a great way to organize and control the output of your artboard.
You also have some options that are available to you up here in the Options bar.
Notice that I have these orientation icon, so I can switch from Portrait to Landscape
just by clicking on it.
You can also select from preset artboard sizes, such as the popular page sizes letter here
Ill go ahead and select A4 for now.
You also have numerical control over the size and location of your artboard.
Lets say, I want to go ahead and switch mine back to 6x8 inches.
I would go ahead and highlight Width value, and you can do that, by the way just by clicking
on the letter next to it.
So Ill click on the W, and Ill change it to 6 in, and then press the tab key, and Ill
change the Height value which is now active to 8 in order to reset the size of that page.
Notice however, that Illustrator went ahead and resized the artboard with respect to its
center, and thats because the center reference point is selected up here in the Options bar.
If I want to position the artboard with respect to its upper left corner, I go ahead and click
on the upper left point inside of that reference matrix, and now Ill change the X value to 0,
and then Ill tab to the Y value and change it to 0 as well, and that gos ahead and restores
the original location of the page. In order to accept the work just press the Escape key
in order to return to the Black Arrow tool.
and,
coloring,
cs6,
illustrator,
in,
line,
work
0
comments
Coloring and Line Work in Illustrator CS6
Final Product What Youll Be Creating

Unlike Photoshop, however, Illustrator gives you the flexibility to edit individual paths. Since Illustrator’s brush strokes are vector, you can change the shape, width, color and blending mode to achieve exactly the look you want. You can even delete a brush stroke you don’t want. Try that, Photoshop! This tutorial will use another feature introduced in CS5, Draw Inside. Let’s get started!
Step 1
You can use this technique with any line art or illustration. I am going to quickly create my line art by tracing a source photo from Wikimedia Commons, photo by Guillaume Piolle.

Step 2
To create the line art, use the “Tapered Strokes” brush from the default set. You can adjust the brush settings by double-clicking the Brush Tool to bring up its options. This is a matter of personal preference; experiment until you find a setting that works for you. I prefer to set the brush so that the paths confirm fairly closely to my strokes, but don’t end up with too many points.


Step 3
Now you’ll do the modeling with the Bristle Brush. Lock the line work layer and create a new one below it.In order to get the most out of the Bristle Brush, it’s best to understand its settings. I’ll add a detailed explanation of each setting at the end of this tutorial for reference.
It’s also important to note that to get the full benefit of the Bristle Brush, you must use a Wacom Intuous 3 or higher tablet and a 6D Art pen. The tablet and pen combination will respond to tilt, bearing, rotation, and pressure. A mouse alone will only respond to movement, but will still work fine for this tutorial.
To create a new bristle brush click the new brush icon on the brushes panel. Choose Bristle Brush, which will bring up its options. There are tons of possibilities with a Bristle Brush, but to start, choose Flat Angle as the shape, and increase the size to 5mm. Leave the other settings as they are, with the exception of the Opacity. Set it low, to about 30%.


Step 4
Using the Pen Tool, outline a flat area of shadow on the artwork. Here, I’ve drawn around the top lip. Select the shape and then choose Draw Inside at the bottom of the tool panel. Dotted-line brackets will appear around the shape, letting you know that you’re in Draw Inside mode. You can deselect the shape, but the brackets will remain.

Step 5
Choose a warm gray for the stroke color. I’ve used some swatches from the “Neutral” library, which can be accessed by clicking the Swatch Libraries Menu icon on the bottom left of the Swatches panel.If you didn’t deselect the lip shape in the previous step, it may frustrate you to see that it now has the stroke color you just picked. This can be really annoying, but you just have to remember to deselect the shape. The dotted-line brackets indicate that the shape is still in Draw Inside mode.

Step 6
You may wish to turn off the photo layer, or move the photo to the side so you can use it as a reference. Now just start drawing strokes inside the lip shape. Depending on your Opacity setting, it may be hard to see a single stroke. You may also want to increase the brush size in the Strokes panel for wider swaths of color.Keep painting and building up color and texture. Note that different brush strokes will interact in this way, but if you just use one brush and scrub back and forth, it won’t build up. In other words, a single brush stroke does not interact with itself, so deselect the existing strokes and paint new ones to layer the color.
Step 7
Do the same for the other shadow areas. First choose Draw Normal mode, then select the new shape and choose Draw Inside again. Make sure you’re finished with one before proceeding to the next. Once you exit Draw Inside Mode for a shape, you can’t access it again.TIPS: If you want a darker stroke, you can change the opacity on the fly by using the numeric keys: 1 for 10%, 2 for 20% and so on.
You can double-click any Bristle Brush in the Brushes panel to edit it. If the brush you are changing is already in use in your file, you’ll get this warning. Unless you want every brush stoke to update with your changes, click “Leave Strokes” to leave the existing brush strokes unchanged.

Step 8
Once all the shadow shapes have been drawn and painted, your image should look something like the one below. “Draw Inside” simply creates a Clipping Mask before you draw. So if you want to edit some of the paths or start over, you can go to Object > Clipping Mask > Edit Contents.


Step 9
If you haven’t saved your work, now’s a good time to do that. You’ll most likely get a warning when you save, telling you that your document contains Bristle Brush paths and transparency. Well, duh. Actually, this is an important warning to heed, because Bristle Brushes can make the document very complex and the file size quite large. You can turn off the warning so it doesn’t appear again during this work session.
Step 10
Now we’re going to add some more color, texture and modeling. Create a new Bristle Brush if you want to experiment — a Flat Fan will work nicely.As before, set the Opacity fairly low, then begin painting along the contours of the face and neck. It’s kind of a sculptural process, with the advantage of being able to edit the paths or start over if you want. If you paint a stroke you like, you can copy it and move it to another part of the illustration. You can change the stroke width, the opacity and the blending mode, just as you can with any vector path.
If you’re using a graphics tablet and pen, you’ll get visual feedback as to the direction, tilt and bearing of your brush. Still, it can be a rather random process, but that’s part of the fun, and can lend itself to some happy accidents.


Step 11
I can’t tell you exactly where and how to paint the rest of the strokes, you’ll just have to play around until it looks right. The beauty of using Illustrator instead of Photoshop (or real paint, for that matter), is that if it gets too muddy, you can just delete some strokes or change their opacity. The final image is below.Conclusion
Due to their transparency and fluidity, Bristle Brushes can be used for a wide variety of coloring applications. And because they’re vector paths, you get the best of both worlds: The painterly effects of Photoshop brushes with the control and flexibility of Illustrator.Keys to the Bristle Brush Options:
- Name: Self-explanatory.
- Shape: There are 10 styles. Each one attempts to mimic a real-life brush.
- Size: This is the diameter of the brush. When you buy brushes in an art supply store, their size is measured at the point where the bristles meet the handle, so this measurement refers to that. Use the slider to change, or enter numerals from 1mm to 10mm.
- Bristle Length: Measured from the bristle tip to the point where the bristles meet the handle.
- Bristle Density: Has to do with the number of bristles in a brush. 1% is basically one bristle, but unlike a real-life brush, that one bristle will be the diameter of the brush as it is set in the Size field.
- Bristle Thickness: Use the slider or enter numbers in the field.
- Paint Opacity: 1% is translucent and 100% is opaque.
- Stiffness: I like to think of Stiffness as the “squirly-ness” of the brush. That is, the lower the stiffness, the less the stroke will conform to the path you actually draw. This can be good for random strokes and surprises.
adobe,
and,
cs6,
down,
illustrator,
keys,
page,
the,
up,
using
0
comments
Adobe Illustrator CS6 Using the Page Up and Page Down keys
In this movie, I am going to show you how to get around a document using the Page Up and Page Down keys.
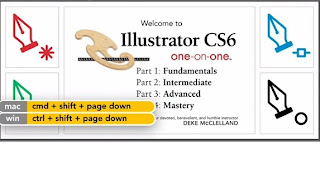
I am going to expect even the biggest shortcut fanatic to remember all of these.
Just remember this Page Up and Page Down combined with any of the modifier keys, does something in Illustrator cs6 .
So lets go ahead and zoom in quite a bit here, and then Ill press the Page Up key, and notice that I move almost a full screen upward.
And then if I press Page Down, I move almost a full screen downward.
If I want to move in smaller increments, then I press Alt+Page Up, this would be Option+Page Up on the Mac, or Alt+Page Down, this would be Option+Page Down on the Mac.
What if I want to move to the right? Well, then Ill press Ctrl+Page Down, thats Command+Page Down on the Mac.
If I want to move to the left, its Ctrl+Page Up, or Command+Page Up.
To move in smaller increments, once again, you add the Alt key.
So its Ctrl+Alt+Page Down, to move in small increments to the right, and Ctrl+Alt+Page
Illustrator CS6 Tutorial
Up, or Command+Option+Page up on the Mac, to move in smaller increments to the left.Now of course, that leaves the Shift key, and you may recall from the previous chapter that the Shift key combined with Page UP and Page Down actually moves you between artboards.
So Shift+Page Up, will take you to the previous artboard, as were seeing here.
And in my case, I am going all the way back to the first one.
And then Shift+Page Down is going to move me to the next artboard.
If I press Ctrl+Shift+Page Up, or Command+Shift+ Page Up on the Mac, I go to the first artboard,
and if I press Ctrl+Shift+Page Down, or Command+Shift +Page Down on the Mac, I go to last artboard, which
in my case is the big artboard that encompasses all the other ones.
And that for those of you who are interested is how you get around a document, using the Page Up and Page Down keys, combined with every modifier key you got.
Wednesday, April 29, 2015
and,
digital,
photoshop,
revolution,
the
0
comments
Photoshop and the digital revolution
“I use Photoshop as I would to hand-print an image; e.g., burning, dodging, etc. I don’t use ‘special effects’ very often; I’m still a big fan of more traditional techniques—applied digitally, of course.”—Marcus Bell
In the days leading up to the advent of digital imaging, the skeptics/realists often predicted that until a digital image could rival the amount of information found in a 35mm film frame, professional photographers would continue to ignore digital imaging. These thoughtful folks proclaimed that there are 10,000,000 discrete units of information (bits) in an exposed 24x36mm film frame. Equalling that requires a 10MB image—a file size that is now commonplace. In fact, at this writing there are a handful of professional 35mm digital SLRs that offer 16–18MB original files. Unlike film photographs,
Photoshop and the digital revolution have helped propel wedding photographers to the level of fine artists. Photograph by Jeff Hawkins Photography.
Hawkins, the other half of Jeff Hawkins Photography, a very successful wedding studio in Longwood, FL, the greatest benefit is “the creative control of our work.” The pair has a renewed excitement for covering weddings and an appreciation for being able to view the images right away—a “powerful advantage for both photographers and clients.” Photographers are no longer just recording images and sending them off to the lab for color correction, retouching, and printing. Says Kathleen, “We can now perfect our art to the fullest extent of our vision!” In the high-style world of wedding photography, the impact of Photoshop has permanently changed the style and scope of the genre. The photographer, in the comfort of his home or studio, can now routinely accomplish special effects that could only be achieved by an expert darkroom technician in years past. Photoshop, paired with the many available plug-in filters, has made wedding photography the most creative and lucrative specialty in all of photography.
And brides love it. Digital albums, assembled using Photoshop-compatible design templates, have become the preferred album type. The style and uniqueness they bring to the wedding experience make every bride and groom a celebrity. The photographers featured in this book are digital artists. While they are not above using time-saving shortcuts in the image-processing side of things, they
Read more »
In the days leading up to the advent of digital imaging, the skeptics/realists often predicted that until a digital image could rival the amount of information found in a 35mm film frame, professional photographers would continue to ignore digital imaging. These thoughtful folks proclaimed that there are 10,000,000 discrete units of information (bits) in an exposed 24x36mm film frame. Equalling that requires a 10MB image—a file size that is now commonplace. In fact, at this writing there are a handful of professional 35mm digital SLRs that offer 16–18MB original files. Unlike film photographs,
Photoshop and the digital revolution have helped propel wedding photographers to the level of fine artists. Photograph by Jeff Hawkins Photography.
Hawkins, the other half of Jeff Hawkins Photography, a very successful wedding studio in Longwood, FL, the greatest benefit is “the creative control of our work.” The pair has a renewed excitement for covering weddings and an appreciation for being able to view the images right away—a “powerful advantage for both photographers and clients.” Photographers are no longer just recording images and sending them off to the lab for color correction, retouching, and printing. Says Kathleen, “We can now perfect our art to the fullest extent of our vision!” In the high-style world of wedding photography, the impact of Photoshop has permanently changed the style and scope of the genre. The photographer, in the comfort of his home or studio, can now routinely accomplish special effects that could only be achieved by an expert darkroom technician in years past. Photoshop, paired with the many available plug-in filters, has made wedding photography the most creative and lucrative specialty in all of photography.
And brides love it. Digital albums, assembled using Photoshop-compatible design templates, have become the preferred album type. The style and uniqueness they bring to the wedding experience make every bride and groom a celebrity. The photographers featured in this book are digital artists. While they are not above using time-saving shortcuts in the image-processing side of things, they
and,
artboards,
cs6,
illustrator,
in,
modifying,
moving
0
comments
Moving and modifying artboards in Illustrator CS6
 In this movie, I will show you how to modify a document by moving its artboards to different locations. Illustrator CS6
 >Moving and modifying artboards in Illustrator CS6
you to modify the existing document. The keyboard shortcut of Ctrl+Alt+P, or Command+Opt +P on the Mac, I will go and choose the command. Notice that we have a whole slew of options that we did not see in the new Document Dialog Box, and were missing a lot of those options as well, we have no control over page size. The only options that we have that are the same these Bleed values, and the option to change the unit of measure. We do have this button right here called Edit Artboards, and you can either click on it,
Illustrator CS6 Tutorial Video which will take you to the Edit Artboard mode or going Cancel out of this dialog box. You also have the option of selecting the Artboard tool, so you have to switch tools in order to edit the Artboards, and this tool has a keyboard shortcut of Shift+O. Im going to go ahead and click on it in order to switch to the Artboard mode. And notice now that the active Artboard is highlighted, and I can drag it to a different location to move it, and this area back here on which the Artboards rest, this area of gray is known as the Pasteboard, or you sometimes see it called the Canvas as well inside of Illustrator. I prefer Pasteboard, however, because you can move objects into the Pasteboard if you want to get them off the printed pages just to keep them around for later. Notice up here in the Options bar, we have this icon that says Move/Copy Artwork with Artboard, and by default its turned on.
Illustrator CS6 Tutorial Video So that means if I drag this Artboard with a 1 in it, the one moves along as well, and now that if I put Artboards in this location, it thinks that the 2, 5 & 6 are part of the gang, and I would move them along with. Now I have got the 3 & 7 involved and ultimately I could get all the numbers on to this one Artboards if I like.Illustrator CS6 Tutorial VideoOf course, theres no reason to do that Ive made a mess of this document, which is why its fortunate that Illustrator not only provides an Undo command but it also provides you with multiple Undos. And you perform the Undos either by choosing this first command from the Edit menu or by pressing Ctrl+Z on the PC, or Command+Z on the Mac.
And Ill just keep pressing that keyboard shortcut until I get my pages back to where they were. Another option for restoring the appearance of your Artwork is to go up to the File menu and choose the Revert command. Now my case revert is dimmed and thats because I went ahead and undid everything that Ive done since opening the document. So, go ahead and redo the last operations by going up to the Edit menu and either choosing the Redo command, or you can press Ctrl +Shift+C, or Cmd+Shift+C on the Mac. And again, weve got multiple redos as well.
So if I press Ctrl+Shift+C, or Cmd+Shift+C, again, then I go ahead and remove the 1, 2, 5, & 6. Now lets say I want to get back to the original version of this Artwork. Go up to the File menu and choose the Revert command, or you have a keyboard shortcut of F12. When I choose this command I get a warning that tells me hey, youre about to lose everything youve done that you didnt save associate with this document. And this is not an undoable operation. So, its something of a defcon if you really messed things up. This is a command to take care of things, and then you click on the Revert button everything goes back to the way was you notice up here in the Edit menu, the Undo command is dimmed because as I say reverting is not undoable, so take care with that one. Now lets say you want to move in Artboard but you dont want move the contents of that Artboard. You want to everything stay where it is.
Then you go to the Options bar and turn off Move/Copy Artwork with Artboard, and then you drag the Artboard any where you like and notice that the contents of that Artboard never move along with it.Illustrator CS6 Tutorial VideoThats how you move in Artboard either with or without the Artwork. Just remember, anytime you want to change your Artboards, whether youre moving them or changing their size as well see in the next exercise. You want to go ahead and switch over to the Artboard tool which you can get by pressing Shift+O. To leave the Artboard mode, you either switch to any other tool here inside the toolbox, or you just press the Escape key, which will take you back to your last used tool which in my case is the Black arrow.Illustrator CS6 Tutorial Video
a,
adobe,
and,
artboards,
cs6,
document,
illustrator,
its,
tutorial,
zooming
0
comments
Adobe Illustrator CS6 Tutorial Zooming a document and its artboards
In this movie, I will show you how to zoom in and out in Illustrator cs6..
And the idea is this, sometimes you are going to want to magnify portions of your illustration
in order to fine-tune adjustments, and other times you are going to want to zoom out so that you can take in your entire artwork at a time.
I am working inside of a document called Welcome again.ai found inside the 03_navigation folder.
 If I go up to the Window menu and choose Artboards command, you can see that this document contains
a total of six Artboards.
So we have the central Welcome screen, and then we have renderings of a bunch of paint tool cursors.
These are the new paint tool cursors in Illustrator cs6 and then finally I have got this big
Artboard that contains everything.
I just wanted you to see that because these Artboards will become important in a moment.
In the meantime though, you zoom in and out from an Illustrationright here located in the View menu.
Now notice that each one of them has a keyboard shortcut.
I find that folks fall into a couple of different categories where shortcuts are concerned.
They either love them and they use them all the time that would be me, by the way.
Illustrator CS6 Tutorial Video
Thats why I mentioned them as I am going through these movies. Other folks just hate them especially when they are first trying to come to terms with a piece of software.
So tell you this you can use keyboard shortcuts or not but I do recommend that you at least
learn these shortcuts here.
Because that will help you move more quickly through the software, also it allows you to
spend less time on focusing on the mechanics of Illustrator and more time and energy on your artwork.
So if you want to zoom in, you can choose the Zoom In command as I am doing here but you are better of using the keyboard shortcut which are easy to remember Ctrl+Plus, or Command+Plus
on the Mac, and you can see that thats zooming me in incrementally.
If I want to Zoom Out, I press Ctrl+Minus, or Command+Minus on the Mac, and again that
zooms me out incrementally.
Notice that I am viewing the Illustration right now at 100%.
Now extensively, this is Illustration showing you Artboard at the sizable print.
However, it is not really accurate and the reason is Illustrator is assuming your screen
resolution is 72 pixels per inch which dates way back to those old 1984 Macintosh boxes,
Illustrator CS6 Tutorial Video
that just isnt the case anymore.
Your screen is more likely to have a resolution in a neighborhood of 100 to 120 pixels per
inch, in which case the Artboards is actually going to print larger than it appears at 100%.
So thats just something to bear in mind.
Now if this were a program like Photoshop, and we kept zooming in from 100% then we would
get bigger and bigger pixels, but Illustrator cs6 is working with vectors, and it is rendering
those vectors to your screen on the fly and as a result we get greater and greater detail
as we zoom in, and you can see that you can zoom in all the way to 6400%, which is a sufficient
level of magnification to see a large bacteria, which is why I have gone ahead and drawn a
little bacteria, right here an Illustration.
Thats how big the largest bacteria are.
So Illustrator really allows you to hone in on that detail.
Now if you want to return to the 100% percent view at any point in time, you just
Ctrl+1, or Command+1 on the Mac.
Illustrator CS6 Tutorial Video
You may also remember from the previous chapter that if you want to zoom in on a specific
Artboard, all you have to do is double-click on that Artboard here inside the Artboards panel.
Another way to work, if I press Ctrl+Alt+0, or Command+Option+0 on the Mac, to go all the way out and take in my entire artwork at a time.
I can click on any one of these Artboards to make it active, and then press Ctrl+0, or Command+0 on the Mac, to zoom in on it, and just as with double-clicking on an Artboard,
here inside the Artboards panel, Ctrl+0, or Command+ 0 goes ahead and fits the Artboard on the screen.
And incidentally, if you ever need to refresh your memory on the shortcuts, all you need
to do is go up to the View menu and check out these five commands right there. These are the shortcuts that Ive mentioned.
Ctrl+Plus, or Command+Plus to Zoom In, Ctrl+Minus, or Command+Minus to Zoom Out, Ctrl+0, or Command+0
to fit the Artboard in the window, Ctrl+Alt+0, or Command+Options+0 on the Mac, to fit everything,
the entire document inside the window, and then Ctrl+1, or Command+1 on the Mac, to go
to the Actual Size which is the 100% view. And thats how you zoom in and out from an Illustration. from the keyboard inside Illustrator cs6
In this movie, Ill show you how Artboards and Rulers interact with each other inside Illustrator cs6.
I have saved my progress as Nice and tidy.ai.Im going to once again switch to the Artboard tool, and then Ill bring up my Rulers by
going up to the View menu choosing Rulers and then choosing the Show Rulers Command. And what that does is it shows me about the Horizontal Ruler at up the top of the screen
and the Vertical Ruler over here on the left-hand side.
And we can see that the unit of measure is points and the reason we can see that is because
theyre very dinky units.Illustrator cs6.
If you wanted to switch out the unit of measure the easiest option is to right-click on either
one of the Rulers, and then choose a different unit, such as Inches, and then both Rulers will update in kind.
Now notice this 00 point right there, so there is a 0 point for the Vertical Ruler, and there is a 0 point for the Horizontal Ruler.
I am going to go ahead and put a couple of guides at those locations by dragging out from the Vertical Ruler, and I am going to press the Shift key as I drag in order to.
Illustrator CS6 Tutorial Video
I have snapped into Alignment with 0 on the Horizontal Ruler, and Ill Shift-drag down
form the Horizontal Ruler in order to snap into Alignment with the 0 point there on the Vertical Ruler.
So thats our 00 point right now. Used to be the 00 point was at the upper left corner of the First Artboard but that was
before I went and made all of these Modifications.
The reason I am showing you this couple of reasons just want you to see, whats going on.
Artboard 10 is still selected and notice were seeing this X and Y coordinates. And if I go ahead and change Reference Point to the upper left point there, then Ill see
Illustrator cs6.that the pages 24 is .25 inches to the right of and 8.92 inches down from that 00 point.
If I wanted to move this Artboard into alignment with the 00 point, Id start by turning off
that move copy Artwork with Artboard Option, because I want to move just the Artboard lets
say, then Ill change the X value 0 and the Y value to 0 as well and that snaps it exactly into alignment.
Illustrator CS6 Tutorial VideoNow press Ctrl+Z, or Command+Z, a couple of times in order to reinstate the position of
that Artboard because I say thats not what I want to do when I do want to do is I want
to go ahead and move the 00 point into exact alignment with the top left corner of Artboard 10.
Well one way to move the 00 point is to go ahead and drag from the upper left corner where the two Rulers intersect each other, and then you can just drop that 00 point in
the place, and now my 00 points right about there, as you can see, in the Horizontal and Vertical Rulers.
If you want to snap into alignment with an Artboard however, you just double-click on that point, and now notice the 00 point is aligned with the upper left corner of Artboard 10.
If I wanted to be aligned with the upper left of Artboard 1 instead, Ill go head and click
Illustrator cs6.on Artboard 1 and double-click on that Ruler Intersection Point up there in the upper left-hand corner.
Illustrator CS6 Tutorial Video
I dont need those Guides anymore.
So Ill go to the View menu choose Guides and then choose the Clear Guides command to get rid of them.
One more thing I wanted to know about Rulers when youre working inside the Artboard mode, you have whats known as Global Rulers which are aligned to all the Artboards. So in other words, we have 100 point, thats aligned to the upper left-hand corner of the
first Artboard and all the other tick marks are aligned to that point, regardless of which
of the artboards is selected. Compare that to the behavior when were out of the Artboard mode, I am going to press the Escape key here in order to switch back to my black arrow tool.
And now notice that my 00 point appears at the upper left corner of Artboard 3 when Artboard 3 is active.
If I were to click on Artboard 2, then Id switch 00 point to its upper left corner, and so on.
So each and every Artboard has its own independent Ruler System. Thats the way it works in every application out there however you can switch this behavior
inside of Illustrator cs6.. By going up to the View menu Rulers Command, and then notice this guy change to Global
Rulers Ctrl+Alt+R, or Command+Opt+R on the Mac.
And that will go ahead and switch you to Uniform Global Ruler System regardless of which of the Artboards is selected.
So notice, I am clicking on different Artboards here and that is not changing the behavior
here inside Illustrator cs6..
Wednesday, March 18, 2015
and,
new,
painting,
photo,
sketch,
to,
way
0
comments
Photo to sketch and painting New way
In this tutorial Ill show you a new technique I use for making different photos to look like paintings or just to turn them to sketch.
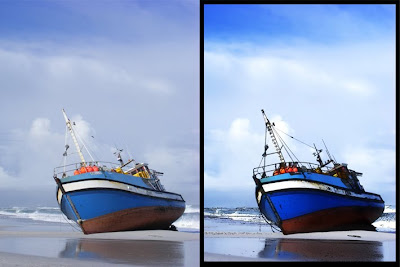
1.Step. First open a new photo, it can be whatever you like. I have tried it on different photos and it worked very well. There was just some minor differences in the settings I was using.
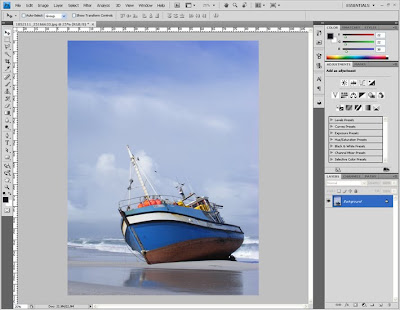
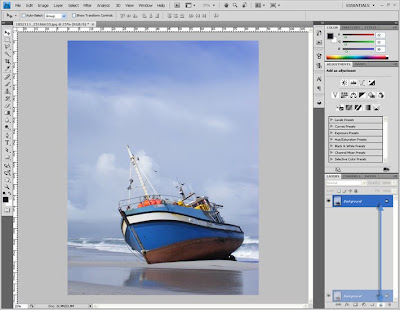
Step 2. Duplicate the layer once. I dont like working on the original very often.
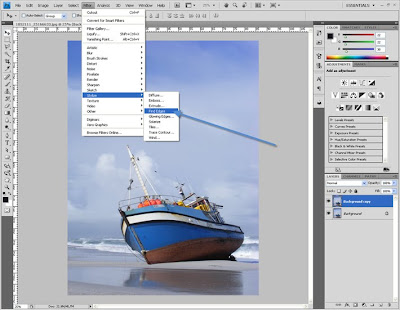
Step 3. Next I use Filter - > Stylize - > Finde edges
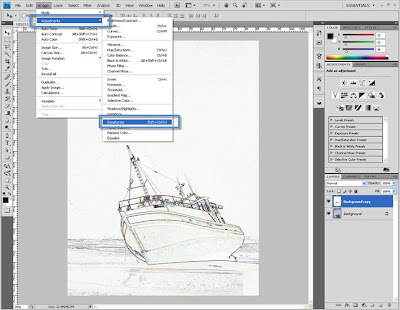
Step 4. After I use this filter, I use desaturate image. CRTL+SHIFT +U
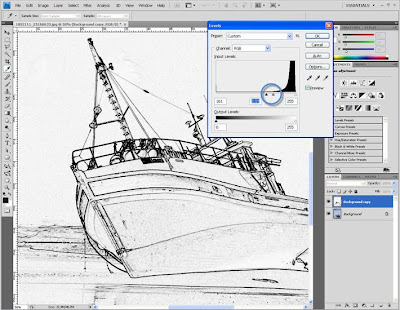
Step 5. Next I use Levels (CTRL+L) and here the settings for every photo will be a little different. But just a little, every black and white photo with more white and less black have a simmiliar look like in the image below:
Step 6. Image - Adjustment - Threshold
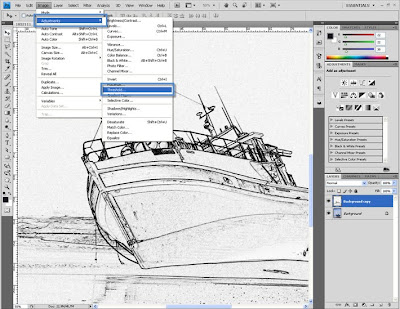
Step 7. The settings for every photo wil lbe little different again, but not that much, simmiliar to mine:
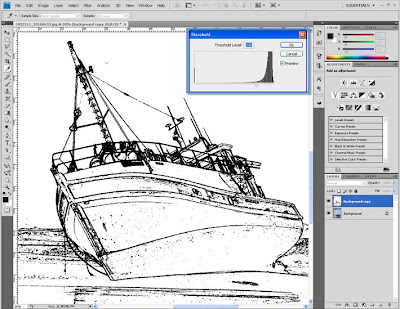
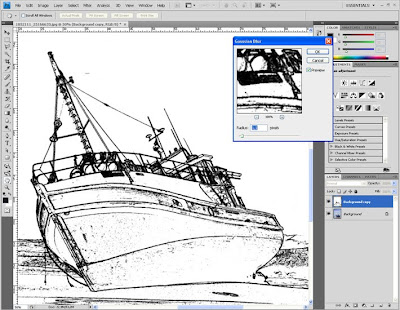
Step 8. Use filter - Blur - Gausian blur to smooth this lines a little.
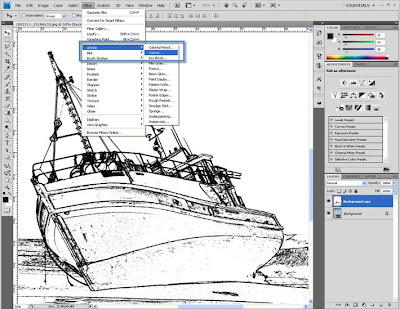
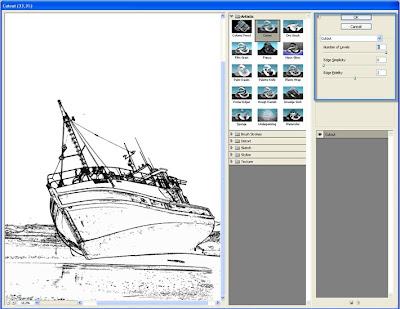
Step 10. Here you can use the eraser tool and remove some of the black spots you dont like, but this is if you like. Ill leave them like this and next Ill use the filter FIlter - > Artistic - > Cutout
Step 11. Here the settings I use:
Step 12. So the sketch version is ready now. On the next few steps Ill show you how I turn it to look like a painting. Duplicate the first layer again.
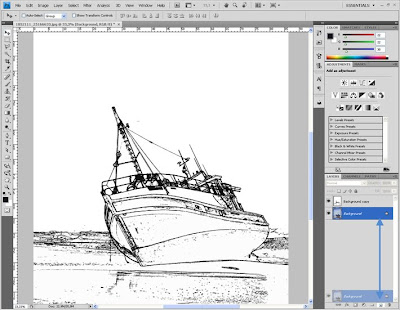
Step 13. Move the duplicate layer on top and change the layer mode to Multiply
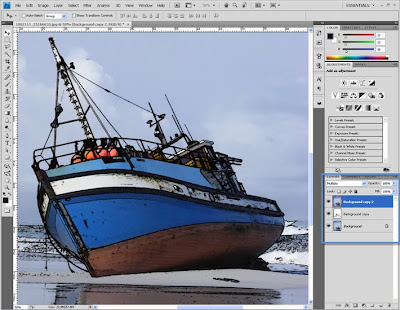
I want to show you 2 different methods for different results.
1. From step 14 to 17 I will show you how to make it look like an unfinished painting.
2. And after step 18 Ill show you how to turn the whole image to look like its a painting using some filters again.
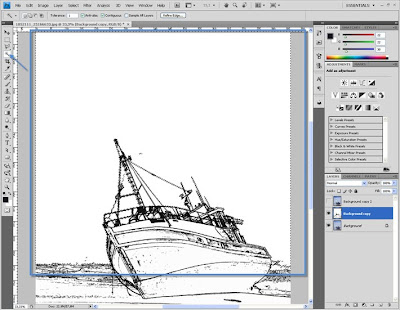
Step 14. Heres the first way: For example I want to delete the sky and leave the boat like it is. Ill hide the new layer and on the sketch layer Ill select the white area where the sky is.
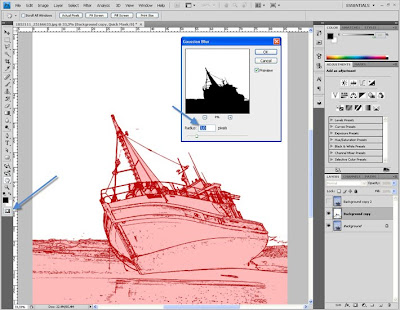
Step 15. Using quick mask tool Ill add some Gausian blur. I know I can use Select - Refine edges. But this is my preffered way in this tutorial.
Here 2 ways again:
1. Delete the white area on sketch in step 16. or
2. Delete the sky on the new layer in step 17.
Step 16. Hit delete. I thing the effect in the next image also looks interesting thats why I am showing it to you.
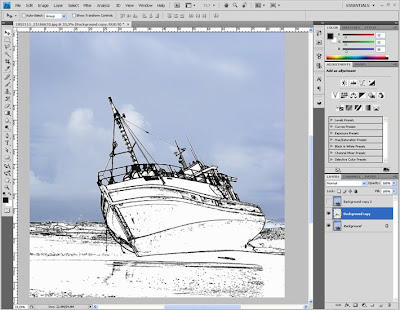
Step 17. Another thing you can do here is not to delete the white layer of the sketch. Instead un-hide the last layer and while its selected hit delete. Youll have then something like this:
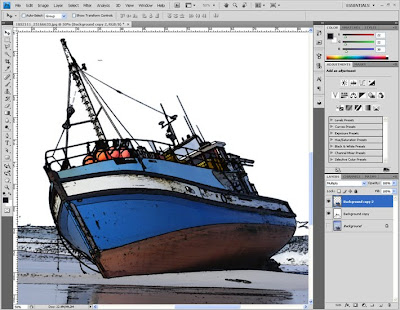
I thing this too looks good, its interesting an you can experimetn a lot now. In this way you can add for example another sky beyond or some other background. I thing this open a lot of different possibilities. You can expeiment.
Now lets get back to Step 13 and continue from there. I hope I did not confuse you with this extra steps but I wanted to show this. I was having just the new duplicated background layer and its layer style was set to multiply.
Step 18. Use Filter - Noise - Median on this layer.
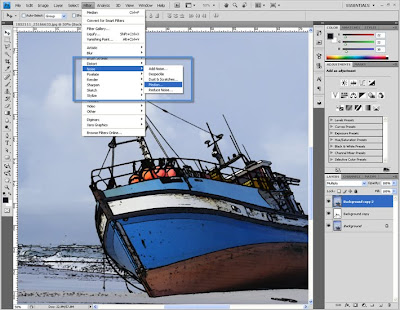
Step 19. And Ill use some levels adjustment on this layer.
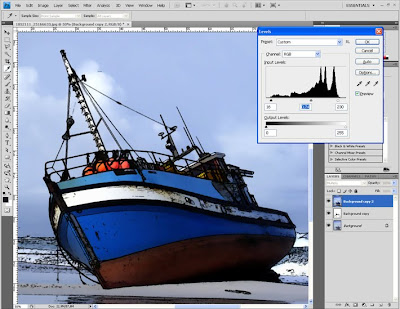
Step 20. THe last thing I do is to duplicate this layer once. use filter blur and set the layer style to overlay, reduce the opcaity to 50. Then duplicate it once again use the Filter - Blur - Radial blur andchange the layer style to screen, reduce the opacity to 50.
FInal result:
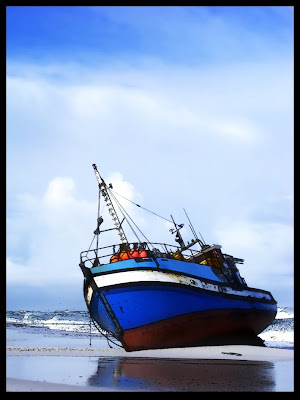
Read more »
1.Step. First open a new photo, it can be whatever you like. I have tried it on different photos and it worked very well. There was just some minor differences in the settings I was using.
Step 2. Duplicate the layer once. I dont like working on the original very often.
Step 3. Next I use Filter - > Stylize - > Finde edges
Step 4. After I use this filter, I use desaturate image. CRTL+SHIFT +U
Step 5. Next I use Levels (CTRL+L) and here the settings for every photo will be a little different. But just a little, every black and white photo with more white and less black have a simmiliar look like in the image below:
Step 6. Image - Adjustment - Threshold
Step 7. The settings for every photo wil lbe little different again, but not that much, simmiliar to mine:
Step 8. Use filter - Blur - Gausian blur to smooth this lines a little.
Step 10. Here you can use the eraser tool and remove some of the black spots you dont like, but this is if you like. Ill leave them like this and next Ill use the filter FIlter - > Artistic - > Cutout
Step 11. Here the settings I use:
Step 12. So the sketch version is ready now. On the next few steps Ill show you how I turn it to look like a painting. Duplicate the first layer again.
Step 13. Move the duplicate layer on top and change the layer mode to Multiply
I want to show you 2 different methods for different results.
1. From step 14 to 17 I will show you how to make it look like an unfinished painting.
2. And after step 18 Ill show you how to turn the whole image to look like its a painting using some filters again.
Step 14. Heres the first way: For example I want to delete the sky and leave the boat like it is. Ill hide the new layer and on the sketch layer Ill select the white area where the sky is.
Step 15. Using quick mask tool Ill add some Gausian blur. I know I can use Select - Refine edges. But this is my preffered way in this tutorial.
Here 2 ways again:
1. Delete the white area on sketch in step 16. or
2. Delete the sky on the new layer in step 17.
Step 16. Hit delete. I thing the effect in the next image also looks interesting thats why I am showing it to you.
Step 17. Another thing you can do here is not to delete the white layer of the sketch. Instead un-hide the last layer and while its selected hit delete. Youll have then something like this:
I thing this too looks good, its interesting an you can experimetn a lot now. In this way you can add for example another sky beyond or some other background. I thing this open a lot of different possibilities. You can expeiment.
Now lets get back to Step 13 and continue from there. I hope I did not confuse you with this extra steps but I wanted to show this. I was having just the new duplicated background layer and its layer style was set to multiply.
Step 18. Use Filter - Noise - Median on this layer.
Step 19. And Ill use some levels adjustment on this layer.
Step 20. THe last thing I do is to duplicate this layer once. use filter blur and set the layer style to overlay, reduce the opcaity to 50. Then duplicate it once again use the Filter - Blur - Radial blur andchange the layer style to screen, reduce the opacity to 50.
FInal result:
Subscribe to:
Posts (Atom)


- Follow Us on Twitter!
- "Join Us on Facebook!
- RSS
Contact