Thursday, June 18, 2015
a,
an,
and,
background,
content,
create,
fill,
from,
hole,
how,
object,
pse9,
remove,
scene,
the,
to,
using
How to remove an object from a scene and create background content to fill the hole using PSE9
Is there a tool in PSE which can help you remove an object or a person from foreground of an image by filling it with the background content?
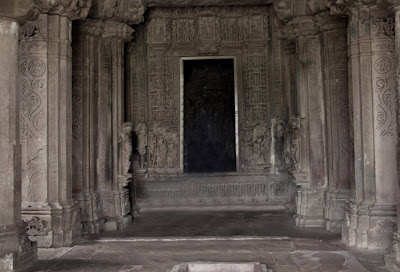
So in my source image above, I wanted to remove the girl from the temple and have just the building.
It may be achievable with clone tool, however it would really be a big time task.
Yes, there is one which was introduced in PSE 9. So here are my initial and final images to show what this tutorial will help you achieve through this tutorial:
 |
| Initial image |
 |
| Final image |
So in my source image above, I wanted to remove the girl from the temple and have just the building.
It may be achievable with clone tool, however it would really be a big time task.
For non-complex images, it may just take seconds to fix that photo using content aware spot healing by doing just a couple of dabs
.
However, I choose an image which is complex as we need to remove a person whose background is not consistent throughout. It has the dark area inside the gate, the gate boundaries, the sculptured wall, the ground with variations in textures and colors. And spot healing from previous versions of PSE might not work since it does not have that intelligence to create content from background and fill it with it.
1. Open the image in Editor.
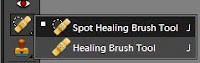
2. Select Spot healing tool from the left tool bar.
| The spot healing brush properties in top properties bar |
3. Now keeping "Content-Aware" option selected in Properties panel, a keeping brugh size of the area not very big(which can be incremented and decremented using ],[ keys), start brushing(dabbing) over the object you want to remove.
So here are some tips which I have learnt on using this tool again and again :
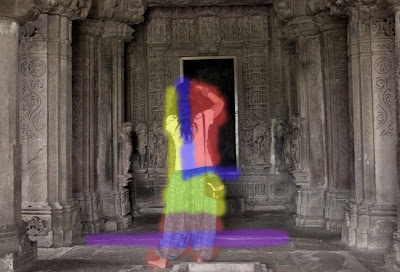
1. In the image above, for areas marked in red, I could use a bigger brush size without worrying much as the background behind the red mark is not very complex and is consistent, and I am not worried much as there are change in colors, no linear planes changing etc. So I can do this part quickly.
2. The areas marked in yellow are bit complicated as they have carvings on the wall. So would be good to start dabbing the brush with small size from the area near to the yellow area boundary in a linear manner. So if you see the carvings on the wall, they are horizontally linear. So it would be good if I start from the left near the boundary of the yellow area towards right horizonally.
3. The areas marked in blue(In L shape) is the area which should be taken care alittle meticulously since it has the frame of the door which has straight lines which need to be content created. So for this I reduced the brush size so that it did not cover the breadth of the frame and started from left such that the brush area includes the area of the existing frame(white frame area). However, this decision making may vary from image to image which would come to you as you try this tool a few times. For non-complex images, it may just take seconds to fix that photo using content aware spot healing and you may not have to do any such decision making. But for complex images, you might need a little thinking to get the best results.
4. For the area in purple, I used clone tool as it was quicker for that scenario. Spot healing content aware brushcould also have been used.
Here is my final result :
Hope this tutorial helps!!!
So here are some tips which I have learnt on using this tool again and again :
1. In the image above, for areas marked in red, I could use a bigger brush size without worrying much as the background behind the red mark is not very complex and is consistent, and I am not worried much as there are change in colors, no linear planes changing etc. So I can do this part quickly.
3. The areas marked in blue(In L shape) is the area which should be taken care alittle meticulously since it has the frame of the door which has straight lines which need to be content created. So for this I reduced the brush size so that it did not cover the breadth of the frame and started from left such that the brush area includes the area of the existing frame(white frame area). However, this decision making may vary from image to image which would come to you as you try this tool a few times. For non-complex images, it may just take seconds to fix that photo using content aware spot healing and you may not have to do any such decision making. But for complex images, you might need a little thinking to get the best results.
4. For the area in purple, I used clone tool as it was quicker for that scenario. Spot healing content aware brushcould also have been used.
Here is my final result :
Hope this tutorial helps!!!
Subscribe to:
Post Comments (Atom)


0 comments:
Post a Comment