Thursday, April 30, 2015
and,
artboards,
copying,
creating,
cs6,
illustrator,
in
0
comments
Creating and copying artboards in Illustrator CS6
In this movie, Ill show you a couple ways to create new artboards, and Ill also introduce

you to some artboard editing tricks that hinge on pressing the Shift and the Alt and Option keys.
Ive once again restored my 8-page newsletter.ai file.
I am going to switch over here to the Artboard tool.
One way to create an artboard is just to drag somewhere in an empty portion of the pasteboard,
like so. And lets say I want to create an artboard that completely encompasses all of the other artboards.
So Ive got a new artboard thats coming in automatically called Artboard 2.
I am going to click on the Name item up there in the Options bar, and Ill change this guy
to Uberboard lets say, and then press the Enter key or the Return key on a Mac.And we can now see that its artboard number 09, up here in the upper left-hand corner,
because after all, its the ninth artboard Ive created.
And we can see its named Uberboard as well.
Now lets say I want this big artboard to exactly encompass all the other ones with In this movie, Ill show you a couple ways to create new artboards, and Ill also introduce
you to some artboard editing tricks that hinge on pressing the Shift and the Alt and Option keys. Ive once again restored my 8-page newsletter.ai file.
I am going to switch over here to the Artboard tool. One way to create an artboard is just to drag somewhere in an empty portion of the pasteboard,
like so. And lets say I want to create an artboard that completely encompasses all of the other artboards.
So Ive got a new artboard thats coming in automatically called Artboard 2. I am going to click on the Name item up there in the Options bar, and Ill change this guy
to Uberboard lets say, and then press the Enter key or the Return key on a Mac. And we can now see that its artboard number 09, up here in the upper left-hand corner, because after all, its the ninth artboard Ive created. And we can see its named Uberboard as well.
Now lets say I want this big artboard to exactly encompass all the other ones with
a margin of an inch all the way around.
Id start by reducing the size of the artboard, so Im dragging the corner handles until they
snap into alignment with the top left corner of page 1, and the bottom right corner of page 8.
Then Ill go up here to be Options bar, and Ill set the Reference Point back to the center,
Ill expand both the Width and Height values by clicking first on the far right side of
that Width value, and then I will enter + 1in, which will give me an additional inch.
But thats not really what I want, if I want an inch all the way around, I need two inches,
so Ill go and change that value from 1 to 2, like so, and then press the Tab key.
So the remarkable thing is I can not only do simple math in Illustrator, but I can also
do that math using different units of measure.
So in this case, for example, with the H value, Im adding 1212 points to 2 inches, and then
I press the Enter key or the Return key on the Mac, to accept that change.
Illustrator CS6 Tutorial Video,
The difficulty when youre working this way is getting to the other artboards, because
Illustrator considers artboard 09 to be in front of 1 through 8.
If I try to click on 1 to select it, I wont end up selecting it.
Instead, Ill create a new artboard. It just comes in at this arbitrary size.
You can see the Width value is 312.
27 points, where is this coming from? I have no idea, but obviously its not what we want.
Two ways to get rid of this artboard or any other existing artboard, when its selected
you can just press the Backspace key here on the PC, or the Delete key on the Mac, or
notice that theres this little closed box right there.
If you click on the X in the upper right- hand corner, then you close the artboard, which
is to say you delete it.
All right, what I want to do though as I was saying is select Artboard 01.
So here is how that works.
To cycle through artboards that are on top of each other, you press the Alt key or the
Option key on the Mac, and you click.
And thatll go ahead and select Artboard 01 instead.
What if I want to create a new artboard inside of an existing artboard, like I want to create
this little tiny artboard inside of Artboard 2? If I were to just start dragging in order
to draw a new artboard, I wouldnt draw the artboard, instead I would move the existing artboard.
So Ill press Ctrl+Z, or Command+Z on the Mac, to undo that movement.
Heres what you do instead, you press the Shift key, and you drag.
Now notice, as long as I have the Shift key down, I go ahead and create an artboard with
the proportions of the other artboards inside this image.
If I dont want to constrain the proportions, then I would release the Shift key as I am drawing the artboard.
So you just need to press it right at the outset of the drag in order to create that
new artboard, like so.
What if you want to duplicate an artboard? Well, if I want to move it of course, I just drag.
If I want to duplicate it, I press and hold the Alt key or the Option key on a Mac.
Notice that gives me that little clone cursor there, because Im seeing two arrow heads,
one on top of another.
Then you drag while the Alt or Option key is down, and you go ahead and create a duplicate of that artboard.
You may ask, didnt I just say a moment ago that when you press the Alt key or the Option
key on the Mac, and you click on an existing artboard you cycle back to one of the other
ones, and thats true, if I were to Alt+Option-click, Id go and select Artboard 2 right through Artboards 09 and 11.
However, if you Alt drag, then you make a copy.
Finally, I want to show you how to copy not only the artboard, but the art thats inside
of it as well, and Ill demonstrate that using Artboard 04.
I want to select the artboard right away without selecting the bigger one, so Ill just Alt-click
or Option-click on it so that I cycle right to it.
Then you go up to the Options bar, and you click on this icon Move/Copy Artwork with
artboard to turn it back on, and now you go ahead and Alt-drag or Option-drag that artboard,
and youll copy both the Artboard, and the number 04 inside of it, along with.
And that friends is how you create and copy artboards with the help of the Shift as well
as the Alt and Option key. Illustrator CS6
Read more »
Illustrator CS6 Tutorial Video
you to some artboard editing tricks that hinge on pressing the Shift and the Alt and Option keys.
Ive once again restored my 8-page newsletter.ai file.
I am going to switch over here to the Artboard tool.
One way to create an artboard is just to drag somewhere in an empty portion of the pasteboard,
like so. And lets say I want to create an artboard that completely encompasses all of the other artboards.
So Ive got a new artboard thats coming in automatically called Artboard 2.
I am going to click on the Name item up there in the Options bar, and Ill change this guy
to Uberboard lets say, and then press the Enter key or the Return key on a Mac.And we can now see that its artboard number 09, up here in the upper left-hand corner,
because after all, its the ninth artboard Ive created.
And we can see its named Uberboard as well.
Now lets say I want this big artboard to exactly encompass all the other ones with In this movie, Ill show you a couple ways to create new artboards, and Ill also introduce
you to some artboard editing tricks that hinge on pressing the Shift and the Alt and Option keys. Ive once again restored my 8-page newsletter.ai file.
I am going to switch over here to the Artboard tool. One way to create an artboard is just to drag somewhere in an empty portion of the pasteboard,
like so. And lets say I want to create an artboard that completely encompasses all of the other artboards.
So Ive got a new artboard thats coming in automatically called Artboard 2. I am going to click on the Name item up there in the Options bar, and Ill change this guy
to Uberboard lets say, and then press the Enter key or the Return key on a Mac. And we can now see that its artboard number 09, up here in the upper left-hand corner, because after all, its the ninth artboard Ive created. And we can see its named Uberboard as well.
Now lets say I want this big artboard to exactly encompass all the other ones with
Illustrator CS6 Tutorial Video
a margin of an inch all the way around.
Id start by reducing the size of the artboard, so Im dragging the corner handles until they
snap into alignment with the top left corner of page 1, and the bottom right corner of page 8.
Then Ill go up here to be Options bar, and Ill set the Reference Point back to the center,
Ill expand both the Width and Height values by clicking first on the far right side of
that Width value, and then I will enter + 1in, which will give me an additional inch.
But thats not really what I want, if I want an inch all the way around, I need two inches,
so Ill go and change that value from 1 to 2, like so, and then press the Tab key.
So the remarkable thing is I can not only do simple math in Illustrator, but I can also
do that math using different units of measure.
So in this case, for example, with the H value, Im adding 1212 points to 2 inches, and then
I press the Enter key or the Return key on the Mac, to accept that change.
Illustrator CS6 Tutorial Video,
The difficulty when youre working this way is getting to the other artboards, because
Illustrator considers artboard 09 to be in front of 1 through 8.
If I try to click on 1 to select it, I wont end up selecting it.
Instead, Ill create a new artboard. It just comes in at this arbitrary size.
You can see the Width value is 312.
27 points, where is this coming from? I have no idea, but obviously its not what we want.
Two ways to get rid of this artboard or any other existing artboard, when its selected
you can just press the Backspace key here on the PC, or the Delete key on the Mac, or
notice that theres this little closed box right there.
If you click on the X in the upper right- hand corner, then you close the artboard, which
is to say you delete it.
All right, what I want to do though as I was saying is select Artboard 01.
So here is how that works.
To cycle through artboards that are on top of each other, you press the Alt key or the
Option key on the Mac, and you click.
And thatll go ahead and select Artboard 01 instead.
What if I want to create a new artboard inside of an existing artboard, like I want to create
Illustrator CS6 Tutorial Video
this little tiny artboard inside of Artboard 2? If I were to just start dragging in order
to draw a new artboard, I wouldnt draw the artboard, instead I would move the existing artboard.
So Ill press Ctrl+Z, or Command+Z on the Mac, to undo that movement.
Heres what you do instead, you press the Shift key, and you drag.
Now notice, as long as I have the Shift key down, I go ahead and create an artboard with
the proportions of the other artboards inside this image.
If I dont want to constrain the proportions, then I would release the Shift key as I am drawing the artboard.
So you just need to press it right at the outset of the drag in order to create that
new artboard, like so.
What if you want to duplicate an artboard? Well, if I want to move it of course, I just drag.
If I want to duplicate it, I press and hold the Alt key or the Option key on a Mac.
Notice that gives me that little clone cursor there, because Im seeing two arrow heads,
one on top of another.
Then you drag while the Alt or Option key is down, and you go ahead and create a duplicate of that artboard.
Illustrator CS6 Tutorial Video
You may ask, didnt I just say a moment ago that when you press the Alt key or the Option
key on the Mac, and you click on an existing artboard you cycle back to one of the other
ones, and thats true, if I were to Alt+Option-click, Id go and select Artboard 2 right through Artboards 09 and 11.
However, if you Alt drag, then you make a copy.
Finally, I want to show you how to copy not only the artboard, but the art thats inside
of it as well, and Ill demonstrate that using Artboard 04.
I want to select the artboard right away without selecting the bigger one, so Ill just Alt-click
or Option-click on it so that I cycle right to it.
Then you go up to the Options bar, and you click on this icon Move/Copy Artwork with
artboard to turn it back on, and now you go ahead and Alt-drag or Option-drag that artboard,
and youll copy both the Artboard, and the number 04 inside of it, along with.
And that friends is how you create and copy artboards with the help of the Shift as well
as the Alt and Option key. Illustrator CS6
a,
adobe,
and,
cs6,
from,
illustrator,
navigating,
numerically,
panel
0
comments
Adobe Illustrator CS6 Navigating numerically and from a panel
Now lets say you want to magnify your illustration on screen, but none of the standard zoom increments
 are really working for you.
For example, here I am taken in the illustration wide and if I press Ctrl+Plus, or Command+Plus on the Mac, then Ill zoom to 100%.
And if I do it again, Ill zoom to 150% and then 200% and then 300% and so on.
So weve got some pretty big increments going on and these are the exact same increments we get with the Zoom tool and with the other zooming techniques.
Im going to go ahead and press Ctrl+1, or Command+1 on the Mac, to zoom out to 100%.Illustrator cs6
If you want to dial in a custom zoom value then you can drop down here to this zoom option thats listed in the very bottom left corner of the document window.
Click on it, and then instead of entering a value, which you can do if you like, but my preferred method of working here is to press the Up arrow key in order to zoom in increments of one so you have very tight control.
You can also press the Shift Up arrow to move in 10% increments.
Illustrator CS6 Tutorial
And so at 120%, Im thinking Im zoomed in a little bit too far, Ill go ahead and take that down by pressing the Down arrow key until I reduce that value to 116% and that looks good to me.Now as I say, the other option of course is to dial in your own value.
For example, I could go ahead and zoom in to 2400%.
Now the problem becomes when youre this far zoomed into an illustration its difficult to get your bearings, you may not necessarily know where you are.
In that case, you want to bring up the Navigator panel, and you do that by going up to the Window menu and choosing the Navigator command, and then youll see this panel thats showing you your entire Illustrator cs6 and a tiny red thing right there that shows you the portion of theIllustrator cs6 that youre seeing right now.
All right, Im going to go ahead and expand this panel, like so so that I can see my Illustrator cs6 in a little more detail.
And by the way, working this way is great if you have two monitors, so you can go ahead and throw the Navigator panel on one monitor and of course have your document window open up in another.
Illustrator CS6 Tutorial
Anyway at this point, I could scroll inside the Illustrator cs6 by dragging this guy to a different location, or if I prefer I can just click somewhere in the illustration.You also have these zoom controls right here, so you can click on the little mountain to zoom out incrementally, or you can click on the big mountain to zoom in, you can also drag this zoom slider.
The only problem with this slider from my vantage point is it doesnt really show you a dynamic zoom, so you have to pause while youre dragging in order to update the screen.
It is a final way to work.
You can press and hold the Ctrl key or the Command key on the Mac, that will change your cursor to a little magnifying glass, and then you can drag around the portion of the Illustrator cs6 that you want to zoom.
As soon as you release Illustrator cs6 will show you that region on screen.
And then of course if the Navigator panel is getting too big for you, you can go ahead and drag a quarter or one of the sides in order to make it smaller.
And thats how you zoom to any degree you desire as well as get around using the Navigator panel here in Illustrator cs6 .
adobe,
an,
ball,
create,
flaming,
glossy,
how,
illustrator,
in,
to,
ultra
0
comments
How to Create an Ultra Glossy Flaming Ball in Adobe Illustrator
Tutorial Details
- Program: Adobe Illustrator CS5
- Difficulty: Intermediate
- Length: 22:58 mins
Final Product What Youll Be Creating

cs6,
document,
illustrator,
modifying,
tutorial,
with,
your
0
comments
Modifying your document with illustrator Cs6 Tutorial

This video teach you Modifying your document with illustrator cs6 tutorial
And Im take this one is just could want to them to move them to an arbitrary location. So lets start things off by centering the one, and you do that by going up to the Control panel at the top of the screen, go over here to the right-hand side, and youll see word Align, go ahead and click on it. And then well go and change is Align to Option from Align to Selection to Align to Artboard. And now Ill click on each one of these Middle Align Icons both Horizontal Align Center, and then Vertical Align Center. and then Vertical Align Center. So I am going to press Shift Down arrow--lets say two times--in order to nudge the number downward. Now Ill go up to the Edit menu, and Ill choose the Cut Command or press Ctrl+X, or
| Command+X on the Mac. In illustrator cs6 you To go ahead and move that one to the clipboard, and now Ill go up to the Edit menu and choose one of the coolest commands inside the software paste on all artboards which has a gigantic keyboard shortcut Ctrl+Shift+ Alt+V, or Command+Shift+Opt+V. And then well go ahead and paste that number onto every single page. And all you have to do is switch to the Type tool, which I can get by pressing the T key. But I should say here you may notice that on your toolbox the T is further down. Thats because youre working with a Single Column toolbox, and you can switch between them by clicking on this whole Double Arrow Icon. I have to work with a Double Column toolbox because my screens not tall enough to accommodate all of the tools otherwise. Now I am going to switch to the Type tool, and then its just a matter of selecting each one of these numbers and changing it to a different number. So Im selecting all the ones and changing them, of course, to 2 through 8. And now Ill just switch back to my Default tool which Illustrator CS6 with this tutorial calls the Selection tool
|
adobe,
cs6,
illustrator,
introduction,
tutorial,
video
0
comments
Adobe Illustrator CS6 Tutorial Video Introduction
Adobe Illustrator Cs6 is used by artists and graphic designers to create scalable vector artwork for use in projects for both print and web. Artists use Illustrator for creating clean visual compositions that can be scaled infinitely without losing quality, creating freehand drawings and illustrations, tracing and re-coloring scanned-in artwork, and also creating wireframes from which to create digital paintings.
Designers use Illustrator cs6 for creating logos, icons and other complex shapes, setting type for use in flyers, magazines and business cards, and creating web site mockups and graphics for use across multiple screens. Illustrator cs6 Tutorial isnt just limited to artists and designers though, many people use Illustrator for their projects, and it allows them to create visually compelling and flexible artwork like this.
Hello and welcome to Illustrator CS6 Essential Training. My name is Justin Seeley, and Im a staff author here at lynda.com. Ive been using Illustrator for nearly a decade, and it remains one of my favorite creative suite applications. Well start off slow by covering the basics like creating documents for both print and web, and well dive headfirst into creating vector shapes like
Illustrator also integrates with other Adobe applications like InDesign for print production and digital magazines.
Read more »
Designers use Illustrator cs6 for creating logos, icons and other complex shapes, setting type for use in flyers, magazines and business cards, and creating web site mockups and graphics for use across multiple screens. Illustrator cs6 Tutorial isnt just limited to artists and designers though, many people use Illustrator for their projects, and it allows them to create visually compelling and flexible artwork like this.
Hello and welcome to Illustrator CS6 Essential Training. My name is Justin Seeley, and Im a staff author here at lynda.com. Ive been using Illustrator for nearly a decade, and it remains one of my favorite creative suite applications. Well start off slow by covering the basics like creating documents for both print and web, and well dive headfirst into creating vector shapes like
| rectangles, circles, and even some complex artwork using the Shape Builder tool. |
Illustrator also integrates with other Adobe applications like InDesign for print production and digital magazines.
| Photoshop for use with Smart Filters, Flash for web animations and games or Adobe After Effects and Premiere for use in title sequences and video animation. Whether youre a graphic designer or an artist, Adobe Illustrator cs6 offers you a flexible way to deploy your creative vision to virtually any screen or substrate. |
Final Product Vector in Illustrator CS6 What Youll Be Creating

Step 1 Create Vector in Illustrator CS6
Create a circle (width 367px) with fill color and no stroke by using the Ellipse Tool (M). Make sure to press Shift while you create it so you get a perfect circle and apply a radial gradient, as shown in below.
Step 2 Create Vector in Illustrator CS6
Let’s start with the markings. Create a rectangle (L) at a width of 0.688 and height of 13.044 – towards the upper side of the circle and replicate it towards the lower side (hold the Alt + Shift while you select and drag the upper one downwards).
Step 3 Create Vector in Illustrator CS6
Select the rectangles using the Selection Tool (V). Group them together and align the two of them and the circle both horizontally and vertically on the center.
Step 4 Create Vector in Illustrator CS6
Select the rectangles (V) and rotate them using the Rotate Tool (Right-click > Transform > Rotate) by 1 degree and click copy in the Rotate Tool Dialog Box.
Step 5 Create Vector in Illustrator CS6
Now press Command + D to repeat the rotate copy, and repeat until you get to complete a circle made of small markers, as shown below.
Step 6 Create Vector in Illustrator CS6
Select the middle rectangle from the top using the Selection Tool and enlarge its size downwards so this one stands out. You do this by dragging downwards with the Selection Tool (V) while you press the Shift key.
Step 7 Create Vector in Illustrator CS6
While this marker is selected, copy and drag it downwards. Make sure you press both Alt + Shift while you drag it so it will be centered with the upper one. Once you’ve reached the bottom group them together (Command + G).
Step 8
Rotate the group by an increment of 20 degrees (Right-click > Transform > Rotate) and press copy in the Dialog Box.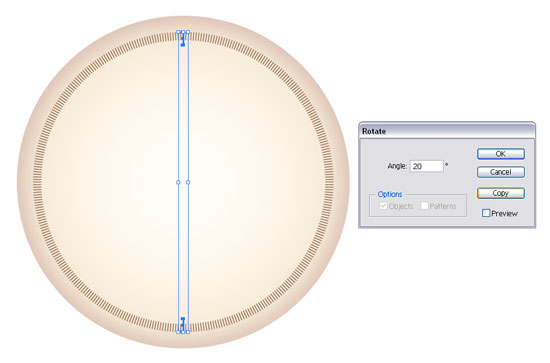
Step 9
Duplicate the action in Step 8 until you covered all the circle by using Command + D.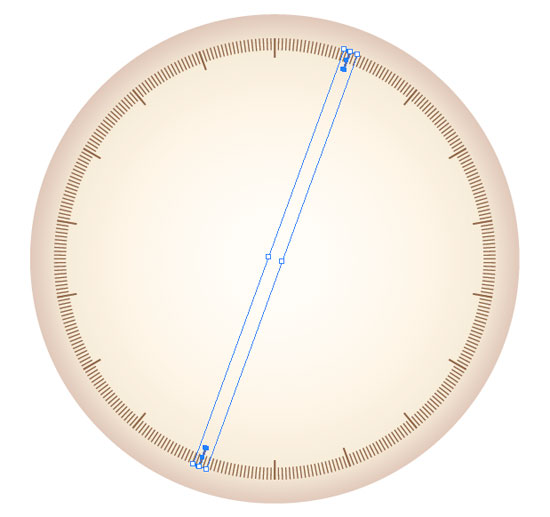
Step 10
Now that we have the markers for the 20 increments, we’ll need the ones for the 10 increments. Select the center marker with the Selection Tool (V), copy and paste in front (Command + C and Command + F), then drag it from the bottom upwards by holding the Shift key so that the size is in between the small and big markers.
Step 11
Select the new marker with the Selection Tool and copy it downwards by dragging it while holding Alt + Shift.
Step 12
Group both of them (Command + G) and rotate by 10 degrees (Right-click > Transform > Rotate). This time in the Rotate Panel click OO.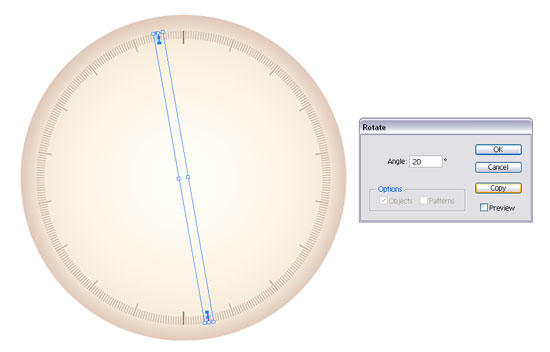
Step 13
Select the rotated one group and rotate it again with 20 degrees, like in step 12 but this time press Copy in the Rotate Panel. Repeat (Command + D) until you get a full circle.
Step 14
Prepare for the text by drawing a circle inside using the Ellipse Tool (L) inside the big one and center align it with the rest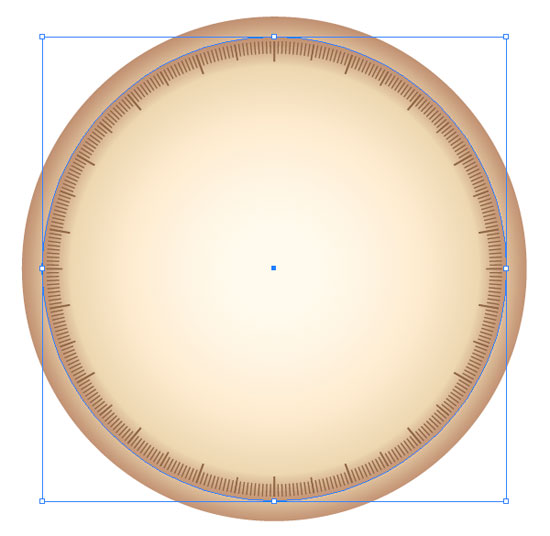
Step 15
While keeping the circle selected use the Type on a Path Tool to write the numbers on the circle that you’ve just created.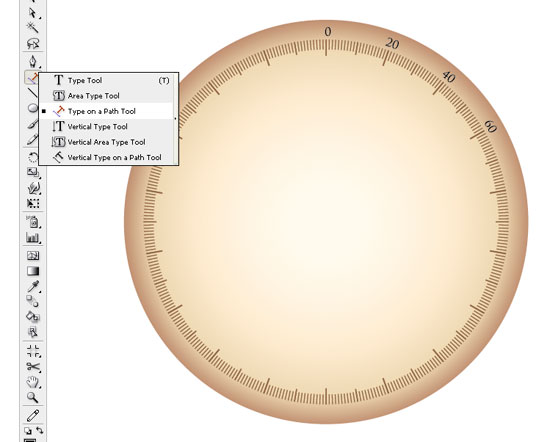
Step 16
Continue to create these numbers in increments of 20 until you are finished.
Step 17
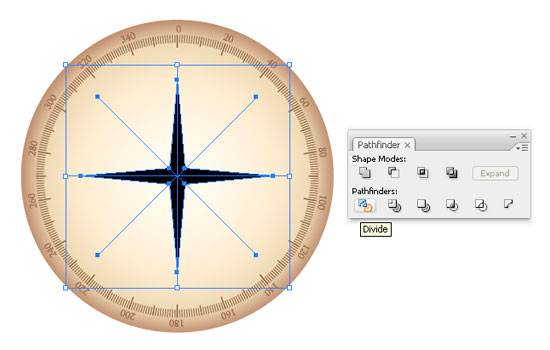
Create a star with four corners by using the Star Tool. Play around with the arrows and Command while you draw it. The one I drew is 225,887px wide.
Step 18
Now that we have a start we need to color each corner in two so we’ll have to divide it on the middle:- Draw an empty line using the Line Segment Tool () that is longer than the vertical of the star.
- Copy the line and Paste in Front (Command + C and Command + F) and rotate the new one by 45 degrees using Selection Tool (V), while holding the Shift key.
- Repeat step 1 and 2 until you have four lines.
- Select the lines and the star and center align them both horizontal and vertical.
- With the lines and the star selected In the Pathfinder Panel (Shift + Command + F9) press divide.
Step 19
- Color the sections of the star using the Direct Selection Tool and the colors of your choice.
- Copy and Paste in Front (Command + C and Command + F) the colored star and rotate it 45 degrees using the Selection Tool (V) while holding the Shift Key.
- Make the new star smaller using the Selection Key (V) and Shift + Alt.

Step 20
Delete three sides of the smaller star and leave just one. Select the two anchor points you see in the above image using the Direct Selection Tool (A). Then use the Selection Tool (V) to drag the upper-right while holding the Shift key until they intersect the bigger star.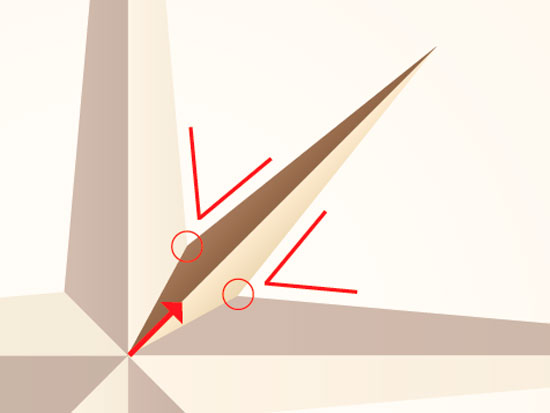
Step 21
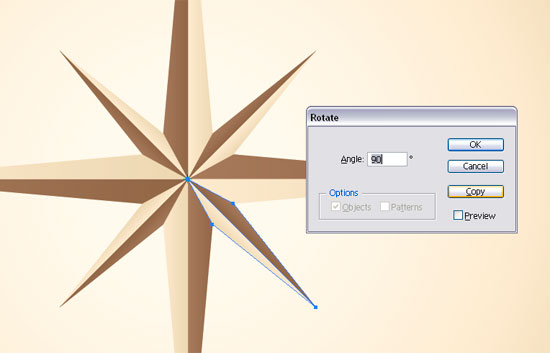
- Select the remaining part of the small star using the Selection Tool (V), press R and drag towards the middle of the big star while holding down the Alt key.
- Once you do that enter 90 in the Rotate Dialog Box and press Copy.
- Repeat (Command + D) until you get a full star again.
Step 22
Using the Text Tool (T) enter all the text (“N,” “E,” “S,” “W,” etc…)
Step 23
Now that we’ve created the direction markers we need to create the mobile part of the compass. Enter the group containing the big star, copy the horizontal segment (Command + C), and paste it (Command + V). Now Select the upper two anchor points using the Direct Selection Tool (A), then Right-click > Average > Both.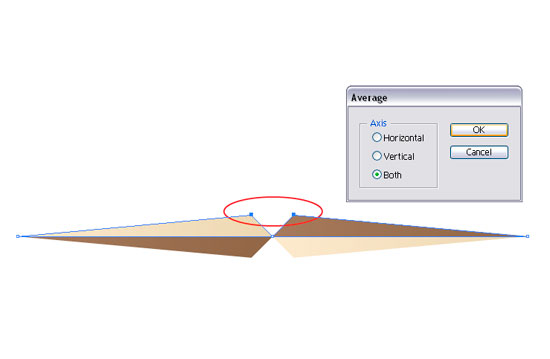
Step 24
Add some color to the segment to make it stand out. I’ve added the colors, as shown below.
Step 25
Using the Ellipse Tool (L) while you hold the Shift key you add two concentric circles to the center part of the mobile segment. In the image below you can see the colors I’ve used for the radial gradients, but you can also access the source files available for all Vector Plus Members.
Step 26
Group (Command + G) all the elements drawn up to now together.Step 27
Let’s create the golden frame of the compass. Create four circles using the Ellipse Tool (L) while you hold the Shift key. Start with creating the widest and finish with the smallest. I’ve created mine with the following widths:469px, 460px, 449px, and 393px.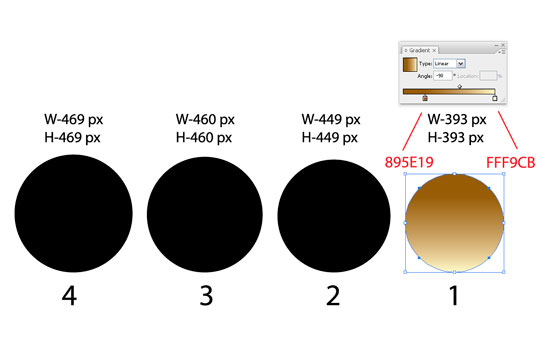
Step 28
Now let’s add some gradients and group the circles together. The swatches I’ve used are available for the Vector Plus Members in the original format.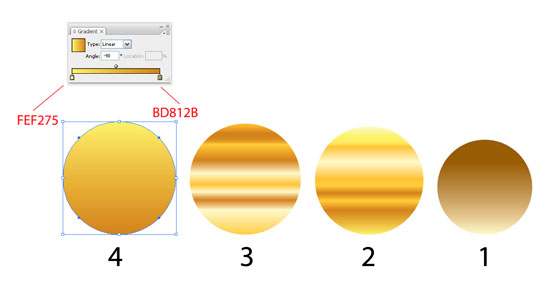
Step 29
Select both the golden part and the other and arrange them using the Selection Tool (V) until you get a similar illustration to that shown below.
Step 30
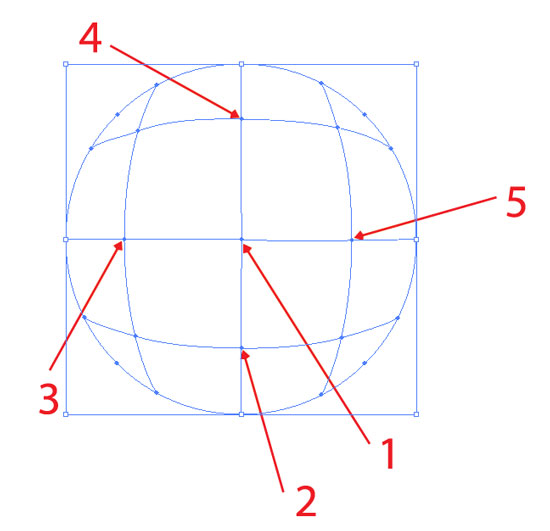
Lets add a shadow to the compass:- Create a white circle using the Ellipse Tool (L).
- Use the Mesh Tool (U) to add 4 mesh points.
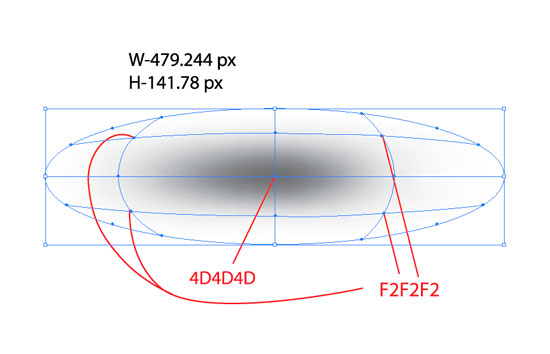
- Use the Direction Selection Tool (A) to select the mesh points and then add the color: #4d4d4d to the center mesh point and #f2f2f2 to the outer mesh points.
- After you are satisfied with the colors, select the circle using the Selection Tool (V) and transform it into an ellipse as shown.
Conclusion
Finally add the ellipse under the compass and position it so you can emulate a light source that created a shadow. Here is the image I’ve obtained.
cs6,
halloween,
illustrator,
pumpkin,
tutorial
0
comments
Halloween Pumpkin Illustrator Tutorial CS6
Let’s have some fun for Halloween. Learn how to draw a realistic Halloween pumpkin in Illustrator. Perhaps you can attach to your eCard or email. This tutorial will focus on the Pen Tool, Pathfinder, and Gradient Tool.
Download Link Illustrator CS6 Tutorial


 With the shapes remain selected, open Pathfinder palette (Window > Pathfinder). Hold down Alt key, click on Add to shape area. This will merge shapes together.
 Select the following gradient setting – color1: R=255 G=255 B=255, color2: R=204 G=122 B=22. Slide the white picker toward the right side. With the merged shape remain selected, drag from the upper center toward bottom.
 Change the Blending Mode of the merged shape to Multiply.
 Repeat this step until you get all the features done (eyes, nose, and mouth).

Read more »
Download Link Illustrator CS6 Tutorial
1. Basic shapes
First, use the Pen tool and draw the basic shapes of the pumpkin.2. Fill Gradient
Fill the shapes with a linear gradient with no stroke fill. Gradient color1: R=255 G=127 B=0, color2: R=255 G=127 B=03. Shading
Select all shapes, go to menu Edit > Copy (Ctrl+C). Then go to menu Edit > Paste in Front (Ctrl+F) to paste in position.4. Stem
Use the Pen tool and draw a shape of stem on top of the pumpkin. Fill it with a radial gradient as shown. Gradient color1: R=111 G=129 B=46, color2: R=82 G=56 B=17.5. Cutout Face Illustrator Tutorial CS6
Make a new layer on top of the pumpkin. Use the Pen tool and draw the basic shapes of the face. Select all the shapes (face only), use the Gradient tool and fill it with a radial gradient as shown. Gradient color1: R=255 G=242 B=0, color2: R=255 G=146 B=0, color3: R=187 G=50 B=0.6. Depth
Now, we need to add some depth to the pumpkin cutouts. Use the Pen tool, roughly draw a shape intersect with the left eye cutout. Then Copy the left eye and Paste in Front. Select the left eye shape and the intersect shape, go to Pathfinder, hold down Alt key and click on Intersect shape areas.7. Shadow & Highligh Illustrator Tutorial CS6
Fill the shadow area with a darker gradient (color1: R=255 G=146 B=0, color2: R=187 G=50 B=0). Then fill the highlight area with a lighter gradient (color1: R=255 G=255 B=139, color2: R=255 G=164 B=0).Final
That’s it!Adobe Photoshop cs6 tutorial pdf,yes we have simplified your search about Adobe Photoshop cs6 tutorial pdf.We will explain you in brief as well as Give you the Pdf download also.Adobe Photoshop Cs6 Tutorial,Photoshop learning with new Adobe Photoshop cs6 serial number is what you find everyday but we will tell you how to use the Features.Adobe Photoshop cs6 Features is the leader in the market of photo editing software.

You will always find hard to find serial numbers but before getting the serial number we will tell you in detail how to use the Adobe Photoshop Cs6 with tutorial.To understand Adobe Photoshop cs6 with full features we will take you the complete guide of it so that you are easily able to understand the Full tutorial of Adobe Photoshop Cs6.
You might be having the Full software of Adobe Photoshop Cs6 pdf if you have than it is fine otherwise you should download the trial version from the official Adobe Website.When your download is complete than you have the 30days time to activate it and make it a full version.
Download Adobe Photoshop cs6 Trial version from Official website This will take you to the download section of the Adobe and than you can download the trial version this must be a large file and will take some to Download so just let it Download and than we will tell you Adobe Photoshop Cs6 Tutorial pdf ,Photoshop learning with new Features. Now your Download Must be over now the first thing that i Want to tell you is that Adobe Photoshop cs6 pdf tutorial has three Applications.
1:Adobe Bridge
2;Adobe Camera Raw
3:Adobe Photoshop
We will Take you to the Adobe Photoshop cs6 part and learn how to use Adobe Photoshop Cs6. 1:Darker tones: The first option that You can choose in Adobe Photoshop cs6 is the one of four different brightness values in the Preferences.A New Background Save and Auto-recovery option is available in Adobe Photoshop cs6 which provide a level of protection against crashes, while the introduction of Adobe’s Mercury Graphics Engine is designed to speed up processor-intensive tools like Liquify, Puppet Warp and Transform.
Adobe Photoshop cs6 tutorial pdf Download
Get Cover Product Template at here File PSD
Read more »
You will always find hard to find serial numbers but before getting the serial number we will tell you in detail how to use the Adobe Photoshop Cs6 with tutorial.To understand Adobe Photoshop cs6 with full features we will take you the complete guide of it so that you are easily able to understand the Full tutorial of Adobe Photoshop Cs6.
You might be having the Full software of Adobe Photoshop Cs6 pdf if you have than it is fine otherwise you should download the trial version from the official Adobe Website.When your download is complete than you have the 30days time to activate it and make it a full version.
Download Adobe Photoshop cs6 Trial version from Official website This will take you to the download section of the Adobe and than you can download the trial version this must be a large file and will take some to Download so just let it Download and than we will tell you Adobe Photoshop Cs6 Tutorial pdf ,Photoshop learning with new Features. Now your Download Must be over now the first thing that i Want to tell you is that Adobe Photoshop cs6 pdf tutorial has three Applications.
1:Adobe Bridge
2;Adobe Camera Raw
3:Adobe Photoshop
We will Take you to the Adobe Photoshop cs6 part and learn how to use Adobe Photoshop Cs6. 1:Darker tones: The first option that You can choose in Adobe Photoshop cs6 is the one of four different brightness values in the Preferences.A New Background Save and Auto-recovery option is available in Adobe Photoshop cs6 which provide a level of protection against crashes, while the introduction of Adobe’s Mercury Graphics Engine is designed to speed up processor-intensive tools like Liquify, Puppet Warp and Transform.
Adobe Photoshop cs6 tutorial pdf Download
Get Cover Product Template at here File PSD
and,
artboards,
changing,
cs6,
illustrator,
in,
of,
shape,
size,
the
0
comments
Changing the size and shape of artboards in Illustrator CS6
Changing the size and shape of artboards in Illustrator CS6
 In this movie, I will show you how to change the change the shape and size of your artboards.
Now the first thing I would like you to do, just to make sure that you and I are on the same page, is to go up to the View menu, and make sure that the Smart Guides command is turned on.
If you see a check mark everythings good, if not go ahead and choose the command, you also have the keyboard shortcut of Ctrl+U and Command+U on a Mac.
What Smart Guides do is they allow you to align objects inside of your illustrationsas well as artboards on the fly.
Next step, of course, is to switch to Artboard tool, you can get by pressing Shift+O, or you can just click on it here inside the toolbox.
But before I do that, I want you to notice something.
At this point, you can see that page 1 is active because it has a black outline, whereas page 2 or Artboard 2 if you prefer is not selected nor or any of the others, because they have gray outlines.
If you click on lets say Artboard 4, you can see that it gets the black outline because
its now active and the others are inactive.
Youll also see a number 4 down here in the bottom left corner of the window.
Illustrator goes ahead and numbers Artboards automatically, in the order you create them.
You can override that however that I will show you in a later movie.
Now I will go ahead and switch to the Artboard tool and notice that Artboard 4 is highlighted.
So I just want you to see that artboard thats selected in a standard mode also become selected here inside Artboard mode.
I am going to go ahead and switch back to Artboard 1 by clicking on it and notice that
you have these handles that are surrounding the Artboard.
If you drag one of the handles then you will resize Artboard on the fly and see those green lines, those are the Smart Guides.
So I have got one Smart Guide on the far right side of artboard and another down there at
the bottom thats showing me that I have a center intersection.
So I know that Im exactly aligned to the right side of pages 2 and 6 as well as the
Now, I am going to drag this bottom handle down until I get alignment with the bottom
of those artboards, and I now have this large artboard that includes 1, 2, 5, and 6 and
has independent artboards inside of it for 2, 5, and 6, which can be a very useful way
to work if you want to have one larger artboard that includes all the artwork inside of a
document, for example, as well as independent artboards for each item.
Its a great way to organize and control the output of your artboard.
You also have some options that are available to you up here in the Options bar.
Notice that I have these orientation icon, so I can switch from Portrait to Landscape
just by clicking on it.
You can also select from preset artboard sizes, such as the popular page sizes letter here
Illustrator CS6in States and A4 in Europe and elsewhere.
Ill go ahead and select A4 for now.
You also have numerical control over the size and location of your artboard.
Lets say, I want to go ahead and switch mine back to 6x8 inches.
I would go ahead and highlight Width value, and you can do that, by the way just by clicking
on the letter next to it.
So Ill click on the W, and Ill change it to 6 in, and then press the tab key, and Ill
change the Height value which is now active to 8 in order to reset the size of that page.
Notice however, that Illustrator went ahead and resized the artboard with respect to its
center, and thats because the center reference point is selected up here in the Options bar.
If I want to position the artboard with respect to its upper left corner, I go ahead and click
on the upper left point inside of that reference matrix, and now Ill change the X value to 0,
and then Ill tab to the Y value and change it to 0 as well, and that gos ahead and restores
the original location of the page. In order to accept the work just press the Escape key
in order to return to the Black Arrow tool.
Read more »
Illustrator CS6 Tutorial Video,
I have gone ahead and restored the saved version of 8-page newsletter.ai found inside the 02_artboards folder.Now the first thing I would like you to do, just to make sure that you and I are on the same page, is to go up to the View menu, and make sure that the Smart Guides command is turned on.
If you see a check mark everythings good, if not go ahead and choose the command, you also have the keyboard shortcut of Ctrl+U and Command+U on a Mac.
What Smart Guides do is they allow you to align objects inside of your illustrationsas well as artboards on the fly.
Next step, of course, is to switch to Artboard tool, you can get by pressing Shift+O, or you can just click on it here inside the toolbox.
But before I do that, I want you to notice something.
At this point, you can see that page 1 is active because it has a black outline, whereas page 2 or Artboard 2 if you prefer is not selected nor or any of the others, because they have gray outlines.
If you click on lets say Artboard 4, you can see that it gets the black outline because
its now active and the others are inactive.
Youll also see a number 4 down here in the bottom left corner of the window.
Illustrator goes ahead and numbers Artboards automatically, in the order you create them.
You can override that however that I will show you in a later movie.
Now I will go ahead and switch to the Artboard tool and notice that Artboard 4 is highlighted.
So I just want you to see that artboard thats selected in a standard mode also become selected here inside Artboard mode.
I am going to go ahead and switch back to Artboard 1 by clicking on it and notice that
you have these handles that are surrounding the Artboard.
If you drag one of the handles then you will resize Artboard on the fly and see those green lines, those are the Smart Guides.
So I have got one Smart Guide on the far right side of artboard and another down there at
the bottom thats showing me that I have a center intersection.
So I know that Im exactly aligned to the right side of pages 2 and 6 as well as the
Illustrator CS6 Tutorial Video,
center of the bottom row of artboards.Now, I am going to drag this bottom handle down until I get alignment with the bottom
of those artboards, and I now have this large artboard that includes 1, 2, 5, and 6 and
has independent artboards inside of it for 2, 5, and 6, which can be a very useful way
to work if you want to have one larger artboard that includes all the artwork inside of a
document, for example, as well as independent artboards for each item.
Its a great way to organize and control the output of your artboard.
You also have some options that are available to you up here in the Options bar.
Notice that I have these orientation icon, so I can switch from Portrait to Landscape
just by clicking on it.
You can also select from preset artboard sizes, such as the popular page sizes letter here
Ill go ahead and select A4 for now.
You also have numerical control over the size and location of your artboard.
Lets say, I want to go ahead and switch mine back to 6x8 inches.
I would go ahead and highlight Width value, and you can do that, by the way just by clicking
on the letter next to it.
So Ill click on the W, and Ill change it to 6 in, and then press the tab key, and Ill
change the Height value which is now active to 8 in order to reset the size of that page.
Notice however, that Illustrator went ahead and resized the artboard with respect to its
center, and thats because the center reference point is selected up here in the Options bar.
If I want to position the artboard with respect to its upper left corner, I go ahead and click
on the upper left point inside of that reference matrix, and now Ill change the X value to 0,
and then Ill tab to the Y value and change it to 0 as well, and that gos ahead and restores
the original location of the page. In order to accept the work just press the Escape key
in order to return to the Black Arrow tool.
Subscribe to:
Posts (Atom)


- Follow Us on Twitter!
- "Join Us on Facebook!
- RSS
Contact