Showing posts with label lomo. Show all posts
Showing posts with label lomo. Show all posts
Wednesday, March 18, 2015
fashion,
lomo,
photoshop,
tutorial
0
comments
Fashion Lomo Photoshop Tutorial
You may have noticed that many clothing stores use images with the same photo effect that looks somewhat like Lomography. In this Photoshop tutorial, well show you how to add the washed out Lomo effect to your photos using all adjustment layers.
Step 1
Open any photo into Photoshop.

Step 2
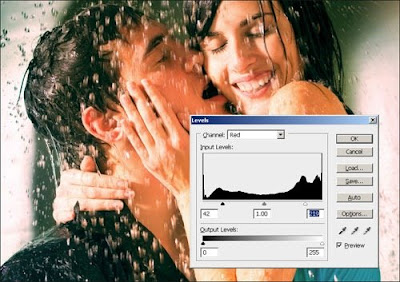
First, well compress the histogram in the red channel to add more contrast to the reds. Choose Layer > New Adjustment Layer > Levels. In the Channel drop down menu, select Red. Drag the black and white input slider towards the middle to increase the contrast in the reds.
Step 3
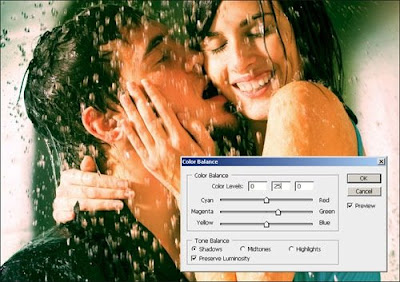
Now were going to add a green tint to the shadows and red tint to the highlights. The Color Balance tool is the perfect tool for this. Choose Layer > New Adjustment Layer > Color Balance. In the Tone Balance option, select Shadows then enter in 0, 25, 0 in the color levels settings.
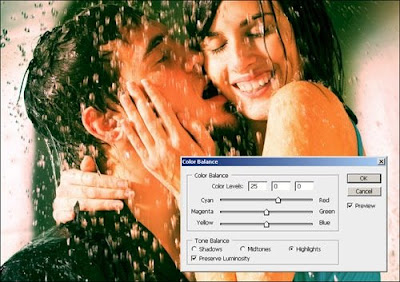
Now select Highlights on the tone balance options and enter 25, 0, 0 in the color levels settings.
Step 4
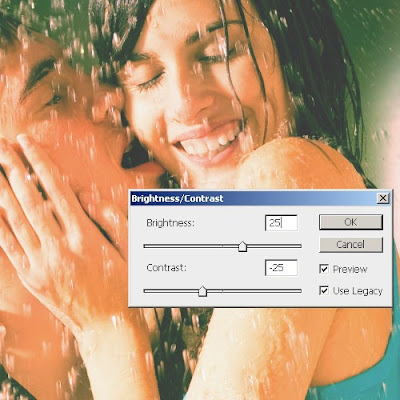
We now have the lomo effect completed and to finish it off, well add a Brightness/Contrast adjustment layer to add the washed out look. Choose Layer > New Adjustment Layer > Brightness/Contrast. If you are using Photoshop CS3, checkmark the "Use Legacy" option. Set the brightness to 25 and contrast to -25 then click OK.
Final Results

Other Examples



Read more »
Step 1
Open any photo into Photoshop.
Step 2
First, well compress the histogram in the red channel to add more contrast to the reds. Choose Layer > New Adjustment Layer > Levels. In the Channel drop down menu, select Red. Drag the black and white input slider towards the middle to increase the contrast in the reds.
Step 3
Now were going to add a green tint to the shadows and red tint to the highlights. The Color Balance tool is the perfect tool for this. Choose Layer > New Adjustment Layer > Color Balance. In the Tone Balance option, select Shadows then enter in 0, 25, 0 in the color levels settings.
Now select Highlights on the tone balance options and enter 25, 0, 0 in the color levels settings.
Step 4
We now have the lomo effect completed and to finish it off, well add a Brightness/Contrast adjustment layer to add the washed out look. Choose Layer > New Adjustment Layer > Brightness/Contrast. If you are using Photoshop CS3, checkmark the "Use Legacy" option. Set the brightness to 25 and contrast to -25 then click OK.
Final Results
Other Examples

Subscribe to:
Posts (Atom)


- Follow Us on Twitter!
- "Join Us on Facebook!
- RSS
Contact