Showing posts with label ice. Show all posts
Showing posts with label ice. Show all posts
Thursday, May 21, 2015
bring,
effect,
how,
ice,
in,
text,
to
1 comments
How to bring Ice effect in text
I looked at few tutorials on this for Photoshop and tried the same in PSE. Its simple and cool effect.
1. Open a blank document with black background. Write some text with Black color on it.
2. Now Control click on the text layer so that the text gets selected as shown.

3. Go to Filter>Artistic>Plastic Wrap. Now repeat this filter 10 times by pressing Control+F 10 times. The result may look something as shown below.

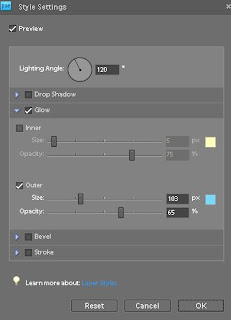
4. Now go to Layer>Layer Style>Style settings. Select Glow>Outer glow and select the color from color swatch to be "79d9f9". The output may look like as shown below :
5. Now rotate the image by 90 Right from Image>Rotate>90 Right. Now from Filter menu>Stylize>Wind. Click Ok. The output text would appear like this :

Now rotate Left 90 to bring it back.
6. Now go to Filter >Distort>Liquify. Use the Warp tool at some of the places to warp some areas of the text to given more frozen ice effect. The output may appear like this :
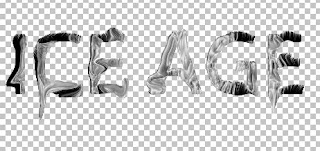
7. You may add a little Bevel from Layer Setting dialog.

8. Now go to Enhance>Adjust Color>Adjust Hue/Saturation. And change the color of the text to some less saturated bluish grey.
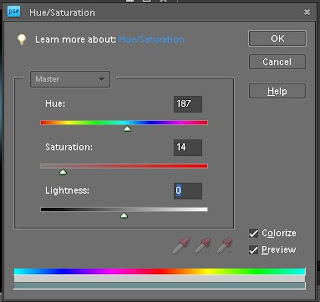
Check the checkbox "Colorize". Here is how it will look after that :
Check the checkbox "Colorize". Here is how it will look after that :

One may add Wind effect again by rotating as we did in step 5. Here is my final output after applying the effect again :


Hello all today we are going to make a Icy text effect in adobe photoshop:

First make a canvas ( I used 400 x 200 px ) and fill it with black:

Second we need to type in our text ( I used “Icy” with Ariel Black at 72pt ):

Now rasterize the text layer by right clicking the layer and click Rasterize Type:

Right click the Icy layer and click Merge down:

Goto Filter > Pixelate > Crystallize:

Enter 3 as the Cell Size:

Now goto Filter > Blur > Gaussian Blur:

Enter 1 pixel and click ok:

Now goto Image > Rotate Canvas > 90 CW:

Goto Filter > Stylize > Wind:

Make sure From the Right is ticked and click ok:

Now goto Image > Rotate Canvas > 90 CCW:

Then Image > Adjustments > Hue/Saturation:

Enter Hue: 215 Saturation: 50 Lightness: 0 and make sure Colorize is checked:

And here is your final result:
Thanks for looking at this tutorial and hope you learned from this.
Read more »
First make a canvas ( I used 400 x 200 px ) and fill it with black:
Second we need to type in our text ( I used “Icy” with Ariel Black at 72pt ):
Now rasterize the text layer by right clicking the layer and click Rasterize Type:
Right click the Icy layer and click Merge down:
Goto Filter > Pixelate > Crystallize:
Enter 3 as the Cell Size:
Now goto Filter > Blur > Gaussian Blur:
Enter 1 pixel and click ok:
Now goto Image > Rotate Canvas > 90 CW:
Goto Filter > Stylize > Wind:
Make sure From the Right is ticked and click ok:
Now goto Image > Rotate Canvas > 90 CCW:
Then Image > Adjustments > Hue/Saturation:
Enter Hue: 215 Saturation: 50 Lightness: 0 and make sure Colorize is checked:
And here is your final result:
Thanks for looking at this tutorial and hope you learned from this.
Subscribe to:
Posts (Atom)


- Follow Us on Twitter!
- "Join Us on Facebook!
- RSS
Contact