Showing posts with label bring. Show all posts
Showing posts with label bring. Show all posts
Saturday, May 23, 2015
a,
bring,
eyes,
focus,
how,
in,
more,
on,
potrait,
pse,
to,
using
1 comments
How to bring more focus on eyes in a potrait using PSE
1. Select Background layer in layers palette
2. Select the complete eye area ( including the white part ) using any selection tool (i used quick selection tool). Right click over the selected portion and say Layer via Copy. Name this layer in layers palette as Eyes by double clicking the layer in the palette.
3. Now select the background layer again and make a selection for the eye ball regions only. And right click and select Layer via Copy and name this layer as Eye ball.
4. Now Conrol+Click on the layer Eyes to show the eyes selected in the image. Click on Background layer and Select Inverse from right click on image area followed by Layer via Copy. Name this new layer as Blur. This constitutes the whole image except the eye region.
5. Now select the layer Blur and Filter>Blur>Gaussian Blur. Modify the blur to something like 2.5 or lesser. This is done to rest of the image leaving eyes so that eyes are prominent in the image. Click Ok. You can later on modify the opacity of the layer making it more transparent if you want to decrease the blur effect. You can do that by selecting this layer in the layer palette and moving the opacity slider on right top of layers palette.
6. Now select the layer Eyes. Go to Enhance>Adjust Sharpness. Now make changes to the amount and radius. Click Ok. You can vary the sliders as per your needs and preview it side by side in image area or preview area in the dialog. Do not oversharpen as it makes the eyes look artificial.
7. Now select only the layer Eye ball and select Enhance >Unsharp mask.
I changed the amount to near 50% and radius to near 16. This details out the pattern inside the eye ball and brings more focus to the eye region.
8. You can now also increase the saturation of this layer by Enhance>Adjust color>Adjust Hue/Saturation. You can select the Grrens from the combo box if you obly want to saturate the Green of the eyes using the Saturation slider.
Click Ok.
Here are the initial and the final images :
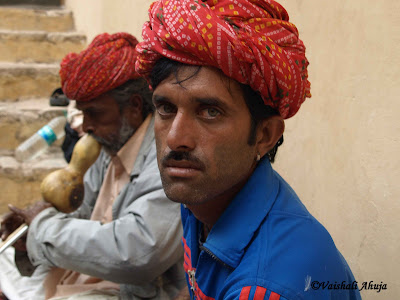
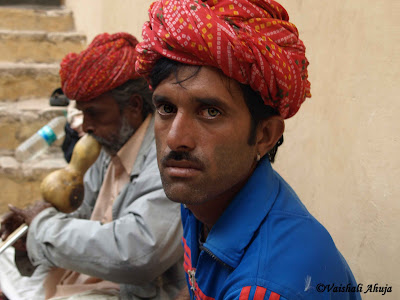
(Click to have larger views to see differences)

Thursday, May 21, 2015
bring,
effect,
how,
ice,
in,
text,
to
1 comments
How to bring Ice effect in text
I looked at few tutorials on this for Photoshop and tried the same in PSE. Its simple and cool effect.
1. Open a blank document with black background. Write some text with Black color on it.
2. Now Control click on the text layer so that the text gets selected as shown.

3. Go to Filter>Artistic>Plastic Wrap. Now repeat this filter 10 times by pressing Control+F 10 times. The result may look something as shown below.

4. Now go to Layer>Layer Style>Style settings. Select Glow>Outer glow and select the color from color swatch to be "79d9f9". The output may look like as shown below :
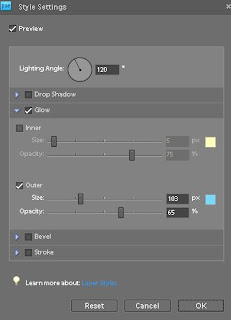
5. Now rotate the image by 90 Right from Image>Rotate>90 Right. Now from Filter menu>Stylize>Wind. Click Ok. The output text would appear like this :
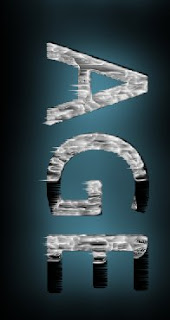
Now rotate Left 90 to bring it back.
6. Now go to Filter >Distort>Liquify. Use the Warp tool at some of the places to warp some areas of the text to given more frozen ice effect. The output may appear like this :
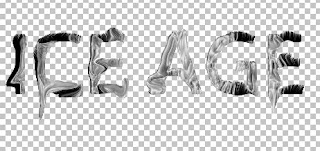
7. You may add a little Bevel from Layer Setting dialog.
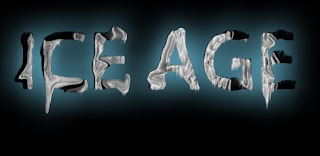
8. Now go to Enhance>Adjust Color>Adjust Hue/Saturation. And change the color of the text to some less saturated bluish grey.
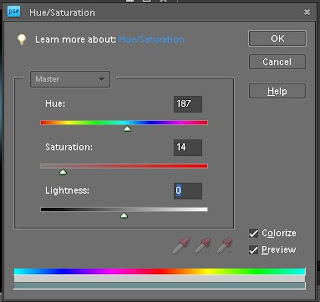
Check the checkbox "Colorize". Here is how it will look after that :
Check the checkbox "Colorize". Here is how it will look after that :
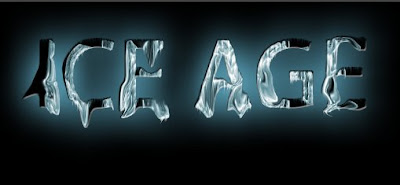
One may add Wind effect again by rotating as we did in step 5. Here is my final output after applying the effect again :

Wednesday, March 18, 2015
a,
bring,
colors,
image,
normal,
to
0
comments
Bring Colors to a normal image
In this tutorial I will show you a non-destructive technique to add vivid colors to your scene, turning it into a spectacular image that can impress your audience easily
Before & After:
Here is the image we will work with

And what we are going to create:

Step 1: Before walking into the main step, we should enhance its brightness and contrast a bit by going to Image>Adjustments>Color Balance. We can find here three options: Shadows, Midtones and Highlights. Adjust each of them as following:


It now looks better:

Step 2: Our scene has three parts: sky, trees and yard. First we will deal with the sky, enhance it by adding blue to the clouds. Use the Pen tool and make a closed path on the sky area, no need to be too exact.

Right click on the sky and choose Make Selection

The path is now changed into a selection (with moving dots)
Step 3: Create a new layer and select the Gradient Tool, set the gradient color from #066caa to white and Reflected Gradient. You should use Reflected Gradient instead of Linear Gradient to enhance its contrast.

Step 4: Press Ctrl-D to deselect the selected area. Go to Filter>Blur>Gaussian Blur and use a radius of 25.2 pixels

Step 5: Now change the blending mode of this layer to Overlay. This mode keeps the color of your current layer and adding it to the below layer so we can see blue in our sky

Step 6: Repeat this technique (from step 2) with the yard but you should use orange gradient instead of blue gradient. If you feel a bit confused, follow the images below:
+ Make a closed path and turn it into a selection:

+ Add a suitable gradient:

+ Blur it and change the blending mode to Overlay:

Step 7: Repeat this technique one more time with the trees, you should use a small radius of Gaussian Blur


And here is the dreamy result we will acquire:
This technique produces a stunning photo effect without destroying the original background. Its based on Blur effect and Overlay mode. Remember you can easily adjust the colors and brightness in each layer by reducing its Opacity and Fill parameters.
Read more »
Before & After:
Here is the image we will work with
And what we are going to create:
Step 1: Before walking into the main step, we should enhance its brightness and contrast a bit by going to Image>Adjustments>Color Balance. We can find here three options: Shadows, Midtones and Highlights. Adjust each of them as following:
It now looks better:
Step 2: Our scene has three parts: sky, trees and yard. First we will deal with the sky, enhance it by adding blue to the clouds. Use the Pen tool and make a closed path on the sky area, no need to be too exact.
Right click on the sky and choose Make Selection
The path is now changed into a selection (with moving dots)
Step 3: Create a new layer and select the Gradient Tool, set the gradient color from #066caa to white and Reflected Gradient. You should use Reflected Gradient instead of Linear Gradient to enhance its contrast.
Step 4: Press Ctrl-D to deselect the selected area. Go to Filter>Blur>Gaussian Blur and use a radius of 25.2 pixels
Step 5: Now change the blending mode of this layer to Overlay. This mode keeps the color of your current layer and adding it to the below layer so we can see blue in our sky
Step 6: Repeat this technique (from step 2) with the yard but you should use orange gradient instead of blue gradient. If you feel a bit confused, follow the images below:
+ Make a closed path and turn it into a selection:
+ Add a suitable gradient:
+ Blur it and change the blending mode to Overlay:
Step 7: Repeat this technique one more time with the trees, you should use a small radius of Gaussian Blur
And here is the dreamy result we will acquire:
This technique produces a stunning photo effect without destroying the original background. Its based on Blur effect and Overlay mode. Remember you can easily adjust the colors and brightness in each layer by reducing its Opacity and Fill parameters.
Tuesday, March 17, 2015
and,
bring,
colour,
image,
light,
of,
ordinary,
out
0
comments
Bring Colour and Light out of Ordinary Image
Step 1
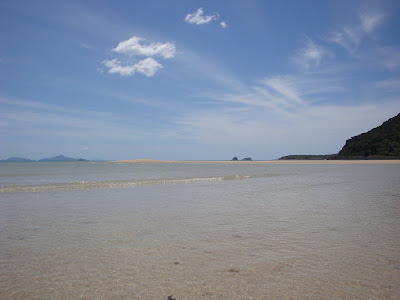
Load a photo of your choice into Photoshop. Here is mine..
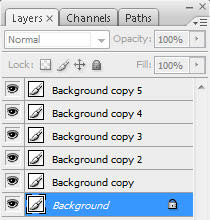
After loading your photo, duplicate the background layer five times:
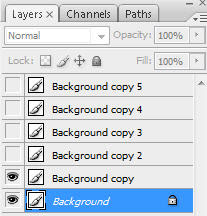
Then hide the top 4 layers and leave just the “Background copy” layer visible.
Step 2
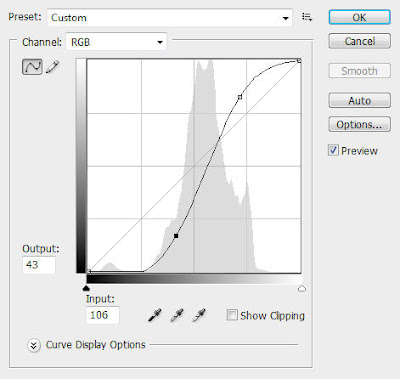
On the “Background copy” layer, hit Ctrl + M to bring up the Curve Tool and apply the following settings:
Then change the blending mode of this layer to “Overlay” with an opacity of 60%, and you will have the following image:
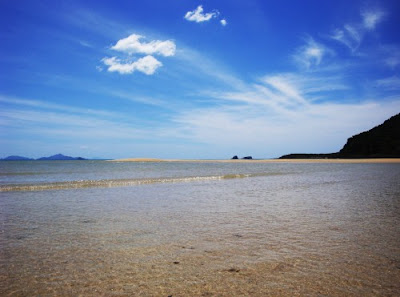
Step 3
Un-hide the “Background copy 2″ layer and select it, hit Ctrl + Alt + Shift key to bring up the Black and White image adjustment tool and apply the following settings:
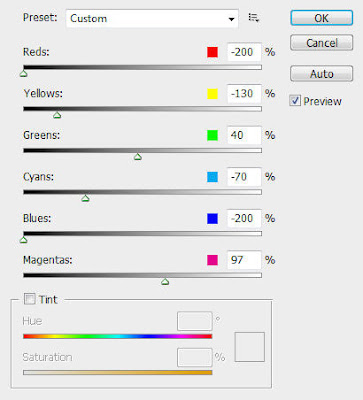
(Please note the settings may be different if you use your own photo, but the idea is to put more emphasis toward certain colours in the image and bring them out a bit more)
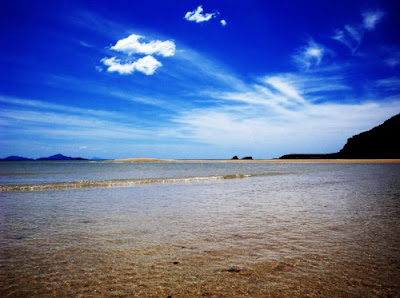
Change the layer blending mode to “Soft Light” with an opacity of 70%.
The effect so far will look like this:
Step 4
Now we can some more exposure to the image. Un-hide the “Background Copy 3″ layer and select it, go to Image > Adjustments > Exposure and apply the following settings:
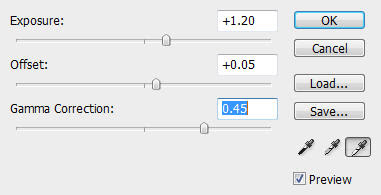
Then change the layer blending mode to “Color” and you will have the following effect:
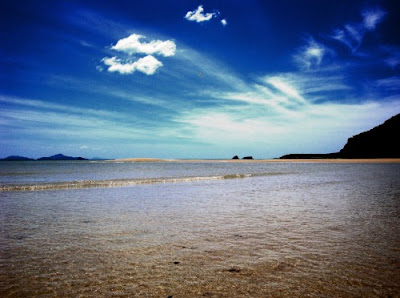
Step 5
Un-hide the “Background copy 4″ layer and select it, go to Image > Mode > Lab Color and change the image mode to LAB.
The go the Channel Palette and select the “lightness” channel:
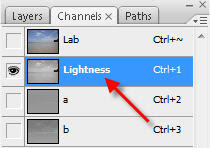
Then hit Ctrl + L to bring up the level adjustment tool, apply the following settings:
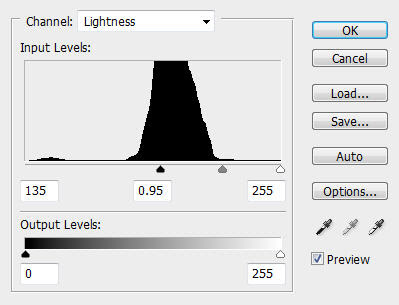
Change the image mode back to RGB mode. When you’re prompted to flatten the image, choose “Don’t Flatten”.
Change to layer blending option to “Soft Light” with an opacity of 50% and you will have the following effect:
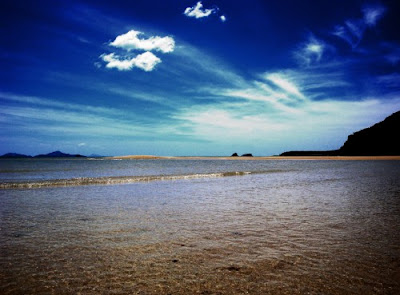
Step 6
Now we can add some extra soft light onto the image.
Un-hide “Background layer 5″ and select it, go to Filter > Blur > Surface Blur and apply the following settings:
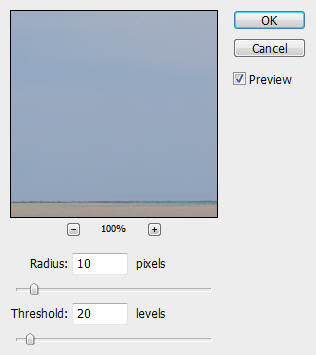
Change the layer blending mode to “Screen” with an opacity of 60% and you will have the following image:
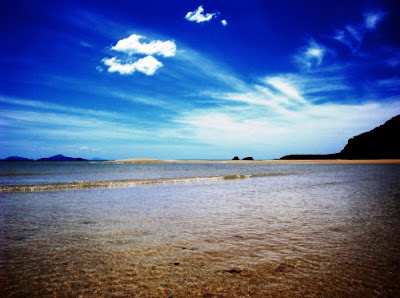
Step 7
This is an optional step. As you can see after several layer blendings, the mountain on the right has become a black spot without any tree to be seen. We can bring the trees back by using the dodge tool.
Duplicate the background layer once more and put the duplicated layer just above the background layer, but beneath any other layer.
Hit “o” key to select the dodge tool, apply the following settings:

Brush over the mountain until the trees are back.
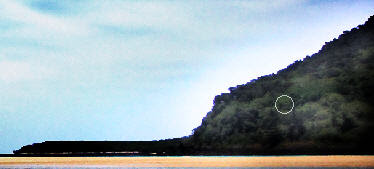
You can reduce the layer opacity a bit to get a better result, also adjust the brush size for the dodge tool if necessary.
And here is the final effect:
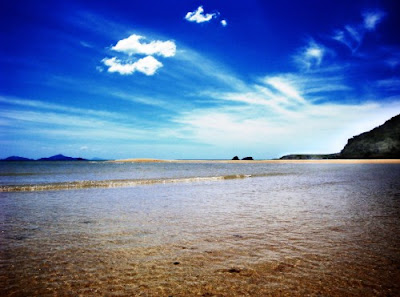
Read more »
Load a photo of your choice into Photoshop. Here is mine..
After loading your photo, duplicate the background layer five times:
Then hide the top 4 layers and leave just the “Background copy” layer visible.
Step 2
On the “Background copy” layer, hit Ctrl + M to bring up the Curve Tool and apply the following settings:
Then change the blending mode of this layer to “Overlay” with an opacity of 60%, and you will have the following image:
Step 3
Un-hide the “Background copy 2″ layer and select it, hit Ctrl + Alt + Shift key to bring up the Black and White image adjustment tool and apply the following settings:
(Please note the settings may be different if you use your own photo, but the idea is to put more emphasis toward certain colours in the image and bring them out a bit more)
Change the layer blending mode to “Soft Light” with an opacity of 70%.
The effect so far will look like this:
Step 4
Now we can some more exposure to the image. Un-hide the “Background Copy 3″ layer and select it, go to Image > Adjustments > Exposure and apply the following settings:
Then change the layer blending mode to “Color” and you will have the following effect:
Step 5
Un-hide the “Background copy 4″ layer and select it, go to Image > Mode > Lab Color and change the image mode to LAB.
The go the Channel Palette and select the “lightness” channel:
Then hit Ctrl + L to bring up the level adjustment tool, apply the following settings:
Change the image mode back to RGB mode. When you’re prompted to flatten the image, choose “Don’t Flatten”.
Change to layer blending option to “Soft Light” with an opacity of 50% and you will have the following effect:
Step 6
Now we can add some extra soft light onto the image.
Un-hide “Background layer 5″ and select it, go to Filter > Blur > Surface Blur and apply the following settings:
Change the layer blending mode to “Screen” with an opacity of 60% and you will have the following image:
Step 7
This is an optional step. As you can see after several layer blendings, the mountain on the right has become a black spot without any tree to be seen. We can bring the trees back by using the dodge tool.
Duplicate the background layer once more and put the duplicated layer just above the background layer, but beneath any other layer.
Hit “o” key to select the dodge tool, apply the following settings:
Brush over the mountain until the trees are back.
You can reduce the layer opacity a bit to get a better result, also adjust the brush size for the dodge tool if necessary.
And here is the final effect:
Ok that’s it for this tutorial! Remember you can always use the layer blending modes, curve/level tools and blur filter to bring out light and contrast for your image.
Cheers and have a nice day!
Many Thanks to www.psdvault.com
Subscribe to:
Posts (Atom)


- Follow Us on Twitter!
- "Join Us on Facebook!
- RSS
Contact