How to edit IPTC metadata of multiple photos using PSE 11 Organizer
Here is how you can achieve that:
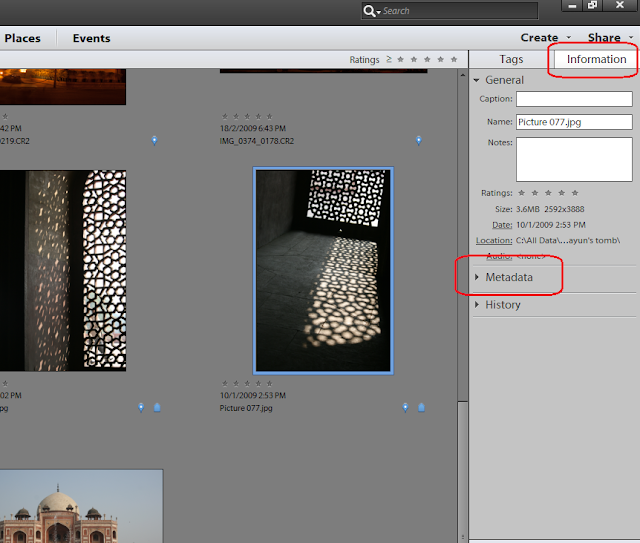
1. For a single image, select a file in Image grid in Organizer. Click on Information tab in right panel as shown, followed by expanding metadata panel as shown in the image below:
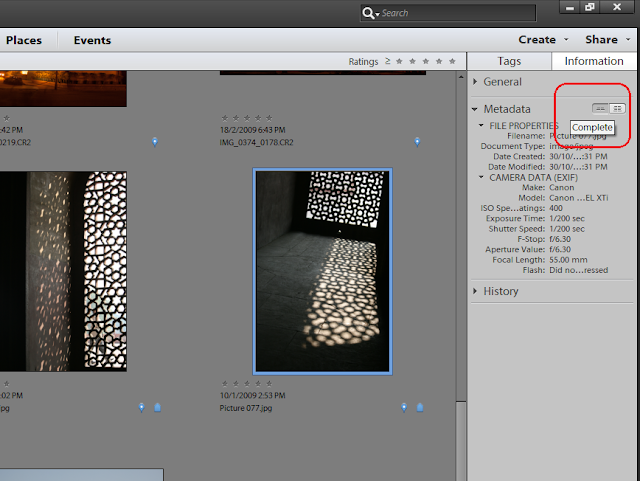
2. Click on the icon shown on right to view Complete metadata of the image selected.
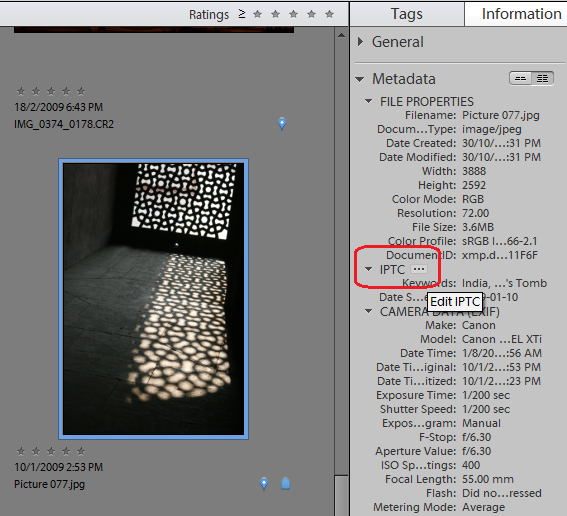
3. Under IPTC header, select the button that shows 3 dots "..."
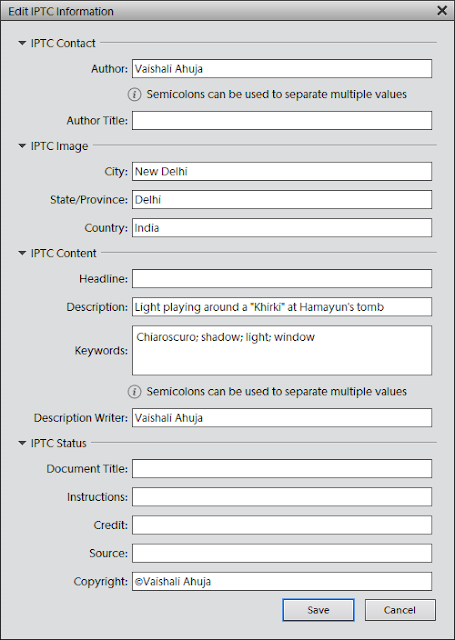
This launches the following dialog showing IPTC metadata fields. Fill in the metadata and Click Save.
The saved metadata should now appear in metadata panel under IPTC header. To edit this metadata, go to the same dialog with the same steps as above and you can then append or overwrite the existing metadata.
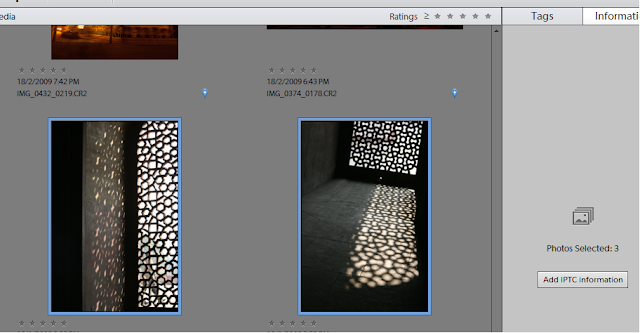
To edit metadata of multiple files, you just need to select multiple files in the image grid and select "Add IPTC information: button in Information panel :
The dialog you see for multiple files is a bit different as it provides a radio button option for Author and Keywords fields to overwrite or append existing values as shown. You can use these options as desired.
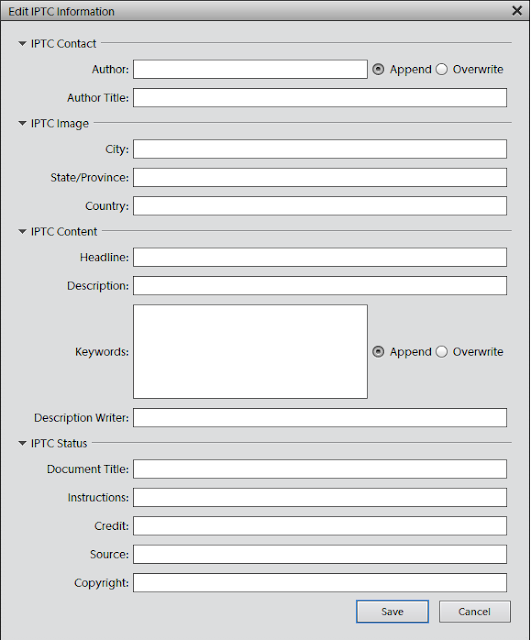
Click Save and here you go!

Taking Memorable Photos of Children
Children are a favorite subject for many photographers. Advertisers know a photo of an adorable child will grab people’s attention. Fundraisers know an image of a sick, wounded, or sad child will bring in donations. And parents cannot imagine a better subject than their child. Parents take cameras to sporting events, school functions, and parties. It seems like every moment of a child’s life is documented either in a still photograph or in a video. But how many photos of children are truly memorable?
Here are some tips on getting shots that draw total strangers into your photographs of children.
Take Time to Get to Know the Child
Most children let you into their world quickly. Before you start taking a picture, spend at least 10 minutes talking to the child. Ask questions about things that interest the child. Good openers include:
“Do you like bugs?”
“Would you rather be a giraffe or a butterfly?”
“What’s your favorite game?
Pay attention to how the child responds. Does he/she make eye contact? Capture that confidence when you take his/her picture. Does the child laugh at the questions or seriously contemplate them? Look for that sense of whimsy or pensive side when you take the picture. Does the child doodle when he/she responds? Then look for ways to show the child is creative. Does the child twist her hair while she’s thinking? Great. Include that in a photo.
If you’re taking photos of your own child, you already know your child’s personality traits, his/her habits, his/her facial expressions. Capture those instead of (or in addition to) a posed in-front-of-the-camera smile.
Observe, Observe, Observe
After you talk to the child, explain you’re going to get your camera ready and back away. The child will soon lose interest in you, giving you a chance to observe the child relating to the world. Inquisitive? Intent? Distracted? Capture that in your images.
If you’re taking photos of your own child, try observing your child as if you don’t know him/her at all. You’ll probably see some things you haven’t noticed before.
Be Unobtrusive
Use a telephoto lens. The best photographs of children are those when a kid is acting like a kid. To capture that and all the emotions that go with it, you need to be an unobtrusive as possible. Use a telephoto lens so you can have some real distance between you and the child. This will help the child tune you out and do whatever he or she does best, whether it’s play, dream, run around, make up stories. Capture that.
Alternately, move in close to the child to capture a curve of the cheek, curls tumbling down a forehead, eyes deep in thought.
Show the Child’s Environment
Try to take your photographs in a place that means something to the child. A bedroom, playroom, playground, field – all of these say something about how the child relates to the world. Does the child run freely across the open field or sit quietly reading a book? Does the child see how high he or she can climb a tree or does he/she prefer to lean against it and pet his/her dog? Is the child’s room spotless, showing the child’s organizational bent, or is it a wild jumble of clothes and toys?
Look for the Extraordinary in the Ordinary
Take photos of the child doing everyday things like eating breakfast, elbows on the table, hair not yet combed; sleeping, curled up with a favorite animals or spread eagle, blankets off, bold even in sleep; doing homework, scowling over a difficult problem or with one eye on the TV. These say a whole lot about who the child is, which is way more moving than a posed photo with perfectly combed hair and a brand new outfit.
Try Shooting in Black and White
This really adds drama. Check it out. You can have black and white prints made from color negatives. You can also turn digital prints into black and white either in your camera (depending on which camera you use) or in a photo software program.
Above all, respect the child’s world. It is complex, compelling, and very, very deep.
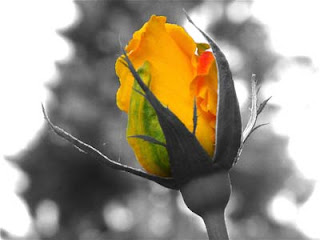
Create dramatic black and white photos by splashing in color.
1. Open a color photo in Photoshop.
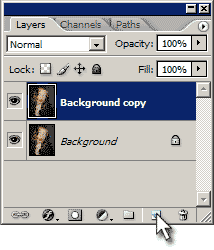
2. Duplicate the layer by dragging the layer to the "Create a New Layer" icon in the layers palette (or CTRL+J).
3. With the new layer selected, goto Image > Adjustments > Desaturate (or Shift+CTRL+U).
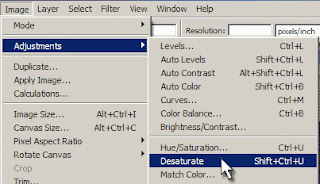
4. Goto Image > Adjustments > Brightness/Contrast and adjust the levels for each so that the black & white photo looks pleasing to your eye.

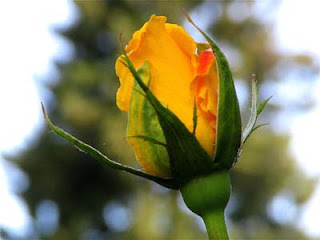
5. Now select the Eraser tool and erase whatever areas you want color. In this example, I erased the flower so that its color would shine through.
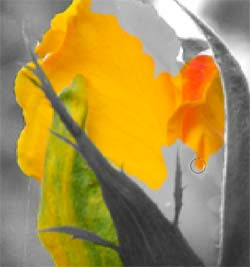
Rename the new layer to B & W, make sure the B & W layer is selected and press (Ctrl+Shift+U) or click Image > Adjustments > Desaturate, now you should have two layers, one of them is colored and the other is B & W.
With the B & W layer selected, click Filters > Others > High Pass and change the Radius value if necessary (3.4 pixels here).

Click Image > Adjustments > Threshold and move the threshold level slider until you get the amount of details that you like (123 here).

Choose the B & W layer and change the Opacity value (the value at the top of the layers window) to 66%.
Choose the Background layer and Click "Create new fill or adjustment layer" (located at the bottom of the layers window) and choose "Hue and Saturation..." and add more saturation to give your work more comics art look (56 here) also adjust Lightness if necessary.

Click Shape tool (U) many times until you get Custom Shape Tool and choose "Talk 1" shape, adjust the shape and change its color as you like.
Click Horizontal Type Tool (T) and add any funny words you like.

If you dont have CS, then the following trick will help you achieve similar results. I actually find this method produces better results. This trick is work on all photoshop versions.
Here is the original image.
Step 1 — New LayerOpen your photo and make a copy of the Background Layer by choosing Layer> Duplicate Layer, or by dragging it to the New Layer Icon at the bottom of the Layers palette.
Step 2 — Change The Blend ModeIn the Layers palette change the Blend Mode of the new layer from Normal to Screen. This will lighten the photo uniformly.
Step 3 — RepeatNow repeat the entire procedure again. Create a new layer, change the blend mode to screen, and then take a look at the result. Continue doing this until you go from "oh-my-god its almost perfect" to "oh-my-god Ive ruined it!"
Step 4 — Lower The OpacityNow leave that last layer active even though its taken you too far and lower the Opacity using the slider at the top right of the layers palette. This lowers the intensity of the effect. When youve found the right amount, you can flatten your image.
Step 5 — Flatten And SaveChoose Layer> Flatten or use the palette’s flyout menu and choose Flatten Image. Thats it. Save your file (File> Save) and youre done.


- Follow Us on Twitter!
- "Join Us on Facebook!
- RSS
Contact