Showing posts with label using. Show all posts
Showing posts with label using. Show all posts
Saturday, June 20, 2015
add,
any,
effect,
film,
how,
photo,
pse9,
saturated,
to,
using
0
comments
How to add Saturated Film Effect to any photo using PSE9
1. Open an image in PSE Editor.
2. Go to Guided Edits and click on Saturated Slide Film Effect under Photographic Effects.

3. Click on Apply button. It can be applied multiple times depending on the extent of the effect you are looking for.
Here are my initial and final images:
 |
| Initial image |
 |
| Final Image |

Thursday, June 18, 2015
a,
an,
and,
background,
content,
create,
fill,
from,
hole,
how,
object,
pse9,
remove,
scene,
the,
to,
using
0
comments
How to remove an object from a scene and create background content to fill the hole using PSE9
Is there a tool in PSE which can help you remove an object or a person from foreground of an image by filling it with the background content?
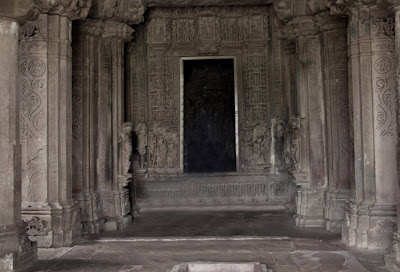
So in my source image above, I wanted to remove the girl from the temple and have just the building.
It may be achievable with clone tool, however it would really be a big time task.
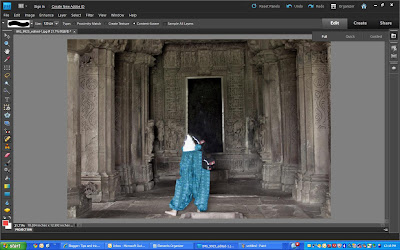
Yes, there is one which was introduced in PSE 9. So here are my initial and final images to show what this tutorial will help you achieve through this tutorial:
 |
| Initial image |
 |
| Final image |
So in my source image above, I wanted to remove the girl from the temple and have just the building.
It may be achievable with clone tool, however it would really be a big time task.
For non-complex images, it may just take seconds to fix that photo using content aware spot healing by doing just a couple of dabs
.
However, I choose an image which is complex as we need to remove a person whose background is not consistent throughout. It has the dark area inside the gate, the gate boundaries, the sculptured wall, the ground with variations in textures and colors. And spot healing from previous versions of PSE might not work since it does not have that intelligence to create content from background and fill it with it.
.
However, I choose an image which is complex as we need to remove a person whose background is not consistent throughout. It has the dark area inside the gate, the gate boundaries, the sculptured wall, the ground with variations in textures and colors. And spot healing from previous versions of PSE might not work since it does not have that intelligence to create content from background and fill it with it.
1. Open the image in Editor.
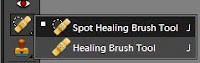
2. Select Spot healing tool from the left tool bar.
 |
| The spot healing brush properties in top properties bar |
3. Now keeping "Content-Aware" option selected in Properties panel, a keeping brugh size of the area not very big(which can be incremented and decremented using ],[ keys), start brushing(dabbing) over the object you want to remove.
So here are some tips which I have learnt on using this tool again and again :
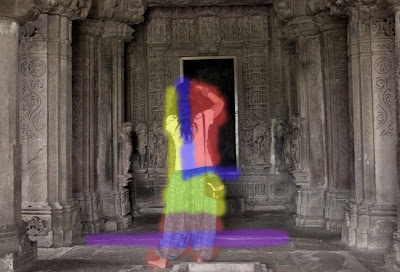
1. In the image above, for areas marked in red, I could use a bigger brush size without worrying much as the background behind the red mark is not very complex and is consistent, and I am not worried much as there are change in colors, no linear planes changing etc. So I can do this part quickly.
2. The areas marked in yellow are bit complicated as they have carvings on the wall. So would be good to start dabbing the brush with small size from the area near to the yellow area boundary in a linear manner. So if you see the carvings on the wall, they are horizontally linear. So it would be good if I start from the left near the boundary of the yellow area towards right horizonally.
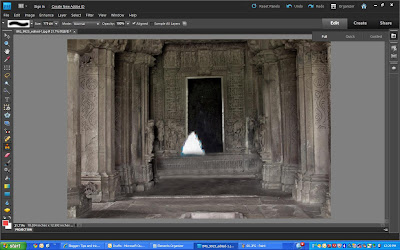
3. The areas marked in blue(In L shape) is the area which should be taken care alittle meticulously since it has the frame of the door which has straight lines which need to be content created. So for this I reduced the brush size so that it did not cover the breadth of the frame and started from left such that the brush area includes the area of the existing frame(white frame area). However, this decision making may vary from image to image which would come to you as you try this tool a few times. For non-complex images, it may just take seconds to fix that photo using content aware spot healing and you may not have to do any such decision making. But for complex images, you might need a little thinking to get the best results.
4. For the area in purple, I used clone tool as it was quicker for that scenario. Spot healing content aware brushcould also have been used.
Here is my final result :
Hope this tutorial helps!!!
So here are some tips which I have learnt on using this tool again and again :
1. In the image above, for areas marked in red, I could use a bigger brush size without worrying much as the background behind the red mark is not very complex and is consistent, and I am not worried much as there are change in colors, no linear planes changing etc. So I can do this part quickly.
3. The areas marked in blue(In L shape) is the area which should be taken care alittle meticulously since it has the frame of the door which has straight lines which need to be content created. So for this I reduced the brush size so that it did not cover the breadth of the frame and started from left such that the brush area includes the area of the existing frame(white frame area). However, this decision making may vary from image to image which would come to you as you try this tool a few times. For non-complex images, it may just take seconds to fix that photo using content aware spot healing and you may not have to do any such decision making. But for complex images, you might need a little thinking to get the best results.
4. For the area in purple, I used clone tool as it was quicker for that scenario. Spot healing content aware brushcould also have been used.
Here is my final result :
Hope this tutorial helps!!!
Monday, May 25, 2015
8,
create,
flames,
how,
pse,
to,
using
0
comments
How to create flames using PSE 8
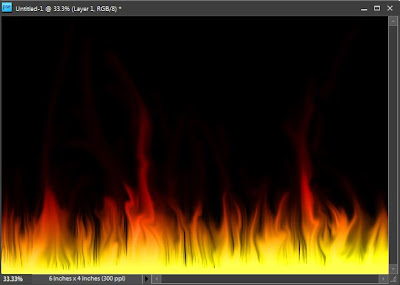
Here is my first attempt in creating flames :
1. Open a blank document with black background.
2. Create a new blank layer and paint the lower bottom area as white with brush tool as shown below
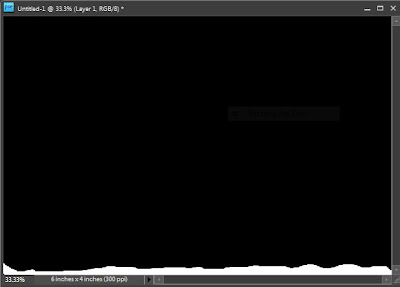
3. Now rotate it right by 90 from Image>Rotate > 90 Right.
5. Filter> Stylize> Wind . Repeat it thrice using Control+F to achieve the following result
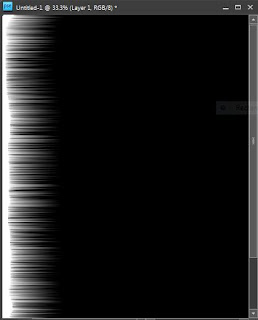
Rotate it back by 90 Left from Image>Rotate > 90 Left.
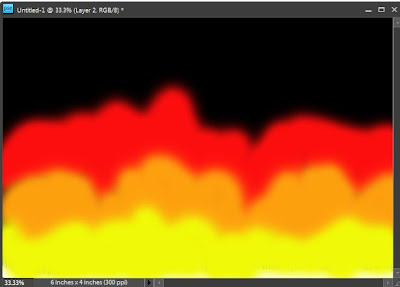
6. Now create another blank layer and use hard brush to paint the area with red, orange and yellow as shown in the figure below. Select topmost layer and go to Filter>Gaussian Blur. Set the radius to 8. Here is how it looks like after this step.
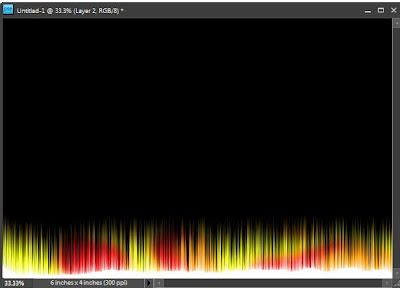
7. And now change the blending mode of this layer to Overlay (from Blending modes dropdown in layer palette). The output looks as shown below :
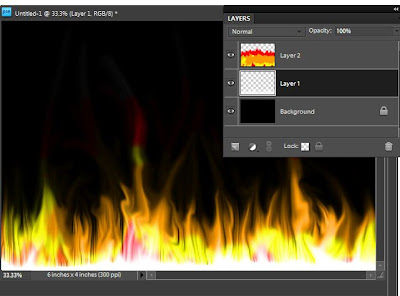
8. Now select the layer below(with wind effect, 2nd layer from bottom) and select Smudge tool from the left toolbar and start smudging it from bottom through up. It looks like this :
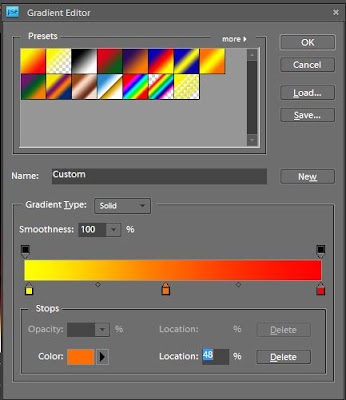
9. Now select the gradient tool and click on Edit button on topbar to define three gradient colors as shown in figure. Move the color stops such that left most is yello, middle stop is at Orange and right most at Red.
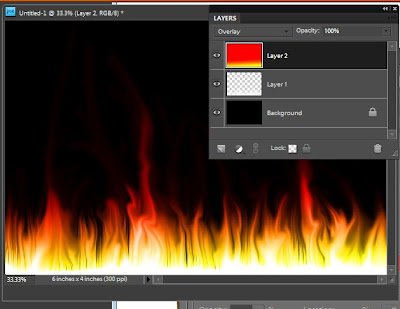
10. Now select the topmost layer in the layer palette and strike the gradient from bottom to middle.
11. Now Control+click on the middle layer(Wind layer) and go to Enhance> Adjust Color> Replace Color. Replace the white color with yellow by selecting respective colors from the color swatches in the dialog.
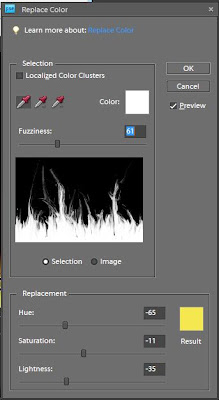
12. Click Ok and here is the final output which I got.
Read more »
1. Open a blank document with black background.
2. Create a new blank layer and paint the lower bottom area as white with brush tool as shown below
3. Now rotate it right by 90 from Image>Rotate > 90 Right.
5. Filter> Stylize> Wind . Repeat it thrice using Control+F to achieve the following result
6. Now create another blank layer and use hard brush to paint the area with red, orange and yellow as shown in the figure below. Select topmost layer and go to Filter>Gaussian Blur. Set the radius to 8. Here is how it looks like after this step.
7. And now change the blending mode of this layer to Overlay (from Blending modes dropdown in layer palette). The output looks as shown below :
8. Now select the layer below(with wind effect, 2nd layer from bottom) and select Smudge tool from the left toolbar and start smudging it from bottom through up. It looks like this :
9. Now select the gradient tool and click on Edit button on topbar to define three gradient colors as shown in figure. Move the color stops such that left most is yello, middle stop is at Orange and right most at Red.
10. Now select the topmost layer in the layer palette and strike the gradient from bottom to middle.
11. Now Control+click on the middle layer(Wind layer) and go to Enhance> Adjust Color> Replace Color. Replace the white color with yellow by selecting respective colors from the color swatches in the dialog.
12. Click Ok and here is the final output which I got.
Sunday, May 24, 2015
11,
edit,
how,
iptc,
metadata,
multiple,
of,
organizer,
photos,
pse,
to,
using
0
comments
How to edit IPTC metadata of multiple photos using PSE 11 Organizer
PSE Editor provides a way to edit IPTC metadata of an image at a time. However, Organizer did not have a way to edit IPTC metadata till Elements 11 version. With PSE 11, Organizer provides a way to edit IPTC metadata of multiple photos at a time as well.
Here is how you can achieve that:
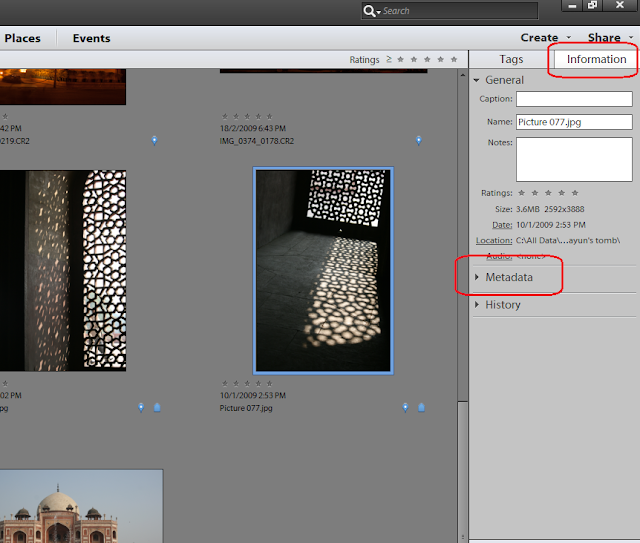
1. For a single image, select a file in Image grid in Organizer. Click on Information tab in right panel as shown, followed by expanding metadata panel as shown in the image below:
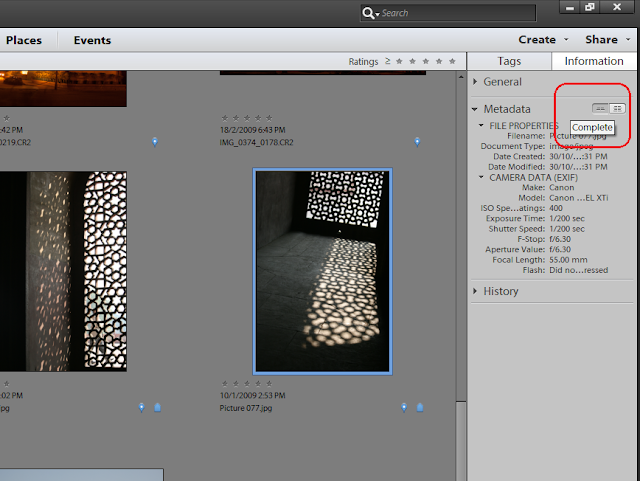
2. Click on the icon shown on right to view Complete metadata of the image selected.
3. Under IPTC header, select the button that shows 3 dots "..."
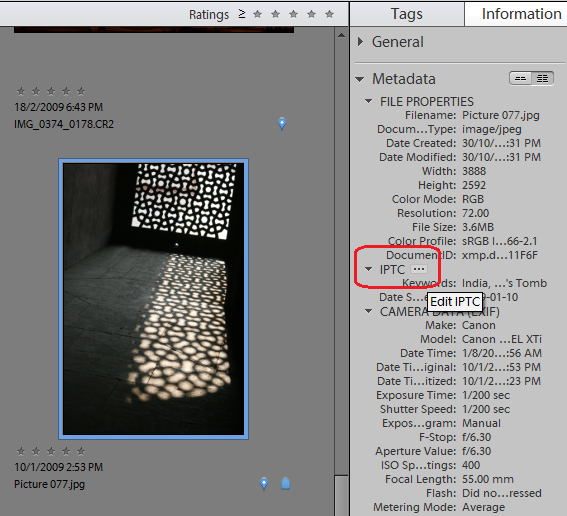
This launches the following dialog showing IPTC metadata fields. Fill in the metadata and Click Save.
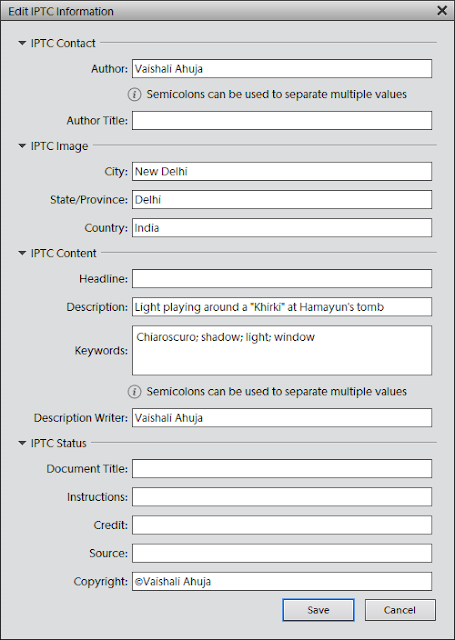
The saved metadata should now appear in metadata panel under IPTC header. To edit this metadata, go to the same dialog with the same steps as above and you can then append or overwrite the existing metadata.
To edit metadata of multiple files, you just need to select multiple files in the image grid and select "Add IPTC information: button in Information panel :
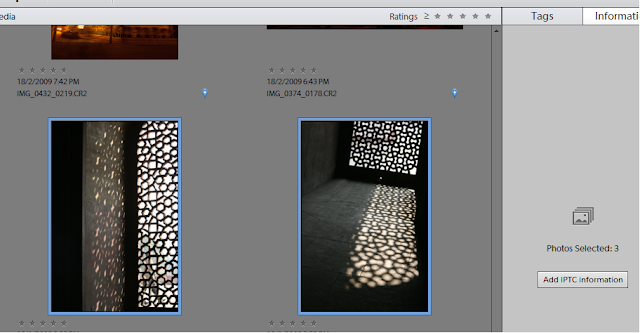
The dialog you see for multiple files is a bit different as it provides a radio button option for Author and Keywords fields to overwrite or append existing values as shown. You can use these options as desired.
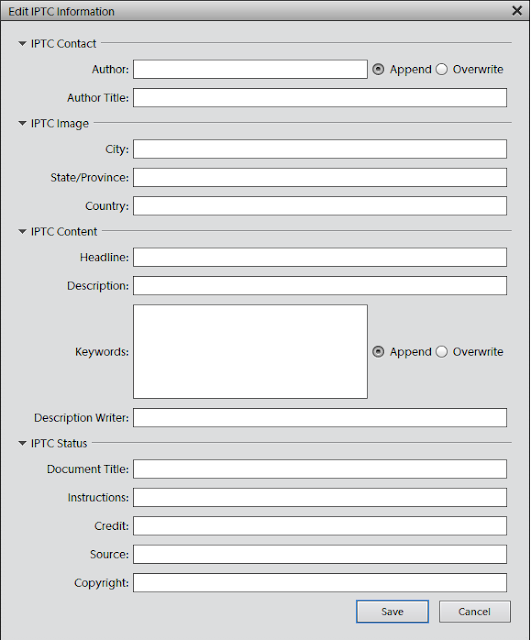
Click Save and here you go!
Here is how you can achieve that:
1. For a single image, select a file in Image grid in Organizer. Click on Information tab in right panel as shown, followed by expanding metadata panel as shown in the image below:
2. Click on the icon shown on right to view Complete metadata of the image selected.
3. Under IPTC header, select the button that shows 3 dots "..."
This launches the following dialog showing IPTC metadata fields. Fill in the metadata and Click Save.
The saved metadata should now appear in metadata panel under IPTC header. To edit this metadata, go to the same dialog with the same steps as above and you can then append or overwrite the existing metadata.
To edit metadata of multiple files, you just need to select multiple files in the image grid and select "Add IPTC information: button in Information panel :
The dialog you see for multiple files is a bit different as it provides a radio button option for Author and Keywords fields to overwrite or append existing values as shown. You can use these options as desired.
Click Save and here you go!
Saturday, May 23, 2015
a,
bring,
eyes,
focus,
how,
in,
more,
on,
potrait,
pse,
to,
using
1 comments
How to bring more focus on eyes in a potrait using PSE
1. Select Background layer in layers palette
2. Select the complete eye area ( including the white part ) using any selection tool (i used quick selection tool). Right click over the selected portion and say Layer via Copy. Name this layer in layers palette as Eyes by double clicking the layer in the palette.
3. Now select the background layer again and make a selection for the eye ball regions only. And right click and select Layer via Copy and name this layer as Eye ball.
4. Now Conrol+Click on the layer Eyes to show the eyes selected in the image. Click on Background layer and Select Inverse from right click on image area followed by Layer via Copy. Name this new layer as Blur. This constitutes the whole image except the eye region.
5. Now select the layer Blur and Filter>Blur>Gaussian Blur. Modify the blur to something like 2.5 or lesser. This is done to rest of the image leaving eyes so that eyes are prominent in the image. Click Ok. You can later on modify the opacity of the layer making it more transparent if you want to decrease the blur effect. You can do that by selecting this layer in the layer palette and moving the opacity slider on right top of layers palette.
6. Now select the layer Eyes. Go to Enhance>Adjust Sharpness. Now make changes to the amount and radius. Click Ok. You can vary the sliders as per your needs and preview it side by side in image area or preview area in the dialog. Do not oversharpen as it makes the eyes look artificial.
7. Now select only the layer Eye ball and select Enhance >Unsharp mask.
I changed the amount to near 50% and radius to near 16. This details out the pattern inside the eye ball and brings more focus to the eye region.
8. You can now also increase the saturation of this layer by Enhance>Adjust color>Adjust Hue/Saturation. You can select the Grrens from the combo box if you obly want to saturate the Green of the eyes using the Saturation slider.
Click Ok.
Here are the initial and the final images :
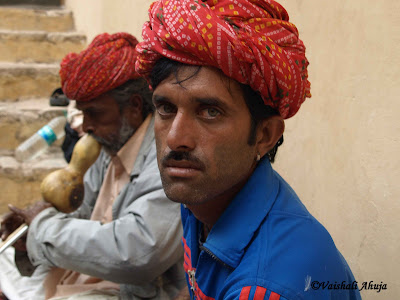
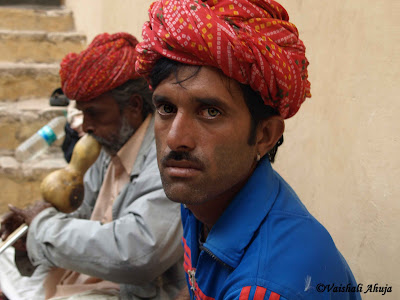
(Click to have larger views to see differences)
Monday, May 18, 2015
9,
create,
how,
pse,
reflections,
subtle,
to,
using
0
comments
How to create subtle reflections using PSE 9
Its so easy and cool to create reflections using PSE 9. It is one of the new guided edit features which is easy to follow with the instructions laid through the workflow. I am also following the steps described in the workflow to demonstrate the creation of a reflection :
1. Open any image in PSE 9 Editor that you want to create reflections of. I picked this image as when i clicked this one, I felt there was a lake missing the the silhouette.
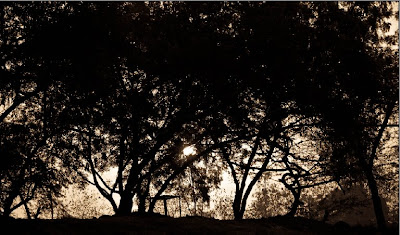
2. Click on Guided Edit tab>Fun Edits> Reflections.
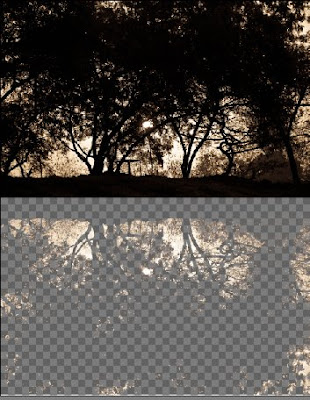
3. Click on the first button : Add Reflection. Here is the output you see after that :
4. Click on the Eye dropper tool and select one of the colors to be filled as background for the reflection. For this image I chose the mustard color as you can see from the color swatch by clicking on one of the areas with this color on the image. And as I click Fill background, I see an output as follows :
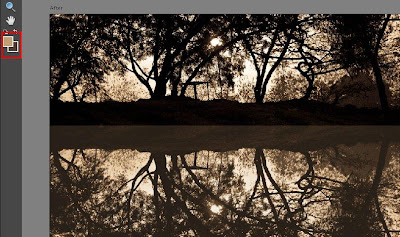
5. In the next step, you get an option to select either Floor, Glass or Water reflection. I chose Water Reflection for this particular image.
It will prompt for adding Ocean Ripple filter, followed by Motion blur to give some realistic effect.
I tried in 768 % of amount for Ocean ripple effect and 7 as distance in Motion blur.
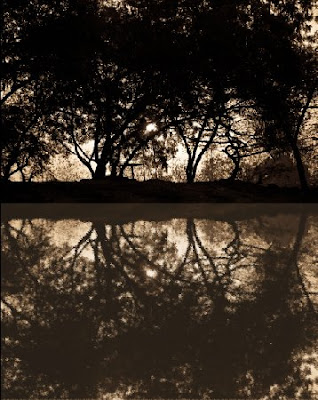
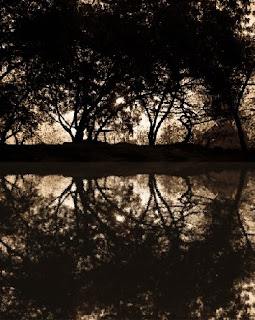
6. Adjust the Reflection intensity as per your needs. I increased it from 80 to 90.
7. Click on Add Distortion. I clicked it twice to make my reflection shorter that the actual image.
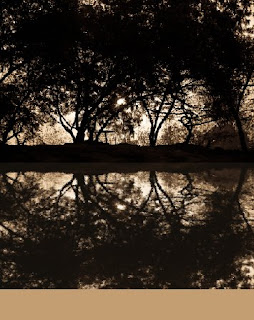
Rest of the area after shortening of reflection gets filled by your foreground color in the color swatch(the background you selected for reflection earlier)
8. Now crop this extra area in the next step using the next button Crop.
9. Once cropped you can add gradient to give more realistic look to your image. here is my final output.
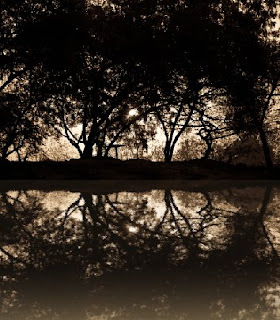
If you are not satisfied with the gradient applied with this button, you may go to full edit and select the top most layer, edit the gradient itself choosing gradient tool and selecting Edit button from top bar.
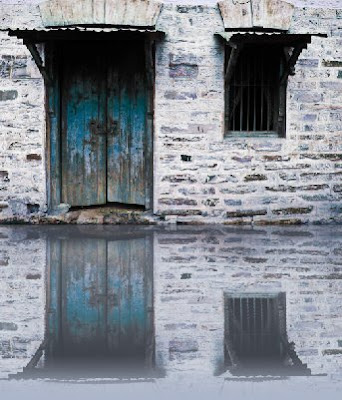
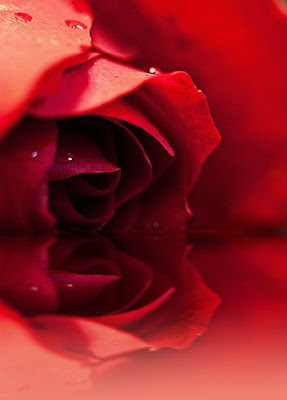
One more example of the reflection created using this feature :
Read more »
1. Open any image in PSE 9 Editor that you want to create reflections of. I picked this image as when i clicked this one, I felt there was a lake missing the the silhouette.
2. Click on Guided Edit tab>Fun Edits> Reflections.
3. Click on the first button : Add Reflection. Here is the output you see after that :
4. Click on the Eye dropper tool and select one of the colors to be filled as background for the reflection. For this image I chose the mustard color as you can see from the color swatch by clicking on one of the areas with this color on the image. And as I click Fill background, I see an output as follows :
5. In the next step, you get an option to select either Floor, Glass or Water reflection. I chose Water Reflection for this particular image.
It will prompt for adding Ocean Ripple filter, followed by Motion blur to give some realistic effect.
I tried in 768 % of amount for Ocean ripple effect and 7 as distance in Motion blur.
7. Click on Add Distortion. I clicked it twice to make my reflection shorter that the actual image.
Rest of the area after shortening of reflection gets filled by your foreground color in the color swatch(the background you selected for reflection earlier)
8. Now crop this extra area in the next step using the next button Crop.
9. Once cropped you can add gradient to give more realistic look to your image. here is my final output.
If you are not satisfied with the gradient applied with this button, you may go to full edit and select the top most layer, edit the gradient itself choosing gradient tool and selecting Edit button from top bar.
One more example of the reflection created using this feature :
Saturday, May 16, 2015
9,
a,
create,
hard,
how,
portrait,
pse,
rock,
style,
to,
using
0
comments
How to create a portrait hard rock style using PSE 9

2. Create a copy of the background layer by pressing Control+J
3. Now select the copy of the background layer and go to Enhance>Convert to Black and White.The following dialog will pop up. You may choose any preset available in the dialog or making changes using the sliders. Click Ok
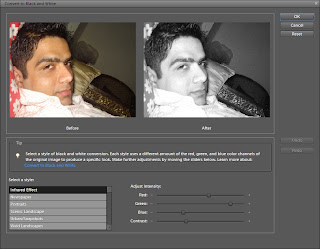
4. Now Select this background copy and rename the layer as Overlay. Keeping this layer selected, change the blending mode of this layer to Overlay from the combo box.

6. Now select Burn tool from toolsbar and brush it over the highlights in the resultant image. You may try the combo box options with the blur tool on top toolbar - Highlights, mid tones, shadows.

Here are my initial and final images :

Friday, May 15, 2015
create,
how,
picture,
pse10,
stacks,
to,
using
1 comments
How to create picture stacks using PSE10
The following two pictures illustrates the "Picture Stack" effect available in PSE10.
This new feature in PSE 10 allows you to get this effect in a couple of minutes<probably less than that>.
Here are the steps :
1. Open the source image in Editor.
2. Go to Guided Edits
3. In the Photo Play category, select "Picture Stack"
4. The next screen appears showing three steps :
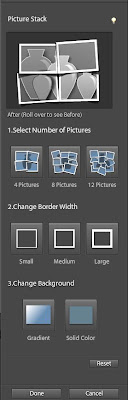
In first step, you can choose the number of pictures in the stack you would like to see. The options are 4, 8, 12.
Once you select that, you can select border width of each photo frame. Teh three options are : Small, Medium and large.
The third ioption allows you to fill the background areas which are shown behind the frames with a solid color or gradient.
In these three clicks your output is ready.
However you may tweak the results like rotating any picture stack or moving it to a different orientation etc in the Full edit.
Select the Move tool in full edit and use it for moving any picture stack to a different position and commit the operation.
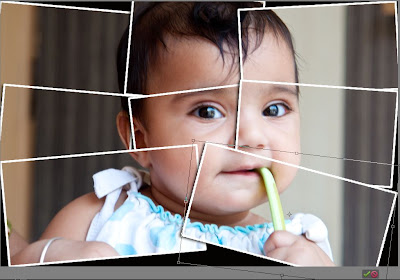
Once commited, the result would appear as shown :
Let me know if you find this useful!
 |
| Original image |
 |
| After Picture stack effect was added |
This new feature in PSE 10 allows you to get this effect in a couple of minutes<probably less than that>.
Here are the steps :
1. Open the source image in Editor.
2. Go to Guided Edits
3. In the Photo Play category, select "Picture Stack"
 |
| 2nd option in the category. |
4. The next screen appears showing three steps :
In first step, you can choose the number of pictures in the stack you would like to see. The options are 4, 8, 12.
Once you select that, you can select border width of each photo frame. Teh three options are : Small, Medium and large.
The third ioption allows you to fill the background areas which are shown behind the frames with a solid color or gradient.
In these three clicks your output is ready.
However you may tweak the results like rotating any picture stack or moving it to a different orientation etc in the Full edit.
Select the Move tool in full edit and use it for moving any picture stack to a different position and commit the operation.
Once commited, the result would appear as shown :
 |
| Final result |
Let me know if you find this useful!
Wednesday, May 13, 2015
and,
content,
create,
have,
how,
in,
own,
panels,
pse,
templates,
them,
theme,
to,
using,
your
0
comments
How to create your own theme templates using PSE and have them in your content panels
You can create your own custom themes for the different creations like Greeting card, Photo book, CD/DVD jacket etc and have them placed in your content panel of Photoshop Elements Editor.
Here are the steps with which I created my own theme "Mothers Day" for Mothers day and had it placed in my content panel.
1. Create a blank file from File>New>Blank File. Select default size of the file.
2. Now paint it with the color you like. I painted pink and used gradient tool to give non monotonous effect of the background.
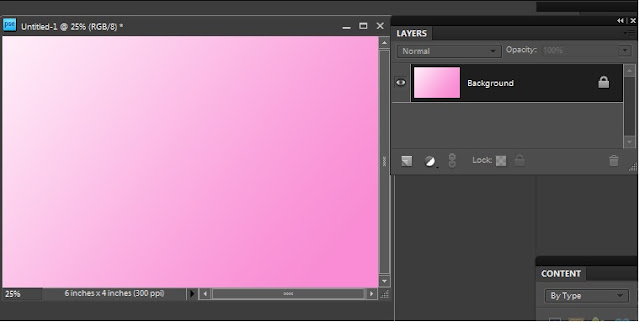
3. Save this as a jpeg on your hard drive. This step is workaround for PSE8 where there is no way of creating a smart object from a leyer as we had in PSE7. Once you have saved the jpeg, click on close widget of the file you were previously working with. It will ask you to save the untitled file. Say No. This will bring back the file you were working till step 2.
4. Now select the background layer from layers pallette and File>Place and select the jpeg saved at step 3. Click on the green checkmark shown shown over the image.
As soon as you do this, you would notice that there is a layer created as a smart object with a tiny icon on the layer thumbnail as shown below. And this layer is exactly as your background layer.
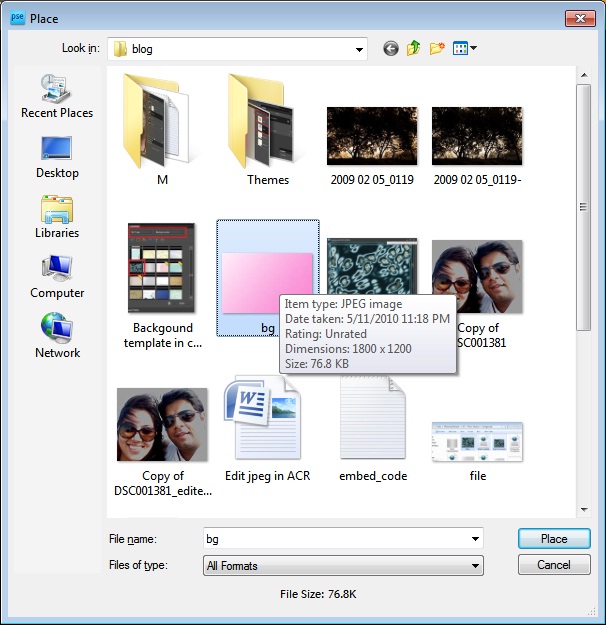
So by now, you would have understood why we saved the background as a separate jpeg in step3. The reason is, in PSE8, we can create smart objects using File>Place. In PSE 7, we do not need the step 3 as we can directly create the background layer as a smart object. This is a workaround in PSE8.
5. Now you can create a duplicate of this smart object layer by pressing Control+J and delete the original background layer.
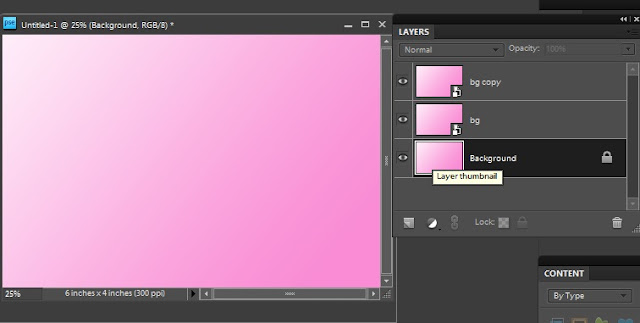
6. From Window meniu, select Content. This will result in Content pane appear in right hand panel.
7. Select "By Type" from Category and "Frames" in sub category.
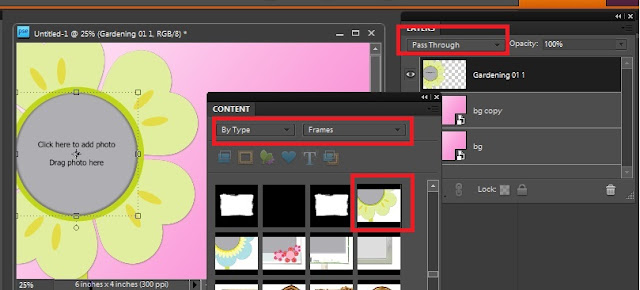
8. Drag a frame from the frames shown in the content bin to the image. Once you do this, you will notice that the blending mode for the frame dropped is "Pass through".
9. Add text layer and put some text to your theme. I am creating a Mothers day greeting card template in this example. So I added the text as shown below.
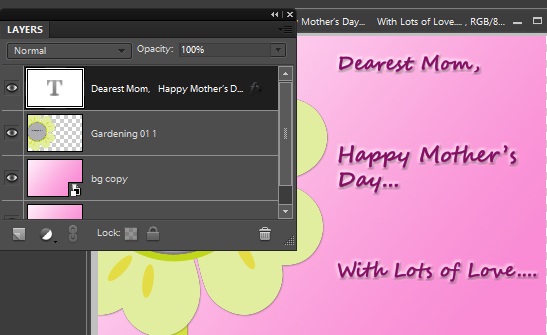
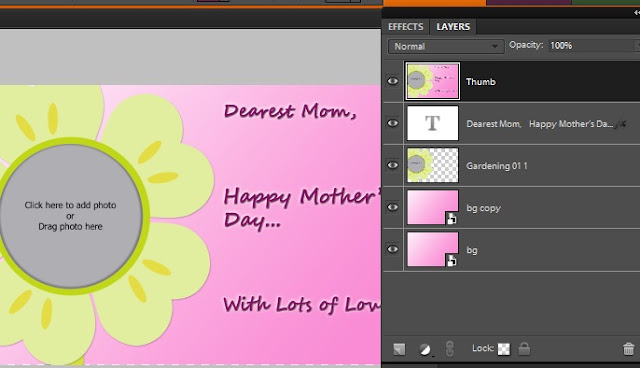
11. Save this file as a psd. I saved it as "Mothers day.psd"
12. Create a template file with name "<filename>.metadata.xml". I created "Mothers day.metadata.xml"
13. Copy the following into your xml file :
**************************************************************************
Also note that you can edit the categories and sub categories as per your needs. For example my above theme will appear under category Event and sub category Celebration. Similarly in category Color and sub category Pink.
You can customize these as per your needs.
14. Now place your jpeg and your metadata xml file at location :
On XP : C:Documents and SettingsAll UsersApplication DataAdobePhotoshop Elements8.0Photo Creations hemes
On Win 7 : C:ProgramDataAdobePhotoshop Elements8.0Photo Creations hemes
Please make sure that your Editor is closed and you relaunch it to see the background created in your content pane.
If you still do not find it in the content pane in Background category, close Editor and rename the file : "C:Documents and SettingsAll UsersApplication DataAdobePhotoshop Elements8.0Localeen_USMediaDatabase.db3" followed by application relaunch. The launch may take sometime as application creates thumbnails for your background at the location where you have created your jpeg.
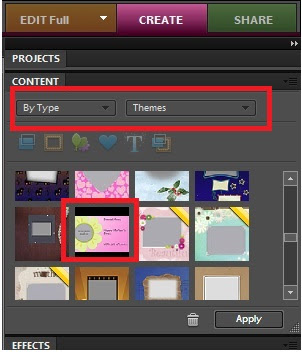
After relaunch, here is where I see my Mothers day theme in Content Panel from Create Pane>Photo Book or Greeting Card :
I hope you find this tutorial useful!
Read more »
Here are the steps with which I created my own theme "Mothers Day" for Mothers day and had it placed in my content panel.
1. Create a blank file from File>New>Blank File. Select default size of the file.
2. Now paint it with the color you like. I painted pink and used gradient tool to give non monotonous effect of the background.
3. Save this as a jpeg on your hard drive. This step is workaround for PSE8 where there is no way of creating a smart object from a leyer as we had in PSE7. Once you have saved the jpeg, click on close widget of the file you were previously working with. It will ask you to save the untitled file. Say No. This will bring back the file you were working till step 2.
4. Now select the background layer from layers pallette and File>Place and select the jpeg saved at step 3. Click on the green checkmark shown shown over the image.
As soon as you do this, you would notice that there is a layer created as a smart object with a tiny icon on the layer thumbnail as shown below. And this layer is exactly as your background layer.
So by now, you would have understood why we saved the background as a separate jpeg in step3. The reason is, in PSE8, we can create smart objects using File>Place. In PSE 7, we do not need the step 3 as we can directly create the background layer as a smart object. This is a workaround in PSE8.
5. Now you can create a duplicate of this smart object layer by pressing Control+J and delete the original background layer.
6. From Window meniu, select Content. This will result in Content pane appear in right hand panel.
7. Select "By Type" from Category and "Frames" in sub category.
8. Drag a frame from the frames shown in the content bin to the image. Once you do this, you will notice that the blending mode for the frame dropped is "Pass through".
9. Add text layer and put some text to your theme. I am creating a Mothers day greeting card template in this example. So I added the text as shown below.
10. Now select all the layers in the palette and right click>Duplicate. This will create duplicate of all layers. Right click again and Merge. name this layer as thumb.
12. Create a template file with name "<filename>.metadata.xml". I created "Mothers day.metadata.xml"
13. Copy the following into your xml file :
**************************************************************************
<?xml version="1.0" encoding="UTF-8"?><PSEContent xmlns="http://ns.adobe.com/PSEContent/2.0/"><name value="$$$/content/themes/Mothers Day=Mothers Day" /><type value="theme" /><creation value="1x1" /><creation value="2x3" /><creation value="3x4" /><creation value="cddvdlabel" /><creation value="cdjacket" /><creation value="dvdjacket" /><creation value="photobook" /><creation value="1x1photobook" /><creation value="3x4photobook" /><category value="$$$/content/category/Event=Event"><subcategory value="$$$/content/category/Event/Celebration=Celebration" /></category><category value="$$$/content/category/Color=Color"><subcategory value="$$$/content/category/Color/Pink=Pink" /></category><category value="$$$/content/category/Style=Style"><subcategory value="$$$/content/category/Style/Cute=Cute" /></category><category value="$$$/content/category/Object=Object" /><category value="$$$/content/category/Mood=Mood"><subcategory value="$$$/content/category/Mood/Fun=Fun" /></category><keyword value="$$$/content/keyword/Toys=Toys" /></PSEContent>
**************************************************************************
Replace the text in the tag with your filename : <name value="$$$/content/themes/<filename>=<filename>" />Also note that you can edit the categories and sub categories as per your needs. For example my above theme will appear under category Event and sub category Celebration. Similarly in category Color and sub category Pink.
You can customize these as per your needs.
14. Now place your jpeg and your metadata xml file at location :
On XP : C:Documents and SettingsAll UsersApplication DataAdobePhotoshop Elements8.0Photo Creations hemes
On Win 7 : C:ProgramDataAdobePhotoshop Elements8.0Photo Creations hemes
Please make sure that your Editor is closed and you relaunch it to see the background created in your content pane.
If you still do not find it in the content pane in Background category, close Editor and rename the file : "C:Documents and SettingsAll UsersApplication DataAdobePhotoshop Elements8.0Localeen_USMediaDatabase.db3" followed by application relaunch. The launch may take sometime as application creates thumbnails for your background at the location where you have created your jpeg.
After relaunch, here is where I see my Mothers day theme in Content Panel from Create Pane>Photo Book or Greeting Card :
I hope you find this tutorial useful!
Subscribe to:
Posts (Atom)


- Follow Us on Twitter!
- "Join Us on Facebook!
- RSS
Contact