Showing posts with label surreal. Show all posts
Showing posts with label surreal. Show all posts
Tuesday, March 31, 2015
desert,
in,
photoshop,
scene,
surreal
0
comments
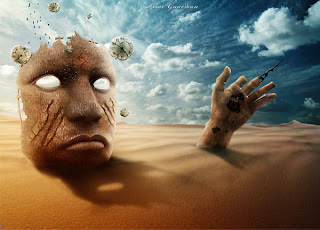
Surreal Desert Scene in Photoshop
Materials Needed:
- Desert 1
- Desert 2
- Iron mask
- Clock
- Bronze Hand
- Gearing Brushes
- Galaxy Brushes
- Bird Brushes
- Sky
- Tree texture
- Celtic Rune Charm Pack
Step 1: Create a new document and add the sky

Step 2: Add a small galaxy on the sky

Step 3: Add the first desert stock photo

Note: You can also use the Eraser Tool (E) and a soft brush to erase some parts of the sky from this photo.
Step 4: Duplicate the "desert 1" layer

Step 5: Add the second desert stock photo

Note: Arrange the image from this step in a way that makes visible the hills of the other two desert photos beneath it.
Step 6: Add the iron mask

Step 7: Add a Gradient Overlay layer style to the iron mask

Step 8: Mask the bottom area of the iron mask

Step 9: Add a Levels adjustment layer

Step 10: Create a shadow for the iron mask

Step 11: Add a sign on the iron mask’s forehead

Step 12: Add two scars to the iron mask

Step 13: Create some lights coming out of the iron mask’s eyes

Step 14: Add a bronze hand

Step 15: Make some color adjustments to the hand

Step 16

Step 17: Add a texture to the hand

Step 18: Use the iron mask as a texture for the hand

Step 19: Create a clock needle

Step 20: Color the hand in orange

Step 21: Create some gears

Step 22: Adjust the lights and the shadows of the iron mask

Note: when you have the Dodge Tool or the Burn Tool selected you can use the Alt key to quickly shift between them.
Step 23: Create a shadow for your hand

Step 24: Add some clocks

Repeat this step to add more clocks to your image. Change the size of each clock and rotate them. Take a look at the following image for reference. Select all your clock layers and merge them together (Ctrl+E). Name this layer "clocks."
Step 25: Add a shadow to the clocks

Step 26

Step 27: Add some birds

Step 28: Final color adjustments

Step 29

Step 30

Step 31

Final Result
I hope you enjoyed this tutorial and that you learned something new. What we have obtained is a photo-manipulation with some ruins in the desert; the clocks, the gears and the clock needle make everything to gravitate around the time theme.
Author : Ciursa Ionut
 About The Writer
Hello! My name is Tommy. Im a blogger, I love graphics design and now i went to Architechture Technical Senior High School. | Facebook |

Monday, March 30, 2015
manipulation,
mannequin,
photo,
surreal
0
comments
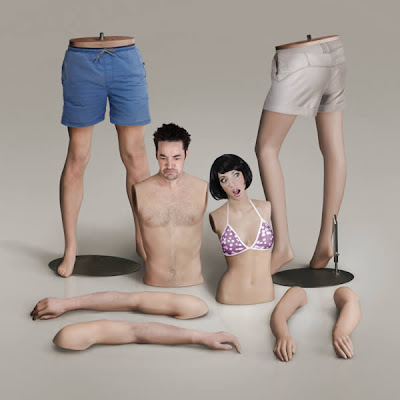
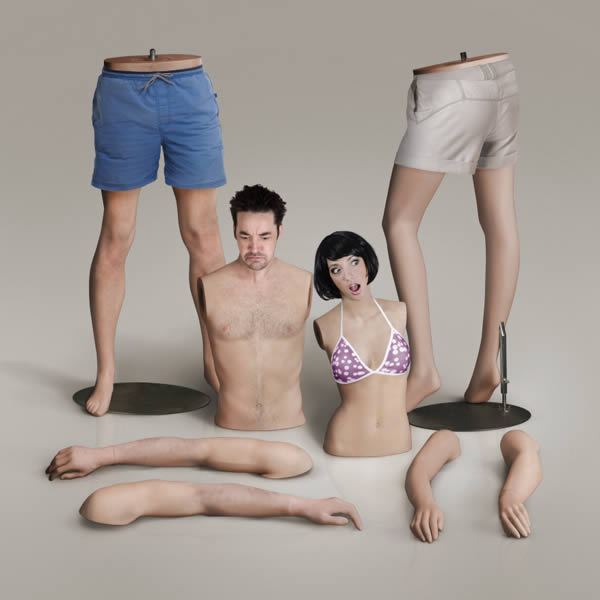
Surreal Mannequin Photo Manipulation
Tutorial Assets
You’ll find the Photoshop PSD file in a directory labeled "source" that came in the ZIP file that you downloaded. You may wish to look through it briefly before we begin.You’ll need the following stock images to complete this tutorial.
- Mannequin one, mannequin two and mannequin three by Marcus Ranum
- Portrait one (medium-sized version)
- Portrait two (medium-sized version)
- Bikini model one
- Bikini model two
- Woman in shorts
- Man in shorts (medium-sized version)
- Man’s legs (medium-sized version)
- Woman’s arm
- Man’s arm
- Barbarian warrior
Step 1
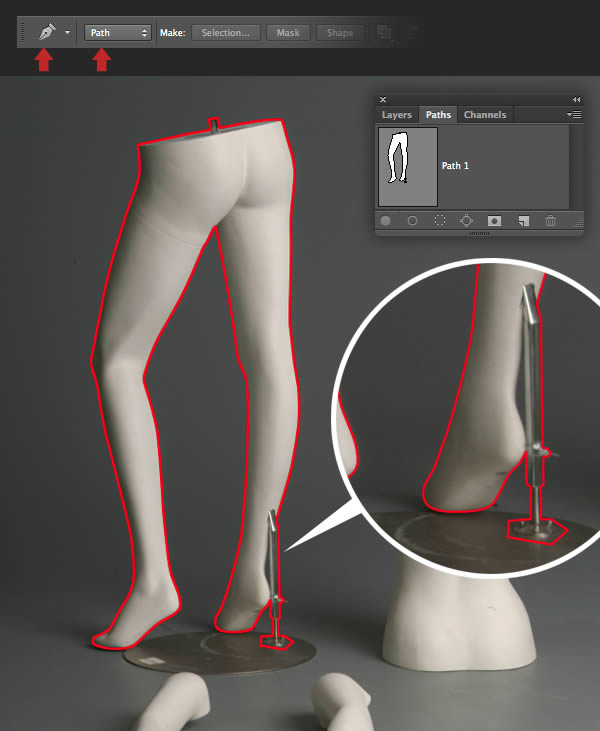
Photoshop has many tools to help us isolate subjects from their backgrounds; most rely on a good contrast from the object we need to select and the background color. Some of techniques we’ll explore later in this tutorial. Unfortunately, for our initial images there’s no quick fix to accurately achieve this.The tool that offers most control is the Pen (P) which creates vector paths. It’s this tool that causes the most fear and frustration amongst new users, but at the same time it’s revered by those who have taken time to get to know it.
Open the first mannequin image and set the Pen (P) to Path in the Options bar. Zoom right in and carefully plot a closed path around the mannequin’s legs, including the support pole as indicated in red. Hold Cmd/Ctrl to access the Direct Selection tool to adjust individual direction/anchor points to fine-tune your path. Now double-click the path thumbnail and label it "Path 1;.
Step 2
Use the same technique to draw two more closed paths around the mannequin’s arms, again indicated in red.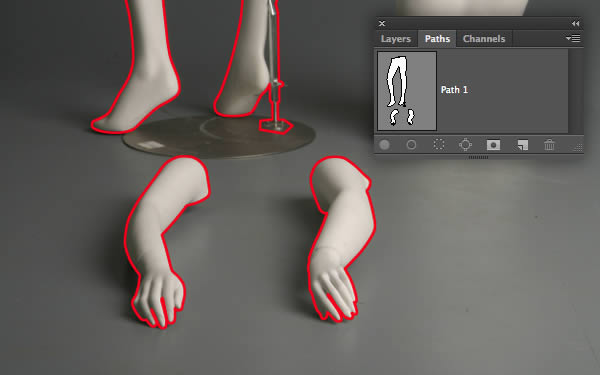
Step 3
We now need to create a sub-path around the inner of the ankle and the pole. Set the Pen to Exclude via the drop-down menu the Options bar and create another path as shown.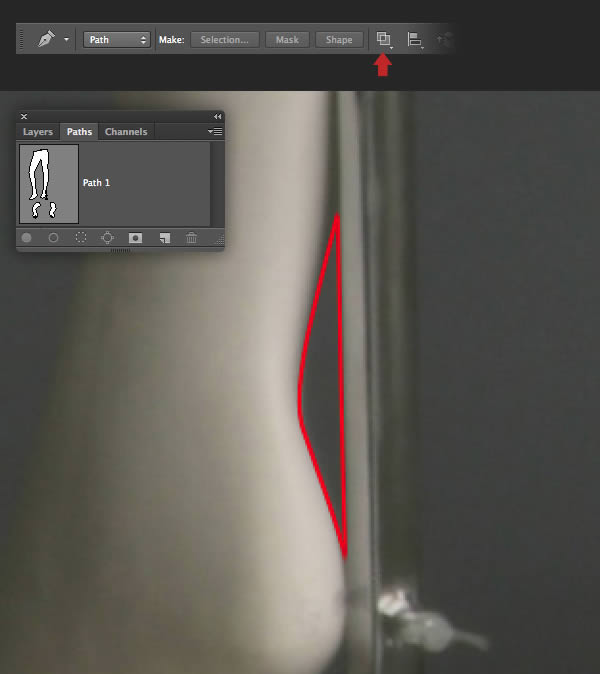
Step 4
Drawing a perfect elliptical path with the Pen Tool is a little tricky. Click the Create new path icon at the foot of the Paths tab and name it "Path 2". Activate the Ellipse option found under the Shape Tool (U) and ensure it’s set to Path again. Now draw an ellipse to match the base plate – don’t sweat if your path is a little inaccurate at this stage, it can easily be fixed, as you’ll discover next.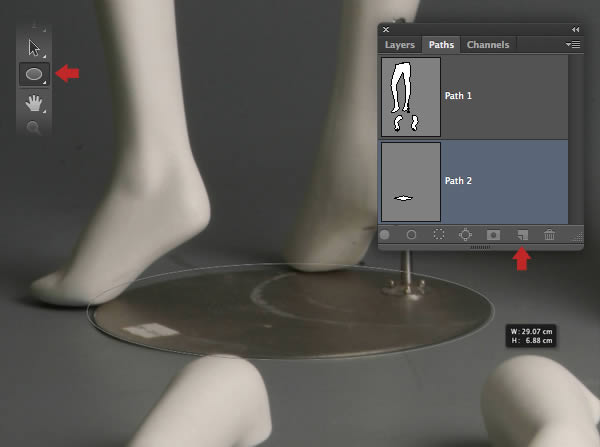
Step 5
To make your path an exact match, first use the Path Selection Tool (A) to select it, then hit Cmd/Ctrl + T to access Transform and scale/rotate accordingly. You can also use the Direct Selection option as you did earlier to tweak individual direction/anchor points as required.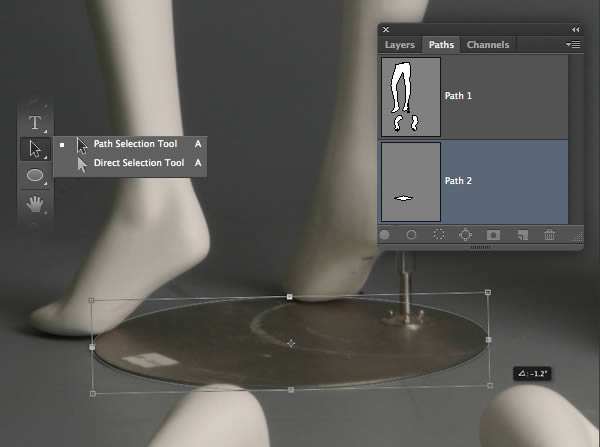
Step 6
You should now have two separate paths. "Path 1" (indicated in red) around the mannequin’s legs/arms and "Path 2" (indicated in yellow) around the base of the stand.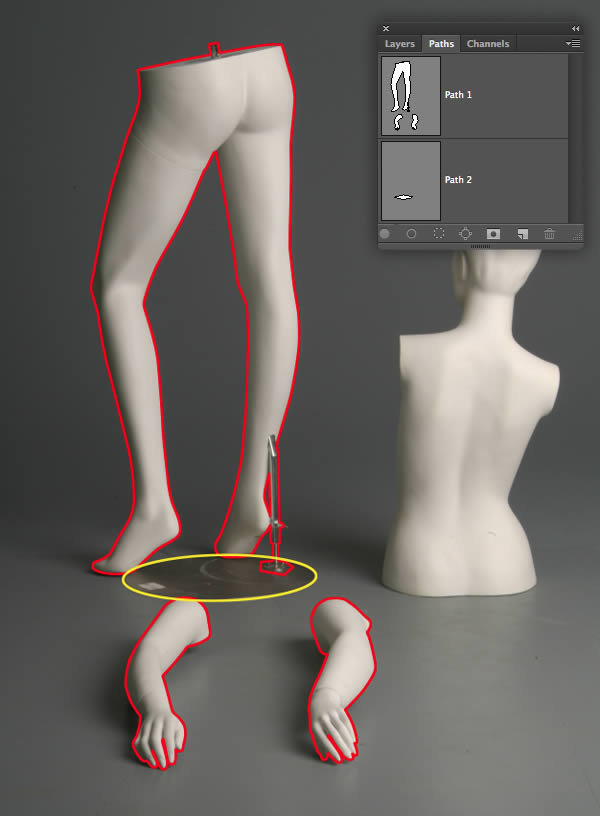
Step 7
Cmd/Ctrl-click the "Path 2" thumbnail to generate a selection, then switch to the Layers tab. Pick any selection tool, then click the Refine Edge button in the Options bar. In the following window choose On Layers (L) from the drop-down menu, set the Feather amount to 0.3px, leave the other settings at zero, ensure Output is set to New Layer with Layer Mask, check Remember settings and hit OK. You’ll now see a duplicate masked layer appear and the visibility of the original layer disabled.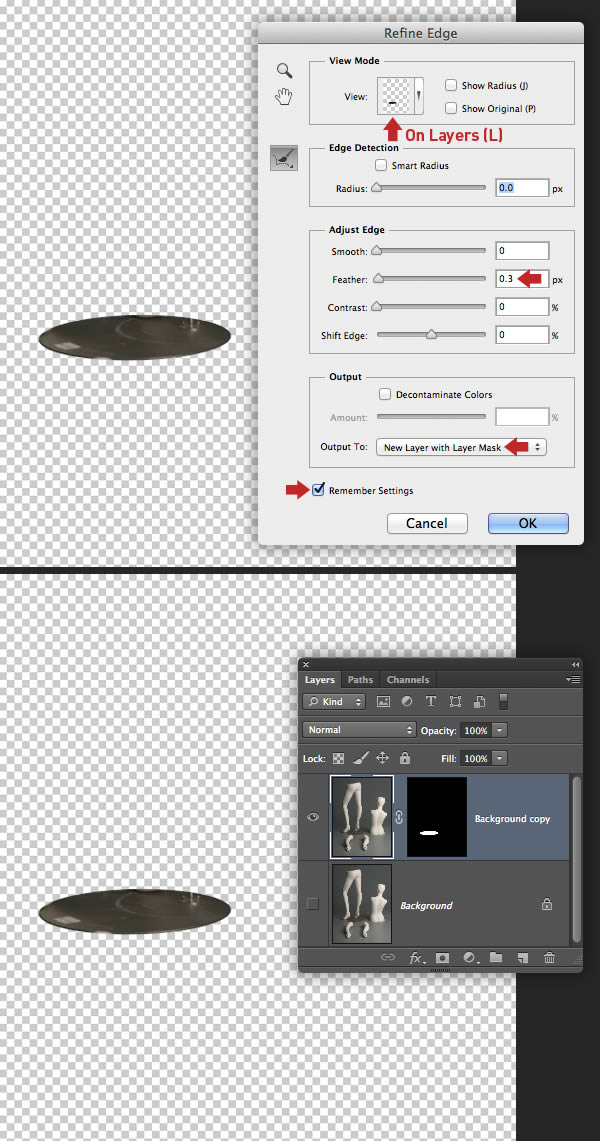
Step 8
Now make a selection from "Path 1" and repeat the previous step to create another masked layer.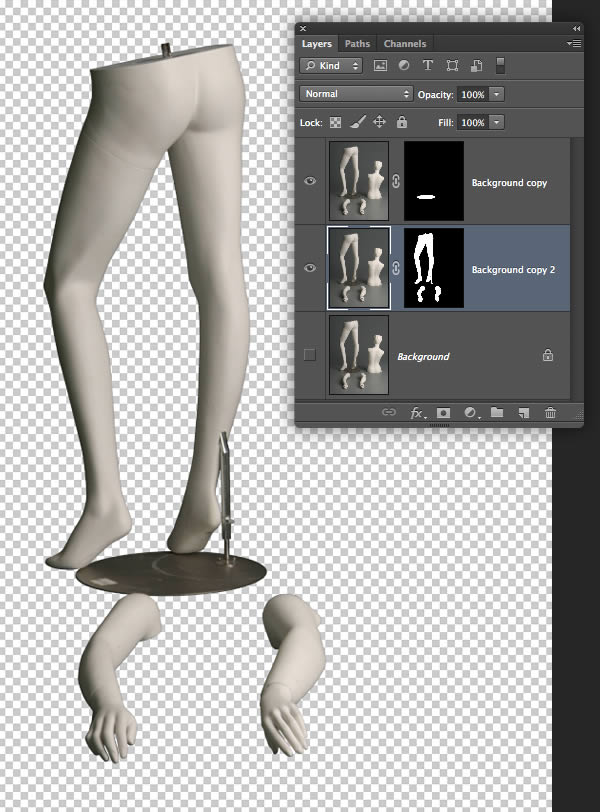
Step 9
Both masks are no longer required, so drag their thumbnails into the trash icon at the foot of the Layers tab and click the Apply button in the next window.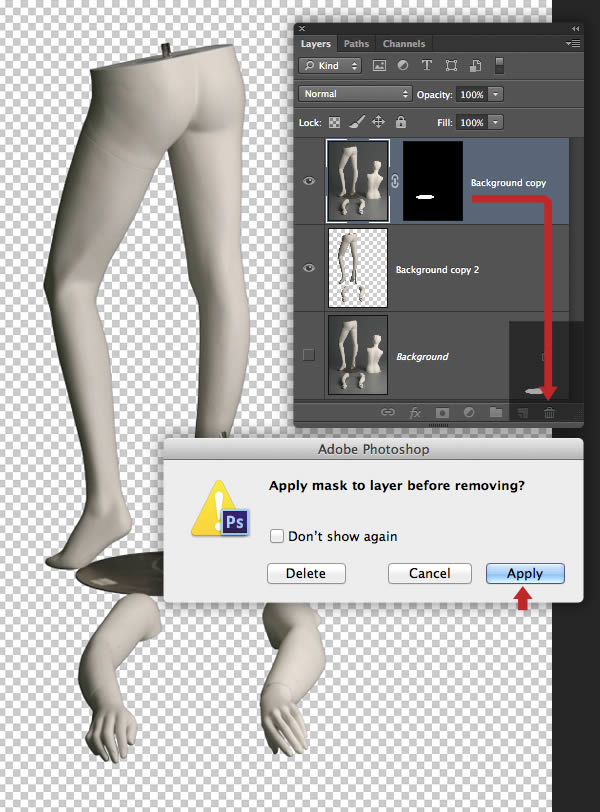
Step 10
Target the top layer thumbnail, then press Cmd/Ctrl + E to Merge Down.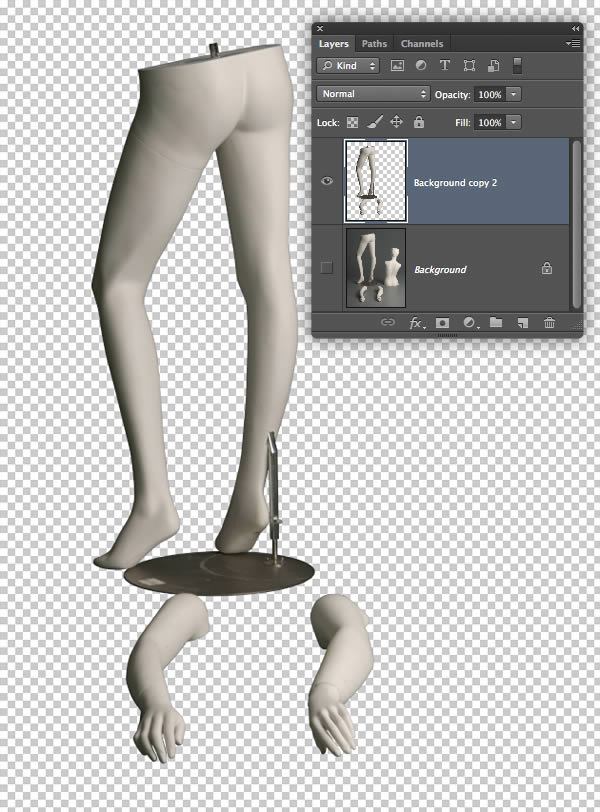
Step 11
Open the second mannequin image and use the same method to draw a closed path around the head and torso.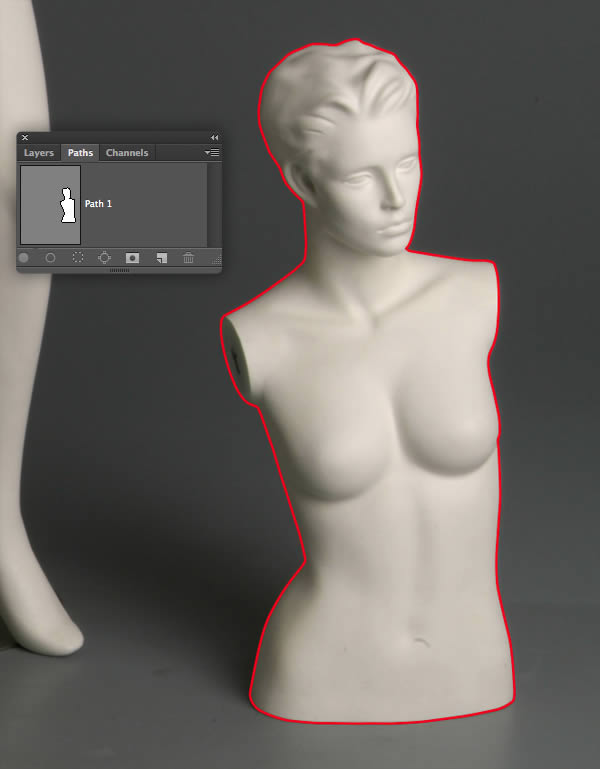
Step 12
Create a path-based selection, repeat the same Refine Edge command, then delete and Apply the mask.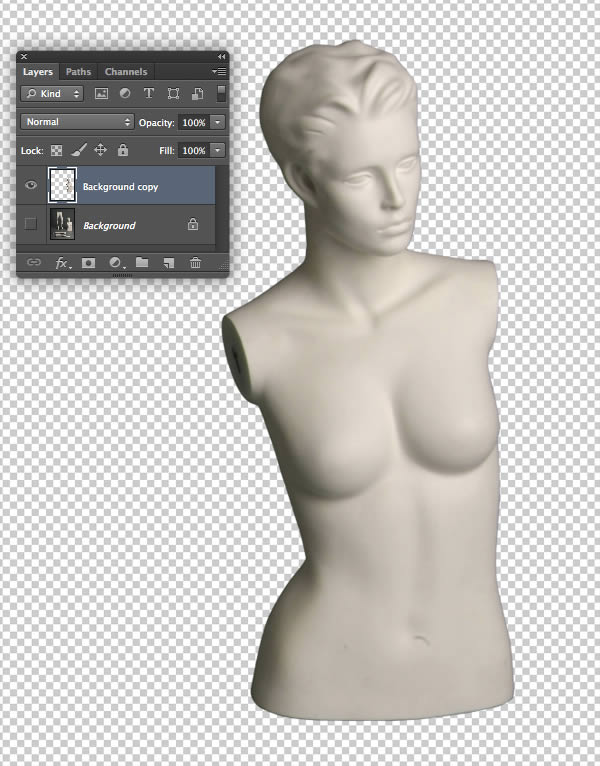
Step 13
Open the third mannequin image and create two closed paths (one around the body parts and one around the base plate) exactly as you did for the first mannequin.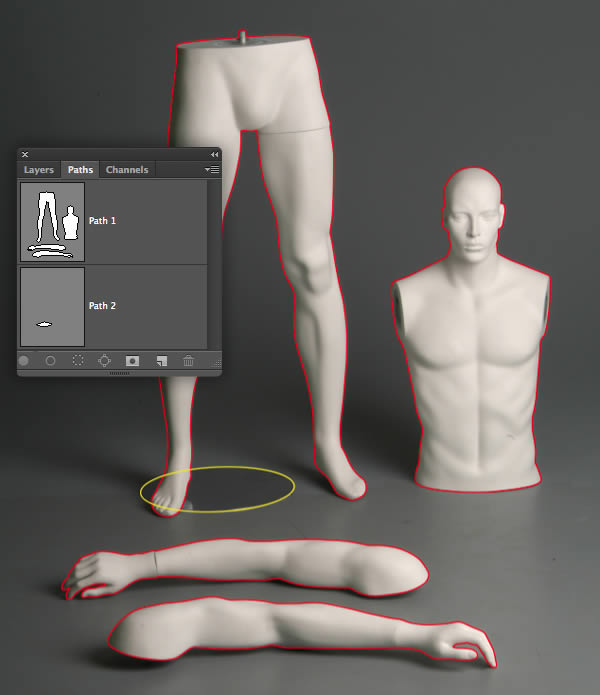
Step 14
Repeat the same workflow to create a single cut out layer.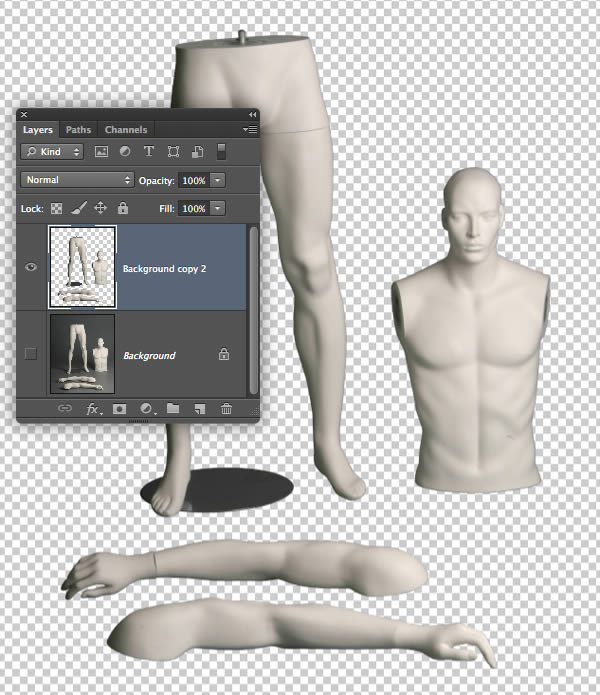
Step 15
Over the next few steps we’ll assemble the separate mannequin body parts into a single scene. Although we’ve used different elements from various photos, the consistency in lighting will make the final result more convincing.Create a new square canvas 29.7cm with the Resolution at 300dpi, the Color Mode in RGB and the Background Contents set to White.
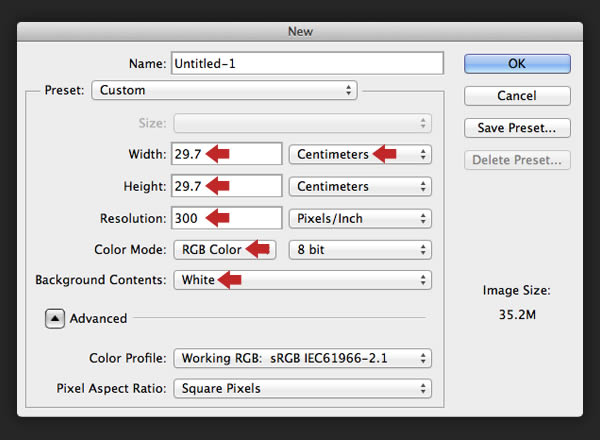
Step 16
Drag over the last isolated mannequin layer into your new document and label it "Male mannequin arms/legs" Grab the Lasso Tool (L) and roughly drag a selection around the head and torso. Now press Shift + Cmd/Ctrl + J to cut the selection to a new layer. Select the Move Tool (V) and reposition to overlap the right leg as shown. Name the new layer "Male mannequin torso".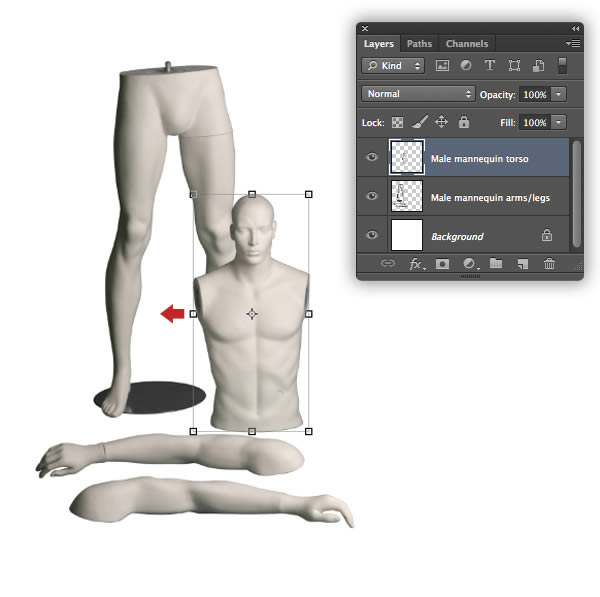
Step 17
Import the first mannequin to create a top layer and name it "Female mannequin arms/legs". Next, add the second mannequin as another top layer and name this "Female mannequin torso". Enlarge/reduce these layers to fix any size differences and reposition as shown.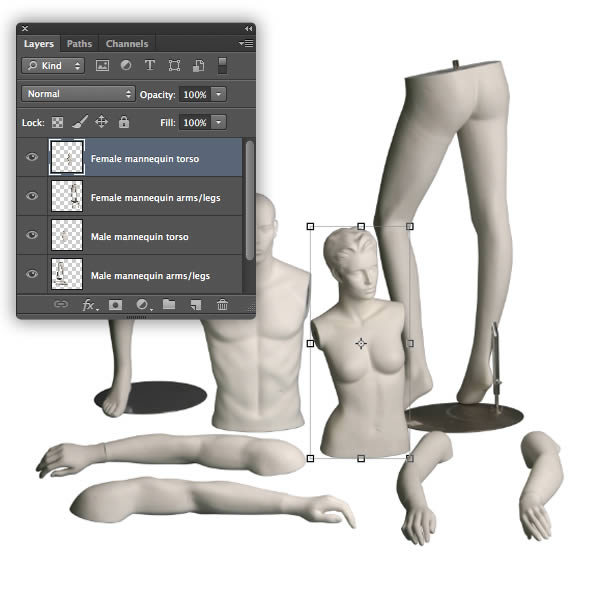
Step 18
To move elements on the same layer, use the Lasso Tool (L) to roughly draw around the body part, then reposition. In this screenshot I moved the female’s arm (on the "Female mannequin arms/legs" layer) to the left slightly.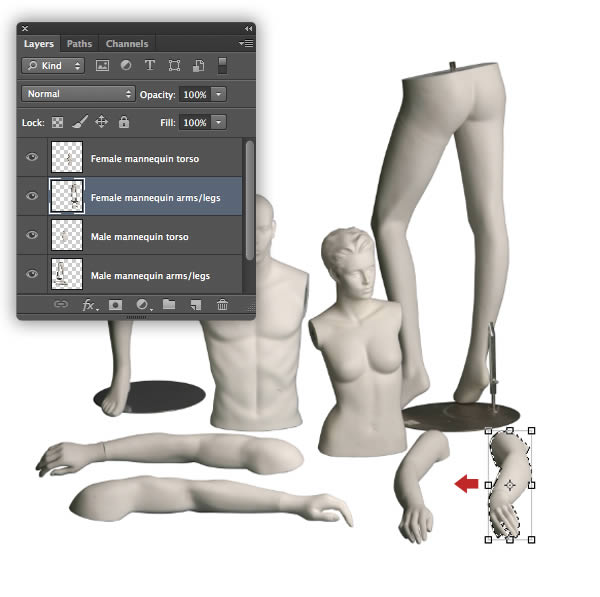
Step 19
Hold Shift, highlight all your mannequin layer thumbnails and resize/position them in one transformation.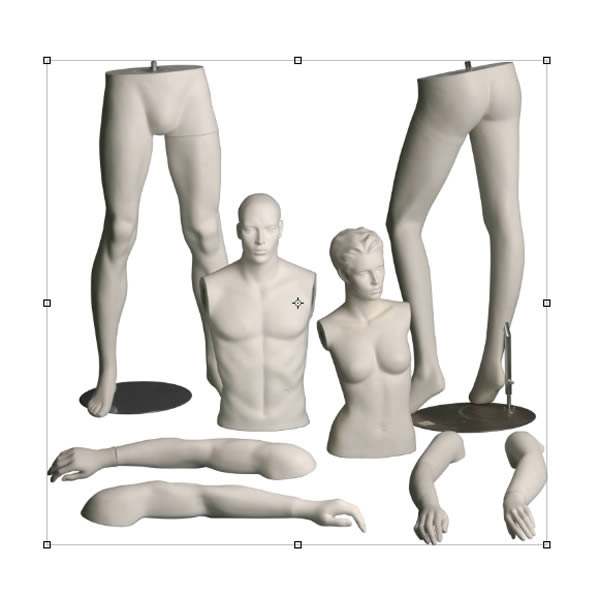
Step 20
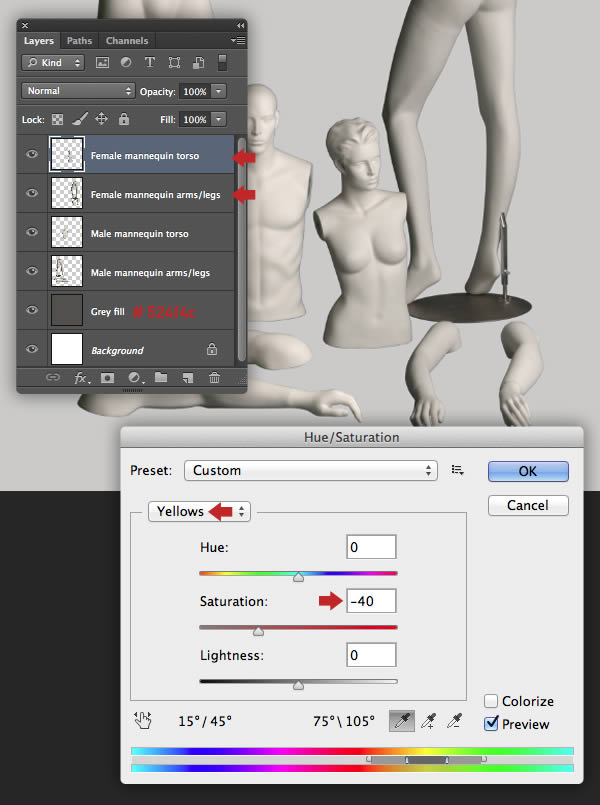
At this point we’ll add a neutral grey background. Set your Foreground color to # 524f4c, then place an empty layer below all the mannequins and hit Alt + Delete to fill with the Foreground grey. Reduce the Opacity of this layer to 30% and label it "Grey fill".The female mannequin appears a little too yellow, so target the "Female mannequin arms/legs" layer and hit Cmd/Ctrl + U to access Hue/Saturation and reduce the Yellows Saturation to -40. Repeat this on the "Female mannequin torso" layer too.
Step 21
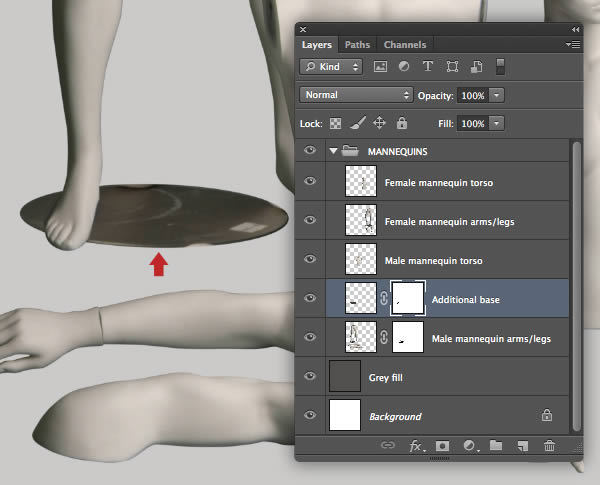
At this stage the male mannequin’s base plate looks at the wrong angle; to fix this, revisit your first female mannequin layered file, generate a selection from "Path 2", then use the Refine Edge command to create a new layer. Delete/Apply the mask and add this as a new layer above "Male mannequin arms/legs".Name this layer "Additional base" and position over the existing base plate. Add a mask to this and the underlying layer, then use a small, hard-edged black Brush (B) on both masks to blend the new base plate as shown.
Step 22
Cmd/Ctrl-click the "Additional base" thumbnail to create a layer-based selection. Set the Clone Stamp Tool (S) to Current Layer and use a small soft-edged brush to remove any scuffs and scratches from the base plate. Now use the same selection/cloning technique to fix the base plate on the "Female mannequin arms/legs" layer.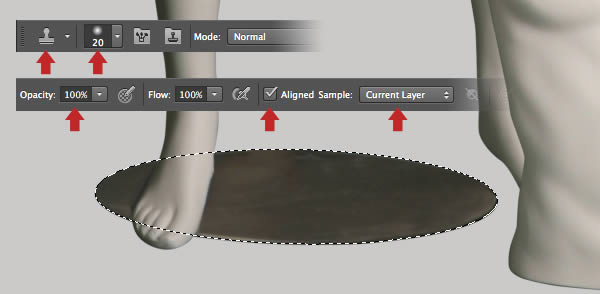
Step 23
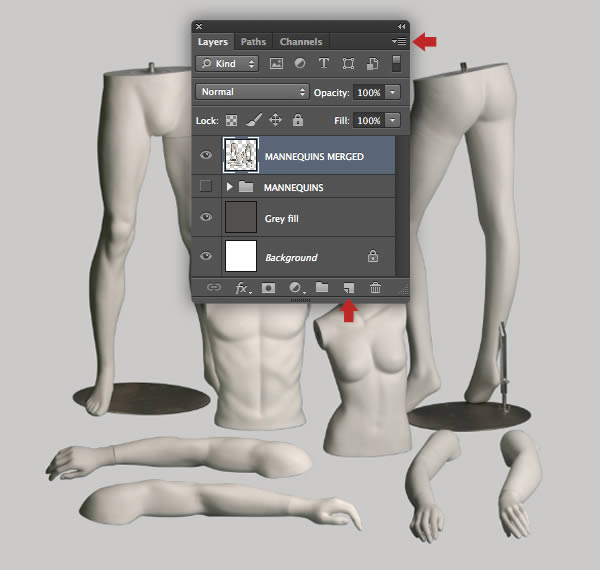
Zoom in and clean up any small blemishes on the figures with a combination of the Healing Brush and Patch Tools (J).Highlight all your mannequin layers, then choose New Group from Layers from the top-right fly-out menu and name it "MANNEQUINS" in the following window. Drag the folder icon over the Create a new layer icon at the foot of the palette to duplicate it. Now hit Cmd/Ctrl + E to Merge Group and rename it "MANNEQUINS MERGED". Finally, switch off the visibility of the original folder.
Step 24
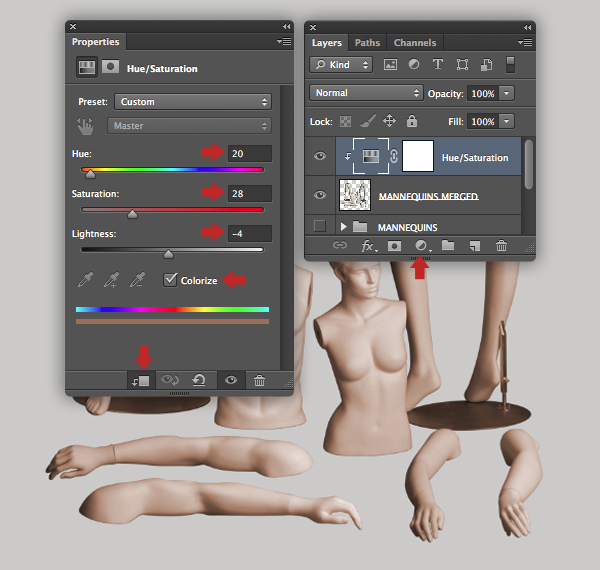
We’ll be layering some real skin textures over the figures later, but for now we’ll modify the color of the mannequins.Target the "MANNEQUINS MERGED" layer and choose Hue/Saturation from the drop-down Create new fill or adjustment layer icon situated at the foot of the Layers tab. In the next window activate the clipping icon so the adjustment only affects the target layer, check Colorize and apply these settings.
Step 25
Target the adjustment layer mask, then use a small black Brush (B) at around 50% Hardness to paint over both base plates and supporting rod. My mask is shown at the bottom of the screenshot for clarity.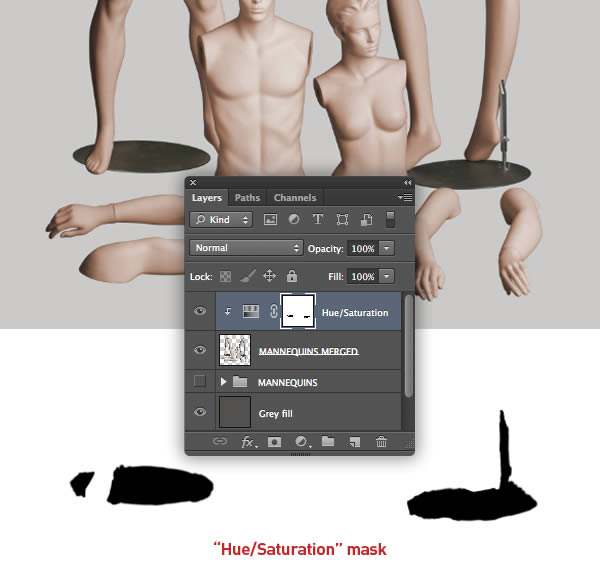
Step 26
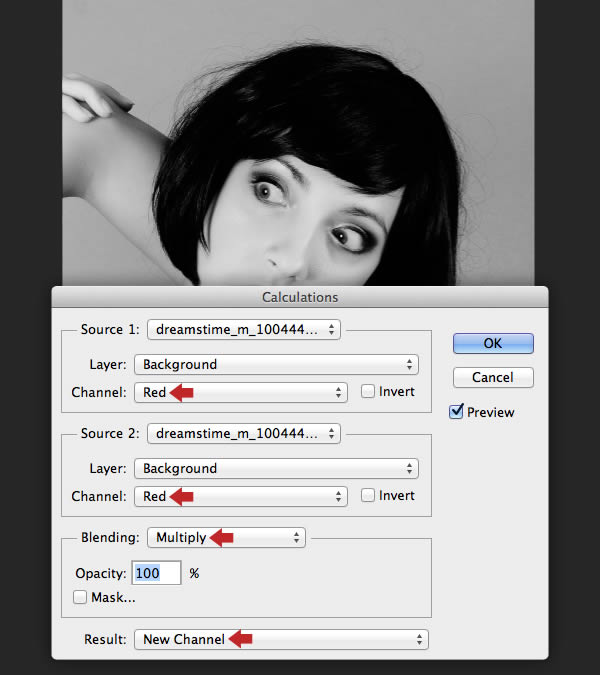
We’ll now move onto extracting the girl’s head. First, use the Crop Tool (C) to remove the excess around the head.To isolate the fine hair precisely from the background we’ll use a channel or density mask. If you’re familiar with my tutorials it’s a technique I often use. Choose Image > Calculations. In this instance both Red channels set to Multiply produce the best contrast as a starting point for the mask. Click OK to create the new channel.
Done!
Author : Mark Mayers
About The WriterHello! My name is Tommy. Im a blogger, I love graphics design and now i went to Architechture Technical Senior High School. | Facebook |
Subscribe to:
Posts (Atom)


- Follow Us on Twitter!
- "Join Us on Facebook!
- RSS
Contact