Showing posts with label advanced. Show all posts
Showing posts with label advanced. Show all posts
Wednesday, April 29, 2015
advanced,
controls,
cs6,
document,
illustrator,
in,
tutorial
0
comments
Advanced document controls in illustrator cs6 tutorial
In this movie Ill introduce you to the Advanced Controls that are available to you in creating a new document in illustrator cs6, they are not really any more advanced in what weve seen so far. It just happened to reside in an area of the dialog box called Advanced. We will go up to the File menu and choose a New command to bring up my New Document dialog box And Ill go ahead and call this document 8-page newsletter because thats what its going to be. And Ill go ahead and change the Number of Artboards to 8 as well.
And change the number of Columns to 4 so that the Artboards are arranged in 4 columns and 2 rows. Im going to switch back to the default unit of measure Points just so that I can show you that you can override the unit of measure anytime you like. So notice that Illustrator has gone ahead and converted all of my inch settings, my active Points which is why now my Artboards are going to be 432 pts wide and 576 pts tall.
 Im kind of thinking the Spacing value is going to be a little bit too high. Id like to change it to a quarter inch, but lets say I dont know what a quarter inch is in Points. Well, all you have to do is dial in 0.25 in, like that, and then press Tab, it will automatically convert to a different unit of measure, or I could even dial in Millimeters if I want, 100mm, for example, then press Tab, and Illustrator goes ahead and converts it to 283.46 pts--who wouldve known? in illustrator cs6
But a quarter inch is probably closer to what I want. Another way to do it is to dial in 0.25" and then press the Tab key, convert it over to 18 pts. So pretty much anything you think you should be able to do you can. There are so many different ways to indicate these units of measure. I can even dial in a fraction if I want to, like 1/3". That will go ahead and give me a third of an inch, and that converts over to 24 pt. Here are the Advanced options, to see them you just click on this Arrowhead in order
Advanced document controls in illustrator cs6 tutorial
Read more »
And change the number of Columns to 4 so that the Artboards are arranged in 4 columns and 2 rows. Im going to switch back to the default unit of measure Points just so that I can show you that you can override the unit of measure anytime you like. So notice that Illustrator has gone ahead and converted all of my inch settings, my active Points which is why now my Artboards are going to be 432 pts wide and 576 pts tall.
But a quarter inch is probably closer to what I want. Another way to do it is to dial in 0.25" and then press the Tab key, convert it over to 18 pts. So pretty much anything you think you should be able to do you can. There are so many different ways to indicate these units of measure. I can even dial in a fraction if I want to, like 1/3". That will go ahead and give me a third of an inch, and that converts over to 24 pt. Here are the Advanced options, to see them you just click on this Arrowhead in order
Advanced document controls in illustrator cs6 tutorial

Tuesday, March 17, 2015
advanced,
fashion,
focus,
retouching,
soft
0
comments
Fashion Retouching Advanced Soft Focus
In this tutorial I will showyou an old technique done in the digital age with much more precision and control. We will look at two techniques used in fasion retouching for a face and you will see on my example how each one looks. So lets get started!
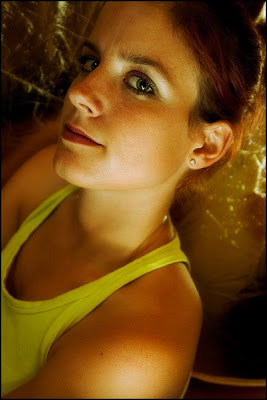
Im going to use an image I shot recently of Stasha. In case you are interested - this was shot with two flashes bounced off nearby walls and a soft gold reflector which you can see in the background. It was done for a group photography exhibition which opened recently in Slovenia.
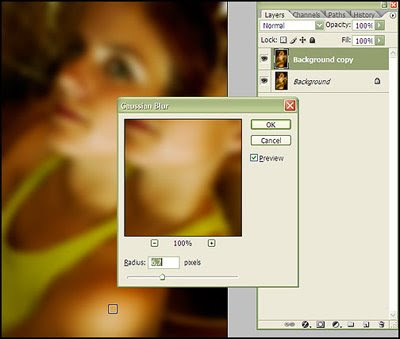
Duplicate the existing layer (Ctrl+J) and go to filter/blur/gaussian blur. Dont copy the settings I have but try to mimic the relative effect (amount of blur) I got. Since the radius number relies on how big the image is you cant really use it as a always-works setting. Hit OK.
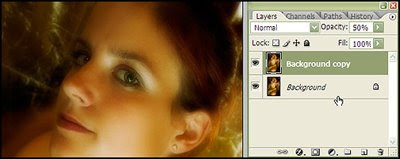
The next step is to set the opacity value to 50%. You can go lower (I usually go as low as 20%) but to make the effect apparent I am going to use this value. Leave the blending mode to normal at this point or try soft light.
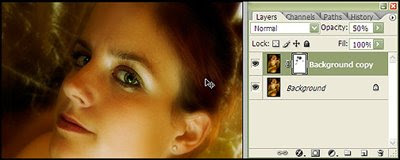
Soft focusing makes the eyes lack detail and this might be a problem for a lot of photographers using film. With digital we can get over this problem by selectively masking out areas we want to attract more attention. In my case this was the lips and both eyes. I created a show-all layer mask and with a big soft brush clicked on the parts where I wanted focus to have a bit less effect.
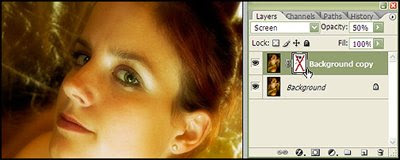
This image has the same blur layer but this time the blending mode is set to screen and the layer mask is turned off (if it wasnt it would create a skull-like effect with dark outlines around the eyes). Personally I like this effect the most so Im keeping it.
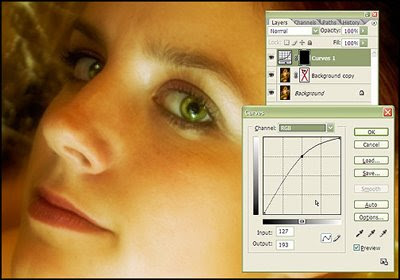
To add some extra spark to the image I have added a curves adjustment layer to brighten up her eyes a bit. And thats it, this concludes the fashion retouching tutorial, I hope you had a nice time. If you have any comments about it I would like to hear them either here as comments. Have a nice one!
Read more »
Im going to use an image I shot recently of Stasha. In case you are interested - this was shot with two flashes bounced off nearby walls and a soft gold reflector which you can see in the background. It was done for a group photography exhibition which opened recently in Slovenia.
Duplicate the existing layer (Ctrl+J) and go to filter/blur/gaussian blur. Dont copy the settings I have but try to mimic the relative effect (amount of blur) I got. Since the radius number relies on how big the image is you cant really use it as a always-works setting. Hit OK.
The next step is to set the opacity value to 50%. You can go lower (I usually go as low as 20%) but to make the effect apparent I am going to use this value. Leave the blending mode to normal at this point or try soft light.
Soft focusing makes the eyes lack detail and this might be a problem for a lot of photographers using film. With digital we can get over this problem by selectively masking out areas we want to attract more attention. In my case this was the lips and both eyes. I created a show-all layer mask and with a big soft brush clicked on the parts where I wanted focus to have a bit less effect.
This image has the same blur layer but this time the blending mode is set to screen and the layer mask is turned off (if it wasnt it would create a skull-like effect with dark outlines around the eyes). Personally I like this effect the most so Im keeping it.
To add some extra spark to the image I have added a curves adjustment layer to brighten up her eyes a bit. And thats it, this concludes the fashion retouching tutorial, I hope you had a nice time. If you have any comments about it I would like to hear them either here as comments. Have a nice one!
Subscribe to:
Posts (Atom)


- Follow Us on Twitter!
- "Join Us on Facebook!
- RSS
Contact