Showing posts with label focus. Show all posts
Showing posts with label focus. Show all posts
Saturday, May 23, 2015
a,
bring,
eyes,
focus,
how,
in,
more,
on,
potrait,
pse,
to,
using
1 comments
How to bring more focus on eyes in a potrait using PSE
1. Select Background layer in layers palette
2. Select the complete eye area ( including the white part ) using any selection tool (i used quick selection tool). Right click over the selected portion and say Layer via Copy. Name this layer in layers palette as Eyes by double clicking the layer in the palette.
3. Now select the background layer again and make a selection for the eye ball regions only. And right click and select Layer via Copy and name this layer as Eye ball.
4. Now Conrol+Click on the layer Eyes to show the eyes selected in the image. Click on Background layer and Select Inverse from right click on image area followed by Layer via Copy. Name this new layer as Blur. This constitutes the whole image except the eye region.
5. Now select the layer Blur and Filter>Blur>Gaussian Blur. Modify the blur to something like 2.5 or lesser. This is done to rest of the image leaving eyes so that eyes are prominent in the image. Click Ok. You can later on modify the opacity of the layer making it more transparent if you want to decrease the blur effect. You can do that by selecting this layer in the layer palette and moving the opacity slider on right top of layers palette.
6. Now select the layer Eyes. Go to Enhance>Adjust Sharpness. Now make changes to the amount and radius. Click Ok. You can vary the sliders as per your needs and preview it side by side in image area or preview area in the dialog. Do not oversharpen as it makes the eyes look artificial.
7. Now select only the layer Eye ball and select Enhance >Unsharp mask.
I changed the amount to near 50% and radius to near 16. This details out the pattern inside the eye ball and brings more focus to the eye region.
8. You can now also increase the saturation of this layer by Enhance>Adjust color>Adjust Hue/Saturation. You can select the Grrens from the combo box if you obly want to saturate the Green of the eyes using the Saturation slider.
Click Ok.
Here are the initial and the final images :
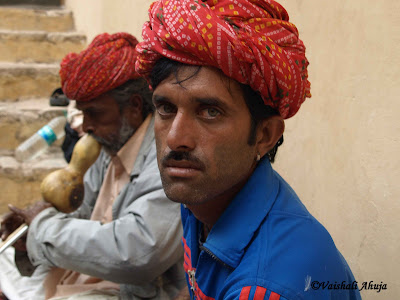
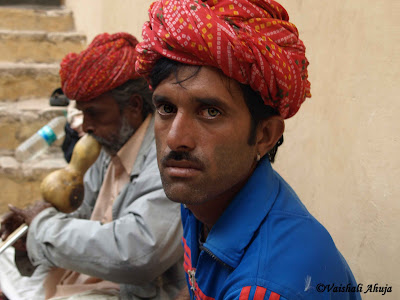
(Click to have larger views to see differences)

Written By Steve Patterson
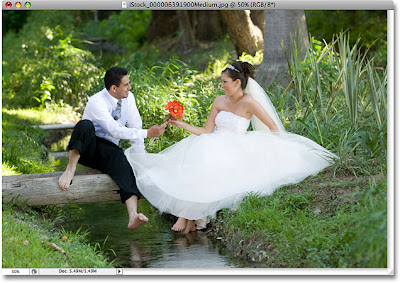
Heres the photo Ill be using in this tutorial:
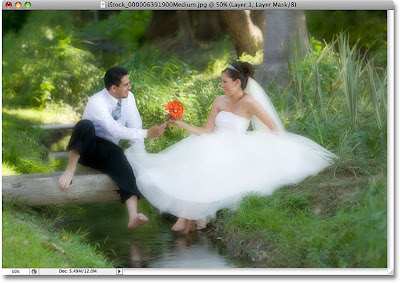
And heres how it will look with the soft focus effect applied:
Lets get started!
Step 1: Duplicate The Background Layer
With our image newly opened in Photoshop, we can see in the Layers palette that we currently have one layer named Background. This layer contains our original image:
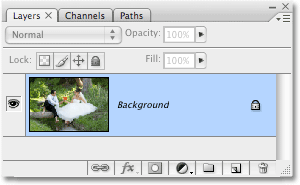
We need to make a copy of the Background layer. Theres a few different ways to make a copy of a layer in Photoshop, but by far the fastest and easiest way is to use the keyboard shortcut Ctrl+J (Win) / Command+J (Mac). Photoshop creates a copy of the Background layer for us, names it "Layer 1", and places it directly above the original Background layer in the Layers palette:
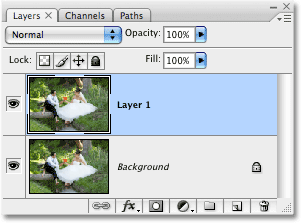
Step 2: Apply The Gaussian Blur Filter To The New Layer
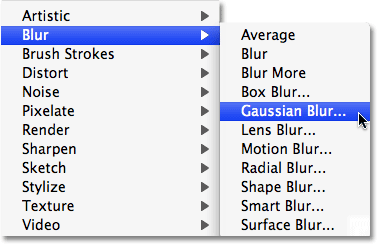
To create the soft focus effect, we need to blur the new layer. For that, we can use one of the most popular filters in all of Photoshop, Gaussian Blur. Make sure you have "Layer 1" selected in the Layers palette (selected layers are highlighted in blue), then go up to the Filter menu at the top of the screen, choose Blur, and then choose Gaussian Blur:
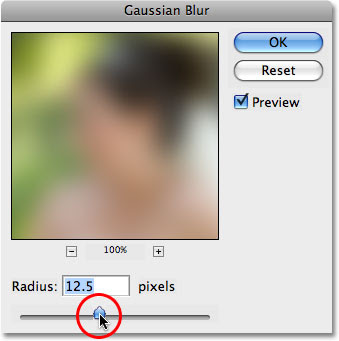
This brings up the Gaussian Blur dialog box. To control the amount of blurring thats applied to the layer, drag the Radius slider at the bottom of the dialog box while keeping an eye on your image in the document window. Dragging the Radius slider to the right will increase the amount of blurring, and dragging to the left decreases the amount of blurring. What youre trying to do here is blur the entire photo without blurring it to the point where you can no longer make anything out in the image. Im going to set my Radius value to around 12 pixels, which works well for the image Im using. Of course, each image is unique, and the Radius value you end up using may be different:
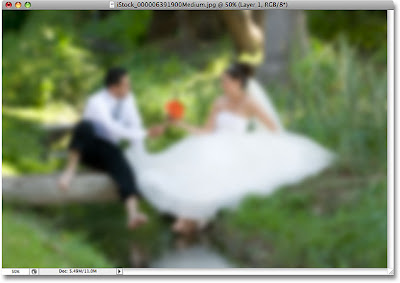
Click OK when youre done to apply the blurring to the layer and exit out of the Gaussian Blur dialog box. Heres my image after applying the Gaussian Blur filter:
Step 3: Lower The Opacity Of The Blurred Layer
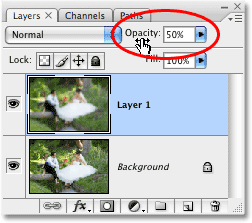
At the moment, the blurring is much too intense. Instead of a soft focus effect, weve recreated how the world might look to someone who needs glasses. We need to reduce the amount of blurring and bring back some of the original image. To do that, all we need to do is lower the opacity value of the blurred layer. Youll find the Opacity option in the top right corner of the Layers palette. With "Layer 1" still selected, lower the opacity value of the layer down to somewhere between 50-60%. Im going to lower mine to 50%:
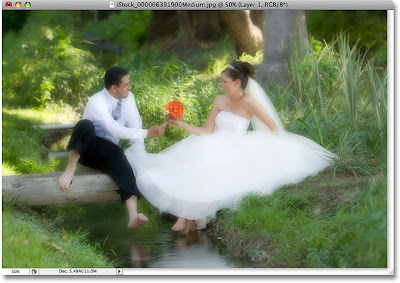
The blurring is now more subtle:
Step 4: Add A Layer Mask
At this point, the basic soft focus effect is complete, but lets fine-tune things by bringing back a little more of the original detail to certain parts of the photo, specifically the two peoples faces and the flower bouquet. Photoshop makes this easy to do thanks to layer masks.
First, lets add a layer mask. With "Layer 1" still selected, click on the Layer Mask icon at the bottom of the Layers palette:
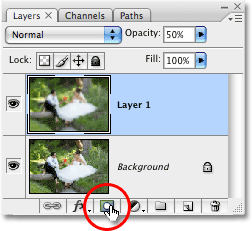
Nothing will appear to have happened yet in the document window, but a layer mask thumbnail has now been added to "Layer 1" in the Layers palette:
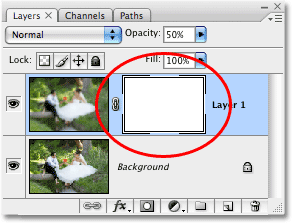
Step 5: Select The Brush Tool
Select Photoshops Brush Tool from the Tools palette, or simply press the letter B to access it with the keyboard shortcut:
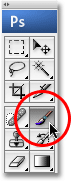
Step 6: Lower The Opacity Of The Brush To Around 25%
Were going to paint with black on the layer mask to reduce the amount of blurring in certain areas, but we dont want to remove the blurring completely. We just want to reduce it, which means well need to lower the opacity of our brush. With the Brush Tool selected, the Options Bar at the top of the screen changes to show options specifically for the Brush Tool. One of those options is Opacity, similar to the opacity option we just looked at in the Layers palette except that in this case, were affecting the brush opacity, not the layer opacity. Lower the brush opacity down to around 25%:

Step 7: Set Your Foreground Color To Black
We want to paint with black, which means we need to set our Foreground color to black. By default, whenever you have a layer mask selected, Photoshop sets the Foreground color to white, with black as the Background color. To swap them so black becomes the Foreground color, simply press the letter X on your keyboard. If we look at the Foreground and Background color swatches near the bottom of the Tools palette now, we can see that black is the Foreground color (the top left swatch):
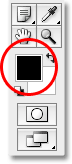
Step 8: Paint Over The Areas Where You Want To Bring Back More Detail
With the Brush Tool selected, black as the Foreground color, and the brush opacity lowered to 25% or so, simply paint over any areas where you want to bring back more of the original image detail. You can change the size of your brush using the left and right bracket keys on your keyboard, which are located to the right of the letter P. The left bracket key makes the brush smaller, while the right bracket key makes it larger. Youll want to use a soft-edge brush, and you can control the edge hardness of the brush by holding down the Shift key and pressing the left and right bracket keys. Press Shift+left bracket a few times to make the edges softer, or Shift+right bracket a few times to make the edges harder.
Im going to paint over the bride and grooms faces with my brush to bring back some detail. If, after painting over an area once, you find you could still bring back a bit more detail, simply release the mouse button, then click and paint over the same area again. Youll need to make sure you release your mouse button before you paint over the same area again, otherwise it wont work:
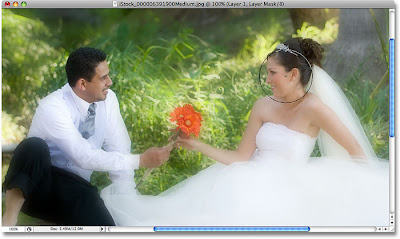
Ill paint a couple of times over the flower bouquet as well to bring back some detail, and Ill leave the rest of the image alone so that only the most important areas of the photo are in focus. Or at least, theyre more in focus than anything else. If we look at the layer mask thumbnail again in the Layers palette, we can see the areas where I painted with black:
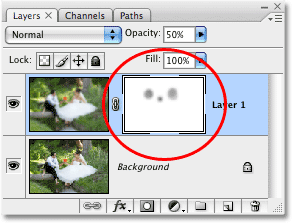
And with that, were done! Here is my final "soft focus" effect result:
Read more »
Heres the photo Ill be using in this tutorial:
And heres how it will look with the soft focus effect applied:
Lets get started!
Step 1: Duplicate The Background Layer
With our image newly opened in Photoshop, we can see in the Layers palette that we currently have one layer named Background. This layer contains our original image:
We need to make a copy of the Background layer. Theres a few different ways to make a copy of a layer in Photoshop, but by far the fastest and easiest way is to use the keyboard shortcut Ctrl+J (Win) / Command+J (Mac). Photoshop creates a copy of the Background layer for us, names it "Layer 1", and places it directly above the original Background layer in the Layers palette:
Step 2: Apply The Gaussian Blur Filter To The New Layer
To create the soft focus effect, we need to blur the new layer. For that, we can use one of the most popular filters in all of Photoshop, Gaussian Blur. Make sure you have "Layer 1" selected in the Layers palette (selected layers are highlighted in blue), then go up to the Filter menu at the top of the screen, choose Blur, and then choose Gaussian Blur:
This brings up the Gaussian Blur dialog box. To control the amount of blurring thats applied to the layer, drag the Radius slider at the bottom of the dialog box while keeping an eye on your image in the document window. Dragging the Radius slider to the right will increase the amount of blurring, and dragging to the left decreases the amount of blurring. What youre trying to do here is blur the entire photo without blurring it to the point where you can no longer make anything out in the image. Im going to set my Radius value to around 12 pixels, which works well for the image Im using. Of course, each image is unique, and the Radius value you end up using may be different:
Click OK when youre done to apply the blurring to the layer and exit out of the Gaussian Blur dialog box. Heres my image after applying the Gaussian Blur filter:
Step 3: Lower The Opacity Of The Blurred Layer
At the moment, the blurring is much too intense. Instead of a soft focus effect, weve recreated how the world might look to someone who needs glasses. We need to reduce the amount of blurring and bring back some of the original image. To do that, all we need to do is lower the opacity value of the blurred layer. Youll find the Opacity option in the top right corner of the Layers palette. With "Layer 1" still selected, lower the opacity value of the layer down to somewhere between 50-60%. Im going to lower mine to 50%:
The blurring is now more subtle:
Step 4: Add A Layer Mask
At this point, the basic soft focus effect is complete, but lets fine-tune things by bringing back a little more of the original detail to certain parts of the photo, specifically the two peoples faces and the flower bouquet. Photoshop makes this easy to do thanks to layer masks.
First, lets add a layer mask. With "Layer 1" still selected, click on the Layer Mask icon at the bottom of the Layers palette:
Nothing will appear to have happened yet in the document window, but a layer mask thumbnail has now been added to "Layer 1" in the Layers palette:
Step 5: Select The Brush Tool
Select Photoshops Brush Tool from the Tools palette, or simply press the letter B to access it with the keyboard shortcut:
Step 6: Lower The Opacity Of The Brush To Around 25%
Were going to paint with black on the layer mask to reduce the amount of blurring in certain areas, but we dont want to remove the blurring completely. We just want to reduce it, which means well need to lower the opacity of our brush. With the Brush Tool selected, the Options Bar at the top of the screen changes to show options specifically for the Brush Tool. One of those options is Opacity, similar to the opacity option we just looked at in the Layers palette except that in this case, were affecting the brush opacity, not the layer opacity. Lower the brush opacity down to around 25%:
Step 7: Set Your Foreground Color To Black
We want to paint with black, which means we need to set our Foreground color to black. By default, whenever you have a layer mask selected, Photoshop sets the Foreground color to white, with black as the Background color. To swap them so black becomes the Foreground color, simply press the letter X on your keyboard. If we look at the Foreground and Background color swatches near the bottom of the Tools palette now, we can see that black is the Foreground color (the top left swatch):
Step 8: Paint Over The Areas Where You Want To Bring Back More Detail
With the Brush Tool selected, black as the Foreground color, and the brush opacity lowered to 25% or so, simply paint over any areas where you want to bring back more of the original image detail. You can change the size of your brush using the left and right bracket keys on your keyboard, which are located to the right of the letter P. The left bracket key makes the brush smaller, while the right bracket key makes it larger. Youll want to use a soft-edge brush, and you can control the edge hardness of the brush by holding down the Shift key and pressing the left and right bracket keys. Press Shift+left bracket a few times to make the edges softer, or Shift+right bracket a few times to make the edges harder.
Im going to paint over the bride and grooms faces with my brush to bring back some detail. If, after painting over an area once, you find you could still bring back a bit more detail, simply release the mouse button, then click and paint over the same area again. Youll need to make sure you release your mouse button before you paint over the same area again, otherwise it wont work:
Ill paint a couple of times over the flower bouquet as well to bring back some detail, and Ill leave the rest of the image alone so that only the most important areas of the photo are in focus. Or at least, theyre more in focus than anything else. If we look at the layer mask thumbnail again in the Layers palette, we can see the areas where I painted with black:
And with that, were done! Here is my final "soft focus" effect result:
Tuesday, March 17, 2015
advanced,
fashion,
focus,
retouching,
soft
0
comments
Fashion Retouching Advanced Soft Focus
In this tutorial I will showyou an old technique done in the digital age with much more precision and control. We will look at two techniques used in fasion retouching for a face and you will see on my example how each one looks. So lets get started!
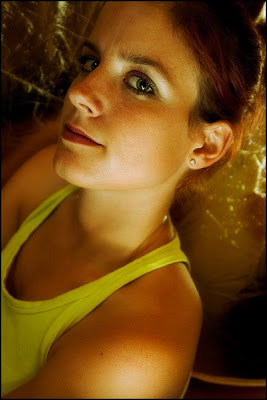
Im going to use an image I shot recently of Stasha. In case you are interested - this was shot with two flashes bounced off nearby walls and a soft gold reflector which you can see in the background. It was done for a group photography exhibition which opened recently in Slovenia.
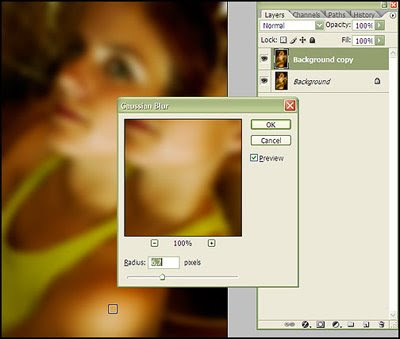
Duplicate the existing layer (Ctrl+J) and go to filter/blur/gaussian blur. Dont copy the settings I have but try to mimic the relative effect (amount of blur) I got. Since the radius number relies on how big the image is you cant really use it as a always-works setting. Hit OK.
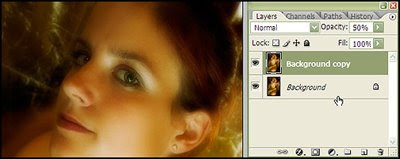
The next step is to set the opacity value to 50%. You can go lower (I usually go as low as 20%) but to make the effect apparent I am going to use this value. Leave the blending mode to normal at this point or try soft light.
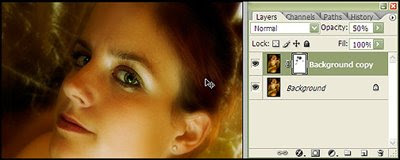
Soft focusing makes the eyes lack detail and this might be a problem for a lot of photographers using film. With digital we can get over this problem by selectively masking out areas we want to attract more attention. In my case this was the lips and both eyes. I created a show-all layer mask and with a big soft brush clicked on the parts where I wanted focus to have a bit less effect.
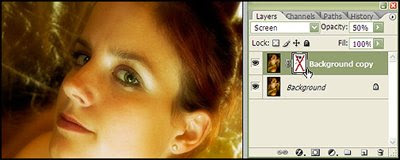
This image has the same blur layer but this time the blending mode is set to screen and the layer mask is turned off (if it wasnt it would create a skull-like effect with dark outlines around the eyes). Personally I like this effect the most so Im keeping it.
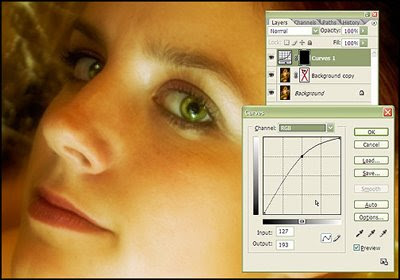
To add some extra spark to the image I have added a curves adjustment layer to brighten up her eyes a bit. And thats it, this concludes the fashion retouching tutorial, I hope you had a nice time. If you have any comments about it I would like to hear them either here as comments. Have a nice one!
Read more »
Im going to use an image I shot recently of Stasha. In case you are interested - this was shot with two flashes bounced off nearby walls and a soft gold reflector which you can see in the background. It was done for a group photography exhibition which opened recently in Slovenia.
Duplicate the existing layer (Ctrl+J) and go to filter/blur/gaussian blur. Dont copy the settings I have but try to mimic the relative effect (amount of blur) I got. Since the radius number relies on how big the image is you cant really use it as a always-works setting. Hit OK.
The next step is to set the opacity value to 50%. You can go lower (I usually go as low as 20%) but to make the effect apparent I am going to use this value. Leave the blending mode to normal at this point or try soft light.
Soft focusing makes the eyes lack detail and this might be a problem for a lot of photographers using film. With digital we can get over this problem by selectively masking out areas we want to attract more attention. In my case this was the lips and both eyes. I created a show-all layer mask and with a big soft brush clicked on the parts where I wanted focus to have a bit less effect.
This image has the same blur layer but this time the blending mode is set to screen and the layer mask is turned off (if it wasnt it would create a skull-like effect with dark outlines around the eyes). Personally I like this effect the most so Im keeping it.
To add some extra spark to the image I have added a curves adjustment layer to brighten up her eyes a bit. And thats it, this concludes the fashion retouching tutorial, I hope you had a nice time. If you have any comments about it I would like to hear them either here as comments. Have a nice one!
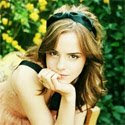
This tutorial will show you how to use lighting effect to emphasize her face, skin and hair. Before that, some nice tips for retouching will be mentioned
Before we start, lets have a look at what well be retouching:
Before:
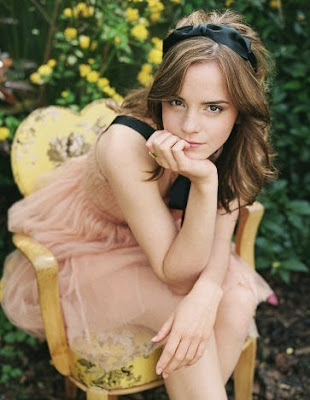
And after:
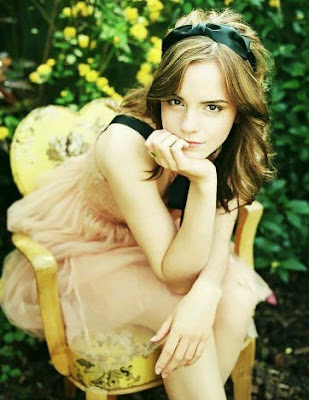
Download the original image and we are ready to go!
Step 1:
The original photo is a bit dark and her skin is not bright and lovely enough. In this case, we can use Channel Mixer tool to enhance the colors separately. You can find this tool at the bottom of Layers tab
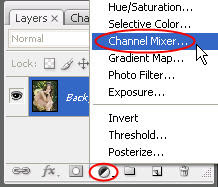
If you are new to this tool, I wish to explain more about it. As you knew, a photo is based on three main colors (in RGB mode): red, green and blue. With the Channel Mixer tool, you can manipulate these raw channels separately. Notice that when choosing Channel Mixer tool, you will see there are 3 options in the Output Channel drop-down box corresponding to 3 main colors. And you can also notice that with each main color, the slider of that color will always be set to 100%, by default. For example, when you choose Red from Output Channel, you can see the Red slider are at 100% (while Blue and Green are at 0%). And by moving these sliders left or right, you can decrease or increase the amount of that color in the corresponding Output Channel.
With this photo, we should mainly increase the amount of Green with the settings below:
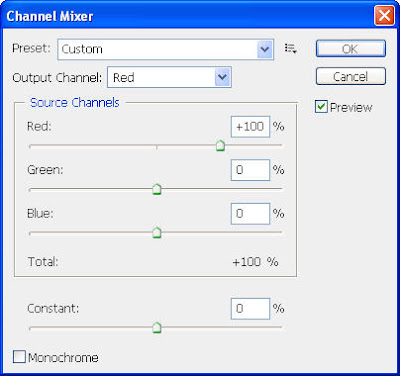
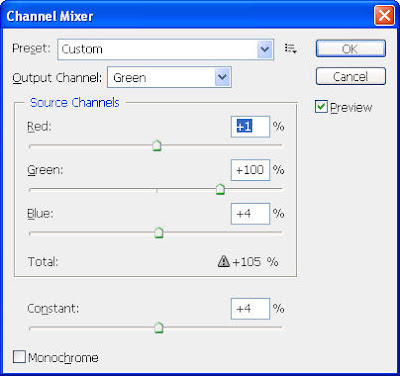
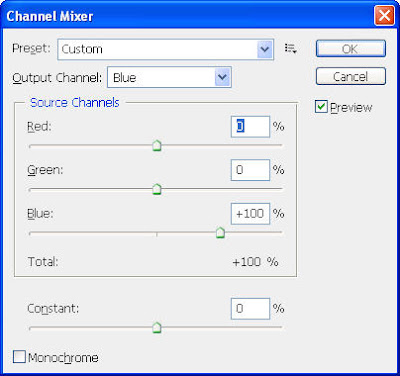
Our photo now looks better
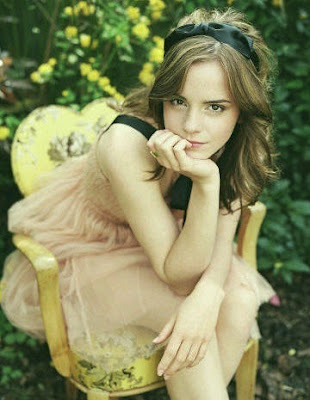
Step 2:
Press Ctrl-Alt-Shift-E to create a flatten image which is the result of the under layers. In this step, we will smooth her skin a bit by going to Filter>Blur>Surface Blur, set the Radius of 2 pixels and Threshold of 4 pixels
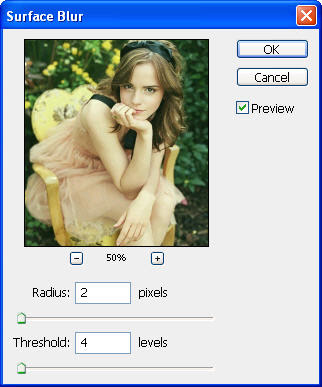
Maybe you will not see any big changes but lets have a closer look...
Before:
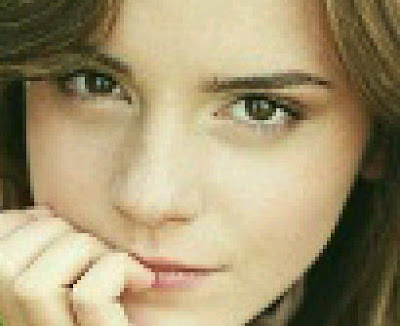
After blurring:
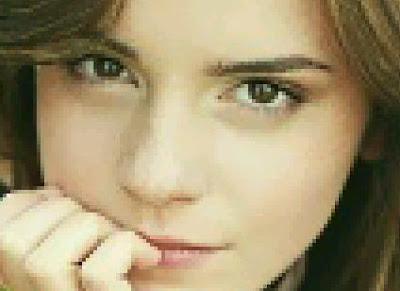
By using this tool with a small Radius and Threshold, you can make subtle changes without making it look fake
Step 3:
Go to Image>Adjustments>Curves to brighten our photo a bit
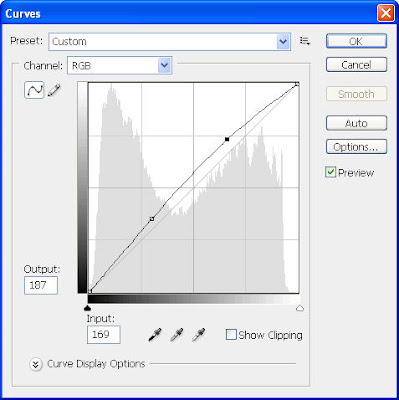
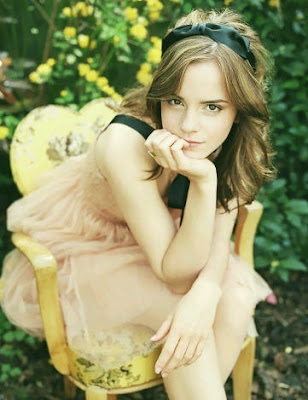
We are almost done, the photo now looks much better:
Step 4:
The last thing we need to do is to add lighting focus to emphasize her beautiful face. Press Ctrl-J to duplicate the current layer and go to Filter>Render>Lighting Effects and use these settings:
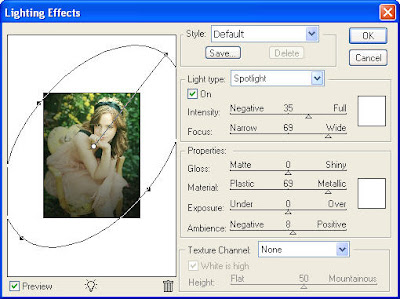
Then change the Blending mode of this layer to Soft Light to make the colors "softer". Lets have a look at the result again:
Retouching photo is fun! And with the Channel Mixer tool and Lighting Effects filter, we can greatly enhance the photo from its raw color channels and set focus on what we want without destroying the original image.
Monday, March 16, 2015
0,
2,
3,
focus,
for,
magic,
photoshop
0
comments
Focus Magic 3 0 2 for Photoshop


Focus Magic uses advanced forensic strength deconvolution technology to literally "undo" blur and recover lost detail. It can repair both out-of-focus blur and motion blur (camera shake) in an image.
Focus Magic, which is used by many forensic scientists, is the only photo sharpening software that can recover detail. You can use this powerful tool to sharpen your blurred photos right now. Unlike other sharpening software, Focus Magic increases the "actual sharpness" (with deconvolution) rather than the "perceived sharpness" (with unsharp mask or
equivalent).
At the time that we wrote Focus Magic, we thought that it would only be used for photos that are noticeably blurred. We were surprised to find however, that nearly all photos can be sharpened with Focus Magic. A lot of our users run all their photos through Focus Magic with a Blur Width of 2. Some professional photographers have also commented that even photographs which they thought were pin sharp could still be sharpened further with Focus Magic.
Website:
http://www.focusmagic.com
Download:
http://rapidshare.com/files/102363601/fomag.rar
Subscribe to:
Posts (Atom)


- Follow Us on Twitter!
- "Join Us on Facebook!
- RSS
Contact