Showing posts with label illustration. Show all posts
Showing posts with label illustration. Show all posts
Thursday, April 30, 2015
based,
cake,
cs6,
illustration,
on,
phoenix
0
comments
Cake Based on Phoenix Illustration CS6
Cake Based on Phoenix Illustration


Wednesday, April 29, 2015
christmas,
cs6,
hat,
illustration,
in,
tutorial
0
comments
Christmas Hat in Illustration CS6 Tutorial
Christmas Hat Illustration CS6 Tutorial
This tutorial will show you how to create a furry Christmas hat with Illustrator roughen effect.Download Source File
Required: Illustrator 9+
1. Hat
Start your hat by drawing 2 basic paths and filling them with Linear gradient (red to darker-red).
2. Shadow
Make a path (shadow path) like the image on the left. Select the top part of the hat, Copy & Paste in Front (Ctrl+F). Now, select the copied path and the shadow path, hold down Alt key and select Intersect shape areas in Pathfinder pallate.

3. Fur
With your Pen Tool, roughly draw a path like the image on the left and fill it with grey color. Go to Effect > Distort & Transform > Roughen
Roughen Options
In your Roughen window, enter the following setting: Size=8%, Detail=95/in, select Corner points. You may click on the Preview check box to preview your result.


Final
Your final illustration should looks like the image shown below.
Have Fun
Now, have fun with your Christmas hat!
Monday, March 16, 2015
art,
illustration,
photo,
quick,
to,
vector
0
comments
Photo to Illustration Quick Vector Art
I am going to show you that is quick and easy way to convert a picture in illustration vector effect. Here we go!
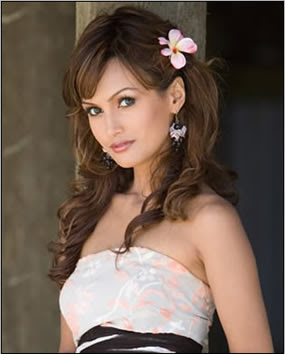
Step 1: First I will start with an image.
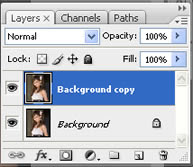
Step 2: Duplicate the Background layer.
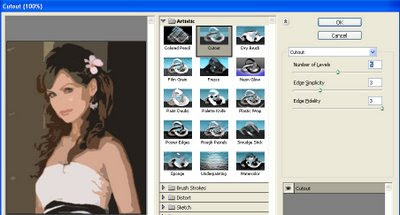
Step 3: Now apply the Cutout filter (Filter => Artistic => Cutout). On the left side the amount of detail in the vector can be controlled by adjusting the Number of Levels, Edge Simplicity and Edge Fidelity sliders. For this example I am using 5 levels, with the Edge Simplicity set to 3 and Edge Fidelity set to 3. Click OK.
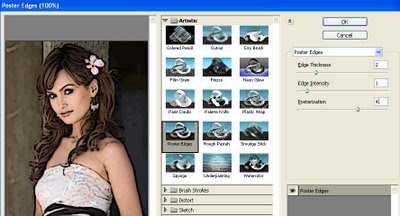
Step 4: You can trace the areas of color divided by the Cutout filter with the Poster Edges Filter. For this example the Edge Thickness is set to 2, Edge Intensity to 1 and Posterization to 4. Click OK.
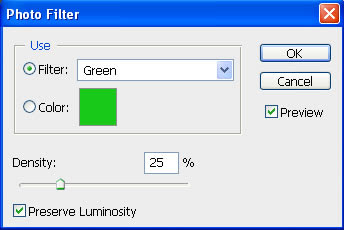
Step 5: The color can be changed subtly with a Photo Filter adjustment layer.
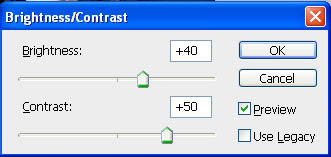
Step 6: And finally, to add to the colored effect, a Brightness/Contrast adjustment layer will help take away the natural highlights/shadows even more.
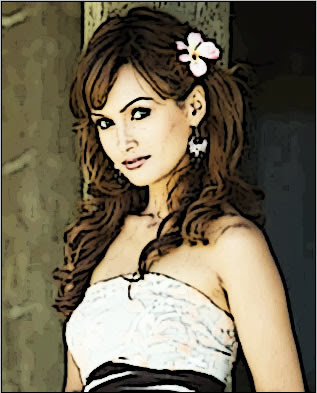
Step 7: Here is my final vector image:
Read more »
Step 1: First I will start with an image.
Step 2: Duplicate the Background layer.
Step 3: Now apply the Cutout filter (Filter => Artistic => Cutout). On the left side the amount of detail in the vector can be controlled by adjusting the Number of Levels, Edge Simplicity and Edge Fidelity sliders. For this example I am using 5 levels, with the Edge Simplicity set to 3 and Edge Fidelity set to 3. Click OK.
Step 4: You can trace the areas of color divided by the Cutout filter with the Poster Edges Filter. For this example the Edge Thickness is set to 2, Edge Intensity to 1 and Posterization to 4. Click OK.
Step 5: The color can be changed subtly with a Photo Filter adjustment layer.
Step 6: And finally, to add to the colored effect, a Brightness/Contrast adjustment layer will help take away the natural highlights/shadows even more.
Step 7: Here is my final vector image:
Subscribe to:
Posts (Atom)


- Follow Us on Twitter!
- "Join Us on Facebook!
- RSS
Contact