Showing posts with label touch. Show all posts
Showing posts with label touch. Show all posts
Easy Retro Style Fashion Touch
Final view

Step 1:
Take a image/photo to edit.

Take a image/photo to edit.
Step 2:
Press Ctrl+M (Curves), increase brightness of the photo.
Set Input = 113 and Output to 150.
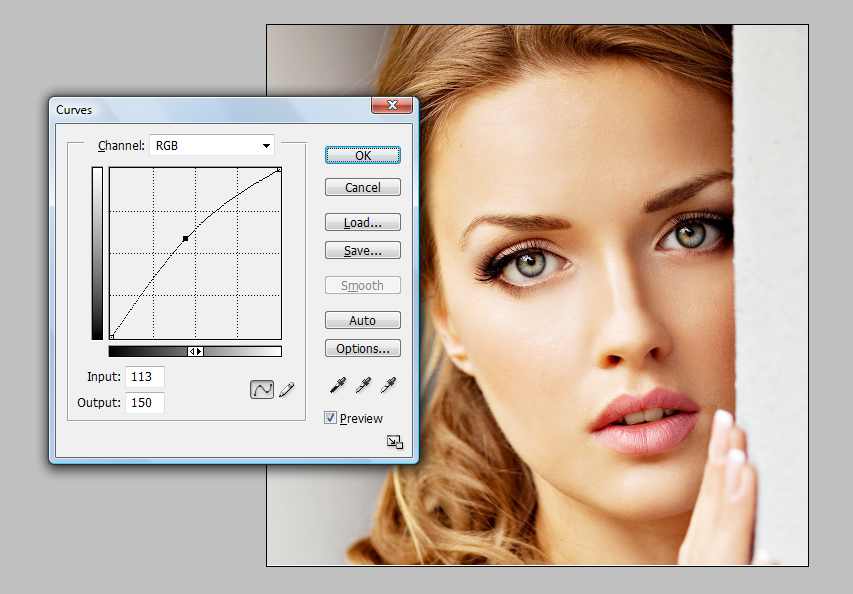
Hit OK.
Step 3:
Make a New Layer (Ctrl+Shft+N).
Fill it with white color (Shft+f5 ---> Color ----> Select white color ---> OK).
And set the Mode Of this Layer To "Soft Light"

Step 4:
Again make a New Layer (Ctrl+Shft+N).
Fill it with Blue color (Shft+f5 ---> Color ----> Select Blue color ---> OK).
And set the Mode Of this Layer To "Lighten" and Opacity to "45%".

Your Layers will be like this.
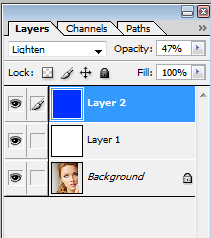
Instate of Blue You can Use any color..
Some sample --


Done..!!

Tuesday, March 17, 2015
light,
painting,
photo,
quick,
technique,
touch,
up,
with
0
comments
Quick Photo Touch up Technique Painting with Light
Step One: Image to Touch-Up
Obviously we need to start with something. Ill be using the photo below.

Step Two: Set Color & Start Painting
More often than anything else, this technique will be used when you have a photograph of someone inside a house - there isnt a lot "wrong" with the photo Im working with but were going to play anyways.
The first step here is to set your foreground color. Think of natural lighting colors - a very light, almost-white yellow, oranges, etc. Make sure that any color you use is nearly white, but not quite.
Then, grab a brush - it doesnt really matter what one, as long as its not too large. Create a new layer (Layer, New, New Layer) and start painting the areas that could use highlighting.
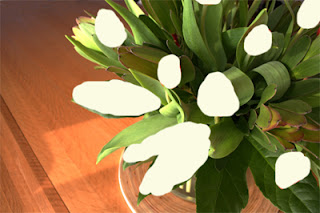
Step Three: Layer Mode
After youve painted a few key areas, its time to see how it looks. Go to your layer mode drop-down (its right at the top of your layers palette, and currently says "Normal") and choose "Overlay".
You may want to lower the opacity and/or clean up the painting with an eraser.
To add more highlights on other areas, repeat the process using a slightly different color on a new layer. This will start building up a beautiful series of highlight and shadow.

Read more »
Obviously we need to start with something. Ill be using the photo below.
Step Two: Set Color & Start Painting
More often than anything else, this technique will be used when you have a photograph of someone inside a house - there isnt a lot "wrong" with the photo Im working with but were going to play anyways.
The first step here is to set your foreground color. Think of natural lighting colors - a very light, almost-white yellow, oranges, etc. Make sure that any color you use is nearly white, but not quite.
Then, grab a brush - it doesnt really matter what one, as long as its not too large. Create a new layer (Layer, New, New Layer) and start painting the areas that could use highlighting.
Step Three: Layer Mode
After youve painted a few key areas, its time to see how it looks. Go to your layer mode drop-down (its right at the top of your layers palette, and currently says "Normal") and choose "Overlay".
You may want to lower the opacity and/or clean up the painting with an eraser.
To add more highlights on other areas, repeat the process using a slightly different color on a new layer. This will start building up a beautiful series of highlight and shadow.
Subscribe to:
Posts (Atom)


- Follow Us on Twitter!
- "Join Us on Facebook!
- RSS
Contact