Showing posts with label ways. Show all posts
Showing posts with label ways. Show all posts
Monday, March 16, 2015
5,
avoid,
digital,
the,
to,
ways,
worst
0
comments
5 Ways to Avoid the Worst Digital
 It is not uncommon for beginners to make digital photography mistakes when they first venture into this hobby. I used to make those awful photography mistakes and my photos were terrible!
Below are five common photography mistakes. You can learn how to prevent them when you shoot and fix them. If you can avoid these mistakes, I can assure you that the quality of your photos will increase dramatically!
Red-Eye
Red-eye happens because the light from the digital cameras flash reflects off the retina of your subjects eyes. This is a problem that is so common that even the pros face it too! The fool-proof way is to turn off the flash when shooting. However, if it is really too dark and you must use the flash, remember to ask your subject to face towards your camera but do not look directly at the lens.
Subject is too far
Sometimes, if you subject is too far away, your photo will lack a focal point. You are trying to fit too much into your photo and it will not look great. This mistake is pretty easy to fix. Just get closer to your subject. If you really cant get close enough, use your digital cameras optical zoom. You will realized that your photo and subject will be nicer if they are closer.
Blurry Photos
If you shake your camera or if your subject is moving, you will get blurred photos. The best way is to use a tripod if your subject is still. But, if your subject is moving, you can use the "action" mode in your digital camera. Different cameras have different terms for this mode. Read your instruction manual. This "action" mode function will optimize the shutter speed to capture the action automatically.
 Underexposed Photos
 Underexposed photos are also one of the very common photography mistakes. It means that there is not enough light and your photo is dark. If you are taking pictures indoor, you can get near a window or move closer to your subject. Besides that, you can also manually adjust the shutter speed of your digital camera.
Overexposed Photos
This means that your photos are too bright. Extreme sunlight or flash can cause overexposed photos. Your photos can have very light or very dark areas. Overexposed photos usually lack detail and can look very washed out. Find a shade when you are shooting your subject on a sunny day. If you are using a flash, do not stand too close to your subject as well.
The above digital photography mistakes are pretty common. The best way to overcome them is to learn from them. Shoot more photos and see how they turn out. If they turn out bad, recall how you took them and under what type of conditions. Try to avoid those mistakes in the future!

How to become skinny in 3 minutes: This is an Old Photoshop work to show the power of this program. This video would show only one of thousand possibility that Photoshop offer to us. After using Photoshop for long time you will have anyway something to learn.
Sunday, March 15, 2015
image,
in,
photoshop,
select,
three,
to,
ways,
your
0
comments
Three Ways to Select Your Image in Photoshop
This tutorial will introduce you to three very different and very simple ways to help select your image. Selection is the basis to running it all in Photoshop.
Method No.1. "Edit in Quick Mask Mode"
1. Open an image in Photoshop.

2. Select brush tool and set its size according to what you select on your image. For example, set the brush size to 8 pixels when you select something really tiny.
3. Foreground color must be black.
4. Before applying the brush to your image for selection, click on Edit in Quick Mask Mode. Now your brush is ready for selection. Notice that the areas you apply your brush to turn pink. If your selection goes out, you can fix it by first setting the foreground to white, and then using your brush tool to ‘erase off’ the unwanted selection. To continue your work, ensure that you reset the foreground color to black. To make it easier on your nerves, you might want to try zooming in and out on your image. It really helps.
5. To zoom in press CTRL +
6. To zoom out press CTRL -
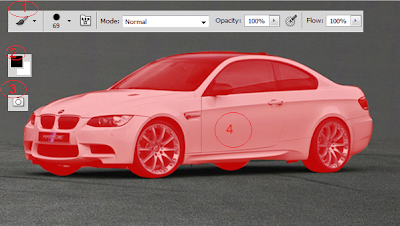
7. When you’re satisfied with the selection you’ve made, click on Edit in Quick Mask Mode again.
8. Press CTRL+SHIFT+ I

9. Now press CTRL + J. A new layer consisting of only what you’d selected will be created.
That’s method 1.
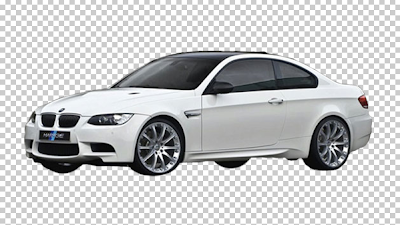
Method No. 2. "Quick Selection Tool"
1. Open an image in Photoshop.

2. Select Quick Selection Tool.
3. You can change the size of the selection tool according to what you select on your image. Also, you must take note of two more important features. These are the angle and the roundness of the selection tool. You can change these depending on your selection needs.
4. To fix a selection, or to deselect a selection, use the Subtract from selection tool.
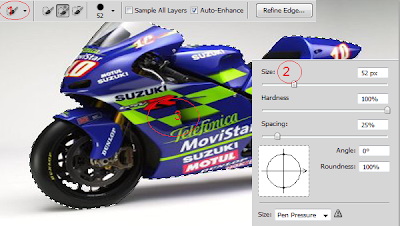
5. Press CTRL + J
That’s method 2.
Method No. 3. "Color Range"
1. Open an image in Photoshop.
Now I am going to select all flowers. For this image the best way of selection is Color Range.
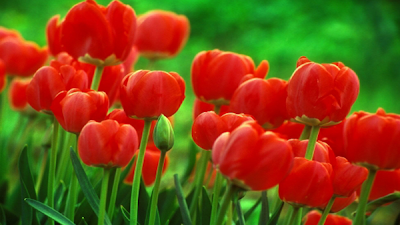
2. Go to Select > Color Range.
3. Pick the Eyedropper tool and click on the red color on your image. To select the different shades of red on your image, make use of the Add to Sample tool.
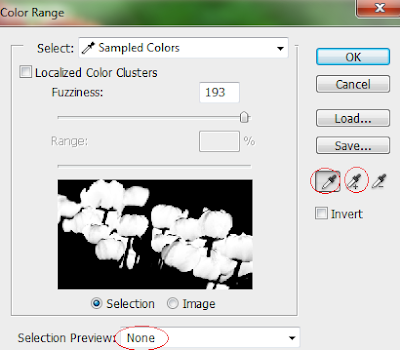
When you’re done, just click OK.
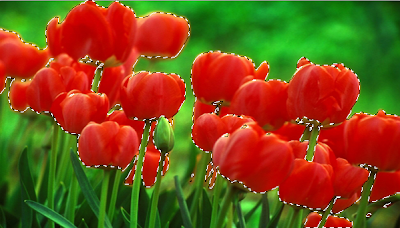
4. Press CTRL + J.
That’s method 3.
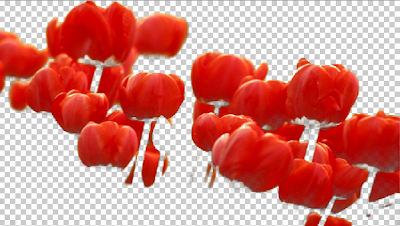 Now, to change the background of your layer with another image, you can simply load a new image and drag and drop it onto the selection layer.
Method No.1. "Edit in Quick Mask Mode"
1. Open an image in Photoshop.
2. Select brush tool and set its size according to what you select on your image. For example, set the brush size to 8 pixels when you select something really tiny.
3. Foreground color must be black.
4. Before applying the brush to your image for selection, click on Edit in Quick Mask Mode. Now your brush is ready for selection. Notice that the areas you apply your brush to turn pink. If your selection goes out, you can fix it by first setting the foreground to white, and then using your brush tool to ‘erase off’ the unwanted selection. To continue your work, ensure that you reset the foreground color to black. To make it easier on your nerves, you might want to try zooming in and out on your image. It really helps.
5. To zoom in press CTRL +
6. To zoom out press CTRL -
7. When you’re satisfied with the selection you’ve made, click on Edit in Quick Mask Mode again.
8. Press CTRL+SHIFT+ I
9. Now press CTRL + J. A new layer consisting of only what you’d selected will be created.
That’s method 1.
Method No. 2. "Quick Selection Tool"
1. Open an image in Photoshop.
2. Select Quick Selection Tool.
3. You can change the size of the selection tool according to what you select on your image. Also, you must take note of two more important features. These are the angle and the roundness of the selection tool. You can change these depending on your selection needs.
4. To fix a selection, or to deselect a selection, use the Subtract from selection tool.
5. Press CTRL + J
That’s method 2.
Method No. 3. "Color Range"
1. Open an image in Photoshop.
Now I am going to select all flowers. For this image the best way of selection is Color Range.
2. Go to Select > Color Range.
3. Pick the Eyedropper tool and click on the red color on your image. To select the different shades of red on your image, make use of the Add to Sample tool.
When you’re done, just click OK.
4. Press CTRL + J.
That’s method 3.
Subscribe to:
Posts (Atom)


- Follow Us on Twitter!
- "Join Us on Facebook!
- RSS
Contact