Showing posts with label image. Show all posts
Showing posts with label image. Show all posts
Friday, May 1, 2015
adobe,
cs6,
how,
illustrator,
image,
in,
new,
the,
to,
trace,
use
0
comments
How to Use the New Image Trace in Adobe Illustrator CS6
Today we will learn the new features of the tracing engine in Adobe Illustrator CS6 and talk about its new functions. We will trace a photo, a sketch and a texture; then we will compare the results between Adobe Illustrator CS5 and CS6. Let’s get started!
In this tutorial I’ll use a photo a strawberry (credit to deviantART user StockProject1) ; the sketch was kindly provided by Victoria Vasilyeva and the texture (credit to deviantART user ~kingkool6).
 This allows us to use other panels and tools while tracing. Such features did not exist in Adobe Illustrator CS5 as well as in earlier releases; the setting of the tracing was made in the Tracing Options dialog box, and then it was impossible to access the other objects and interfaces.

 The new preset, "Silhouettes" allows quick creation of vector silhouettes.
 After the Expand command we get the vector object with the optimal amount of points.


 Note, in Adobe Illustrator CS6 you can set several of the Palette values. This parameter sets while the vector image is been made in color or in greyscale. As you can see, the new tracing engine in Adobe Illustrator CS6 shows better results.
 There is a new feature in Adobe Illustrator according to which you can instantly check out your original image. To do so, press and hold the eye icon near the View option.


 The overlapping method creates stacked paths, the contours of neighbor objects overlay.

The Minimum Area option corresponds to the Noise option in Adobe Illustrator CS6. This option specifies the size of the smallest areas of the initial image, which will be taken into account while tracing.
The Corner Angle option in Abode Illustrator CS5 corresponds with the Corners option in Adobe Illustrator CS6 and is been set in percentage. The higher value we set, the bigger amount of angles the final image will have.
 In Adobe Illustrator CS6 there are no such function of the tracing as the Blur and the Resample. In Adobe Illustrator CS5 the Blur function is for the reducing the number of small artifacts and smoothing the jagged edges in the final image. The Resample option allows speeding up the process of tracing for big size images, losing the quality of the output image.
 When we use the same preset in Adobe Illustrator CS6 the majority of small details disappear.
 Unfortunately, you need to change the parameters of the tracing manually in order to get the same results in Adobe Illustrator CS6.

 I’ve used different presets and operated the parameters manually, but I still couldn’t get the result which would correspond to the result that can be made in Adobe Illustrator CS5.
Read more »
In this tutorial I’ll use a photo a strawberry (credit to deviantART user StockProject1) ; the sketch was kindly provided by Victoria Vasilyeva and the texture (credit to deviantART user ~kingkool6).
Step 1
In Adobe Illustrator CS6 the settings of the tracing is in the new Image Trace panel (Window > Image Trace).Step 2
The presets have also changed between Adobe Illustrator CS5 and CS6Step 3
Let us evaluate the quality of the tracing using the same preset High Fidelity Photo in Adobe Illustrator CS5 and Adobe Illustrator CS6.Step 4
There were some changes in the Colors parameter. This parameter specifies the number of colors which the final vector image will consist of. In Adobe Illustrator CS5 the Max Colors options can be set in the number values, in Adobe Illustrator CS6 the Colors option can be set accurately in percentage.Step 5
You can get access to additional options of the settings if you press the Advanced key in the Image Trace panel. Now we have an opportunity to choose a tracing method. The Abutting method creates cutout paths. The contours of neighbor objects match.Step 6
The Path Fitting option defines the accuracy of the tracing of the initial raster image. In Adobe Illustrator CS5 the smaller value allows to create a more accurate contour, the bigger- the rough contour. In Adobe Illustrator CS6 it is vice versa, the bigger the value is the more accurate contour we get.The Minimum Area option corresponds to the Noise option in Adobe Illustrator CS6. This option specifies the size of the smallest areas of the initial image, which will be taken into account while tracing.
The Corner Angle option in Abode Illustrator CS5 corresponds with the Corners option in Adobe Illustrator CS6 and is been set in percentage. The higher value we set, the bigger amount of angles the final image will have.
Step 7
Let’s see how the new tracing engine works with sketches. Apply the preset Black & White Logo. The tracing of the sketch in Adobe Illustrator CS5 shows good results.Step 8
Let’s try to make the tracing of the texture. We will use the same Black&White Logo preset. As we can see, the result of the tracing in Adobe Illustrator CS5 looks better than in Adobe Illustrator CS6Conclusion
The new tracing engine really works good with the photos and allows quick and accurate vector silhouettes. But when you use it for tracing sketches and textures you will need to operate all the tracing processes manually, and that will not always show good result. If you work with the sketches and textures, the Live Trace feature in Adobe Illustrator CS5 shows good results when you use the presets. Have you used the trace features in Adobe CS6 yet? If so, what do you think?
Thursday, April 30, 2015
–,
cs6,
image,
optimization,
photoshop,
video2brain,
workshop
0
comments
Video2brain – Photoshop CS6 Image Optimization Workshop
The core strength of Photoshop is the way it enables you to improve the quality of your images, whether you’re fixing a major problem or making a subtle adjustment. In this workshop Tim Grey explores a wide variety of techniques to help you get the best results when optimizing your images.
Photoshop CS6 Image Optimization Workshop
He begins with basics like cropping, changing brightness and contrast, and correcting color balance, then moves on to more advanced adjustments like Shadows/Highlights, Curves, and dodging and burning. You’ll learn how to make targeted adjustments that affect only selected parts of the image and apply creative adjustments that don’t so much fix a problem as add a unique touch. And best of all, Tim teaches all these techniques as part of an overall workflow designed to help you work quickly, efficiently, and nondestructively.
Home: _http://iluly.net/1nc

Link Download Photoshop CS6 Image Optimization:
Read more »
Photoshop CS6 Image Optimization Workshop
He begins with basics like cropping, changing brightness and contrast, and correcting color balance, then moves on to more advanced adjustments like Shadows/Highlights, Curves, and dodging and burning. You’ll learn how to make targeted adjustments that affect only selected parts of the image and apply creative adjustments that don’t so much fix a problem as add a unique touch. And best of all, Tim teaches all these techniques as part of an overall workflow designed to help you work quickly, efficiently, and nondestructively.
Home: _http://iluly.net/1nc
Link Download Photoshop CS6 Image Optimization:
http://extabit.com/file/27a3omd6vg69...6IOW.part1.rar
http://extabit.com/file/27a3omd6zu72...6IOW.part2.rar
http://extabit.com/file/27a3omd6xz4h...6IOW.part3.rar
Mirror:
http://i-filez.com/downloads/i/76546...part1.rar.html
http://i-filez.com/downloads/i/76546...part2.rar.html
http://i-filez.com/downloads/i/76546...part3.rar.html
Mirror:
http://letitbit.net/download/19150.1...part1.rar.html
http://letitbit.net/download/53173.5...part2.rar.html
http://letitbit.net/download/54236.5...part3.rar.html
http://extabit.com/file/27a3omd6zu72...6IOW.part2.rar
http://extabit.com/file/27a3omd6xz4h...6IOW.part3.rar
Mirror:
http://i-filez.com/downloads/i/76546...part1.rar.html
http://i-filez.com/downloads/i/76546...part2.rar.html
http://i-filez.com/downloads/i/76546...part3.rar.html
Mirror:
http://letitbit.net/download/19150.1...part1.rar.html
http://letitbit.net/download/53173.5...part2.rar.html
http://letitbit.net/download/54236.5...part3.rar.html
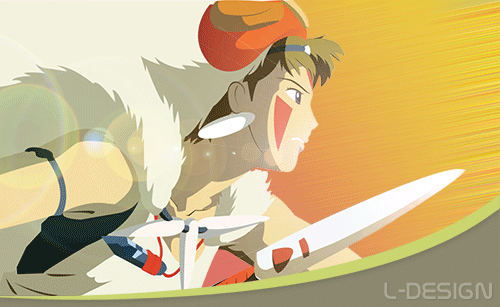
*Ctr + C and Ctr + F = copy and paste into the original position but forward.
*CTR + +/- to zoom in/out.
Step 1 Image Into Vector in illutrator cs6
Open the image, double click on the layer and rename as img, checked the dim image=50%. Create a new layer and make sure it is below of the img layer. Pick the pen tool, start draw from the face area. We will only draw the outer line of the image. For the color, just use the eyedropper tool to pick up from the image we use on the area which we are drawing. Rename layer as face_bg. After that, you will get the result as below:
Step 2 Image Into Vector in illutrator cs6
After that, we will draw out the shadow area which is the darker side. FYI, you only need to draw carefully when the area is intersect with the others. Rename layer as face_shadow. After that, you will get something like this:Step 3 Image Into Vector in illutrator cs6
To create the shadow area, select the face_bg layer then CTR + C and CTR + F. While the duplicated face_bg layer selected, left click on the face_shadow layer by holding shift. Goto window > Pathfinder, click the intersect shape area, then expand. As below: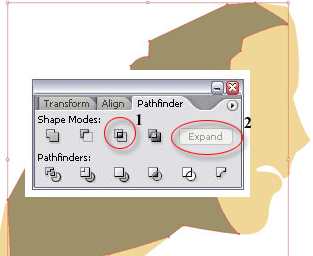
Step 4 Image Into Vector in illutrator cs6
Next, we are going to draw out her eye. You need to zoom in to draw this part.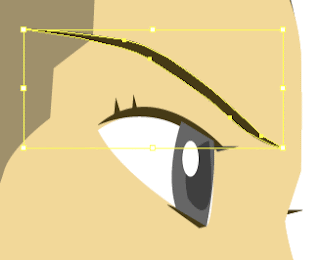
Step 5 Image Into Vector in illutrator cs6
After that, we will add the border for the face area.
Step 6 Image Into Vector in illutrator cs6
After that, we will draw her hair and hat.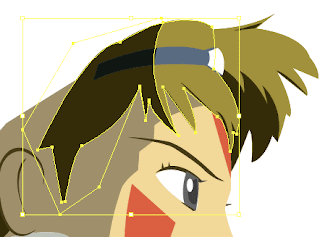
adobe,
cs6,
how,
illustrator,
image,
in,
new,
the,
to,
trace,
use
1 comments
How to Use the New Image Trace in Adobe Illustrator CS6
Today we will learn the new features of the tracing engine in Adobe Illustrator CS6 and talk about its new functions. We will trace a photo, a sketch and a texture; then we will compare the results between Adobe Illustrator CS5 and CS6. Let’s get started!
In this tutorial I’ll use a photo a strawberry (credit to deviantART user StockProject1) ; the sketch was kindly provided by Victoria Vasilyeva and the texture (credit to deviantART user ~kingkool6).
This allows us to use other panels and tools while tracing. Such features did not exist in Adobe Illustrator CS5 as well as in earlier releases; the setting of the tracing was made in the Tracing Options dialog box, and then it was impossible to access the other objects and interfaces.
The new preset, "Silhouettes" allows quick creation of vector silhouettes.
After the Expand command we get the vector object with the optimal amount of points.
Note, in Adobe Illustrator CS6 you can set several of the Palette values. This parameter sets while the vector image is been made in color or in greyscale. As you can see, the new tracing engine in Adobe Illustrator CS6 shows better results.
There is a new feature in Adobe Illustrator according to which you can instantly check out your original image. To do so, press and hold the eye icon near the View option.
The overlapping method creates stacked paths, the contours of neighbor objects overlay.
The Minimum Area option corresponds to the Noise option in Adobe Illustrator CS6. This option specifies the size of the smallest areas of the initial image, which will be taken into account while tracing.
The Corner Angle option in Abode Illustrator CS5 corresponds with the Corners option in Adobe Illustrator CS6 and is been set in percentage. The higher value we set, the bigger amount of angles the final image will have.
In Adobe Illustrator CS6 there are no such function of the tracing as the Blur and the Resample. In Adobe Illustrator CS5 the Blur function is for the reducing the number of small artifacts and smoothing the jagged edges in the final image. The Resample option allows speeding up the process of tracing for big size images, losing the quality of the output image.
When we use the same preset in Adobe Illustrator CS6 the majority of small details disappear.
Unfortunately, you need to change the parameters of the tracing manually in order to get the same results in Adobe Illustrator CS6.
I’ve used different presets and operated the parameters manually, but I still couldn’t get the result which would correspond to the result that can be made in Adobe Illustrator CS5.
Read more »
In this tutorial I’ll use a photo a strawberry (credit to deviantART user StockProject1) ; the sketch was kindly provided by Victoria Vasilyeva and the texture (credit to deviantART user ~kingkool6).
Step 1
In Adobe Illustrator CS6 the settings of the tracing is in the new Image Trace panel (Window > Image Trace).Step 2
The presets have also changed between Adobe Illustrator CS5 and CS6Step 3
Let us evaluate the quality of the tracing using the same preset High Fidelity Photo in Adobe Illustrator CS5 and Adobe Illustrator CS6.Step 4
There were some changes in the Colors parameter. This parameter specifies the number of colors which the final vector image will consist of. In Adobe Illustrator CS5 the Max Colors options can be set in the number values, in Adobe Illustrator CS6 the Colors option can be set accurately in percentage.Step 5
You can get access to additional options of the settings if you press the Advanced key in the Image Trace panel. Now we have an opportunity to choose a tracing method. The Abutting method creates cutout paths. The contours of neighbor objects match.Step 6
The Path Fitting option defines the accuracy of the tracing of the initial raster image. In Adobe Illustrator CS5 the smaller value allows to create a more accurate contour, the bigger- the rough contour. In Adobe Illustrator CS6 it is vice versa, the bigger the value is the more accurate contour we get.The Minimum Area option corresponds to the Noise option in Adobe Illustrator CS6. This option specifies the size of the smallest areas of the initial image, which will be taken into account while tracing.
The Corner Angle option in Abode Illustrator CS5 corresponds with the Corners option in Adobe Illustrator CS6 and is been set in percentage. The higher value we set, the bigger amount of angles the final image will have.
Step 7
Let’s see how the new tracing engine works with sketches. Apply the preset Black & White Logo. The tracing of the sketch in Adobe Illustrator CS5 shows good results.Step 8
Let’s try to make the tracing of the texture. We will use the same Black&White Logo preset. As we can see, the result of the tracing in Adobe Illustrator CS5 looks better than in Adobe Illustrator CS6Conclusion
The new tracing engine really works good with the photos and allows quick and accurate vector silhouettes. But when you use it for tracing sketches and textures you will need to operate all the tracing processes manually, and that will not always show good result. If you work with the sketches and textures, the Live Trace feature in Adobe Illustrator CS5 shows good results when you use the presets. Have you used the trace features in Adobe CS6 yet? If so, what do you think?
Friday, April 3, 2015
effect,
exploding,
image,
or,
splatter
0
comments
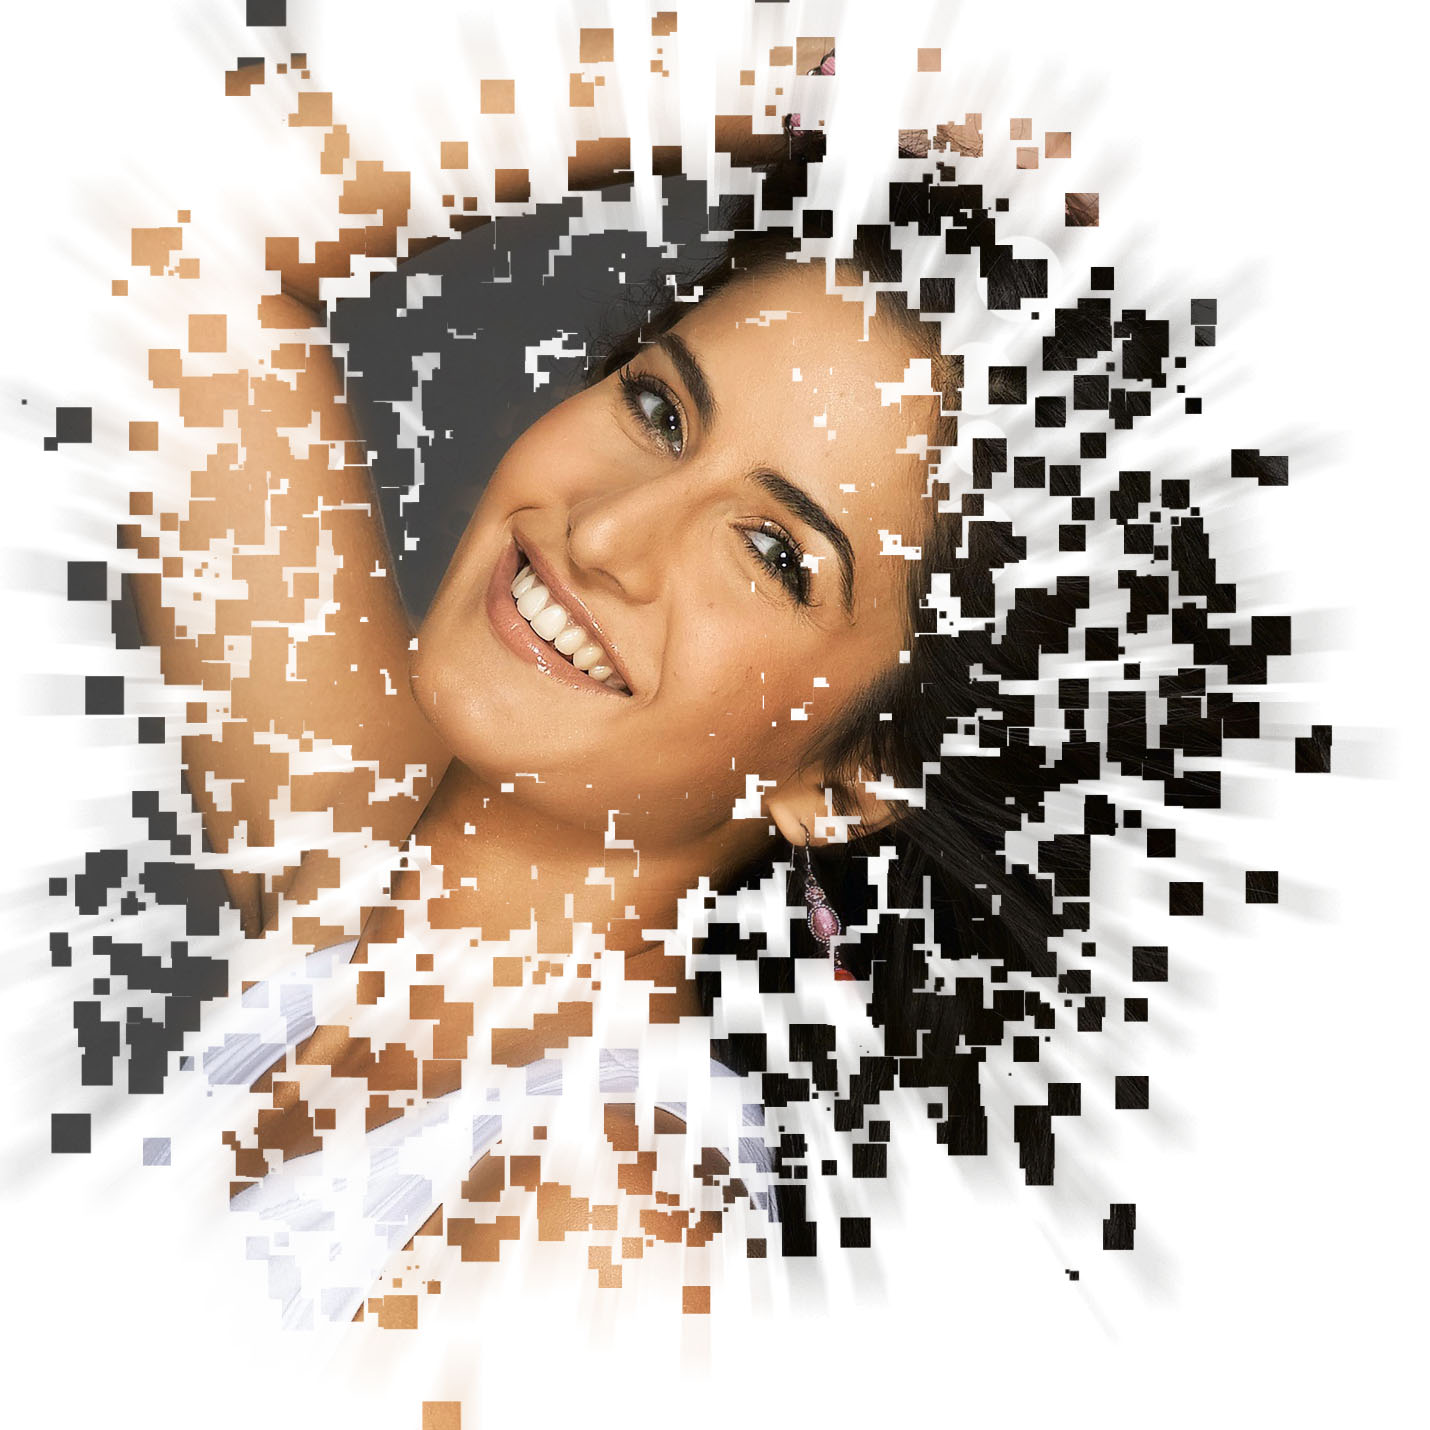
Exploding Image or Splatter Image Effect
Tutorial for Exploding Image
Final view
Step 1:
Create New File.
Paint The background with white color.

Step 2:
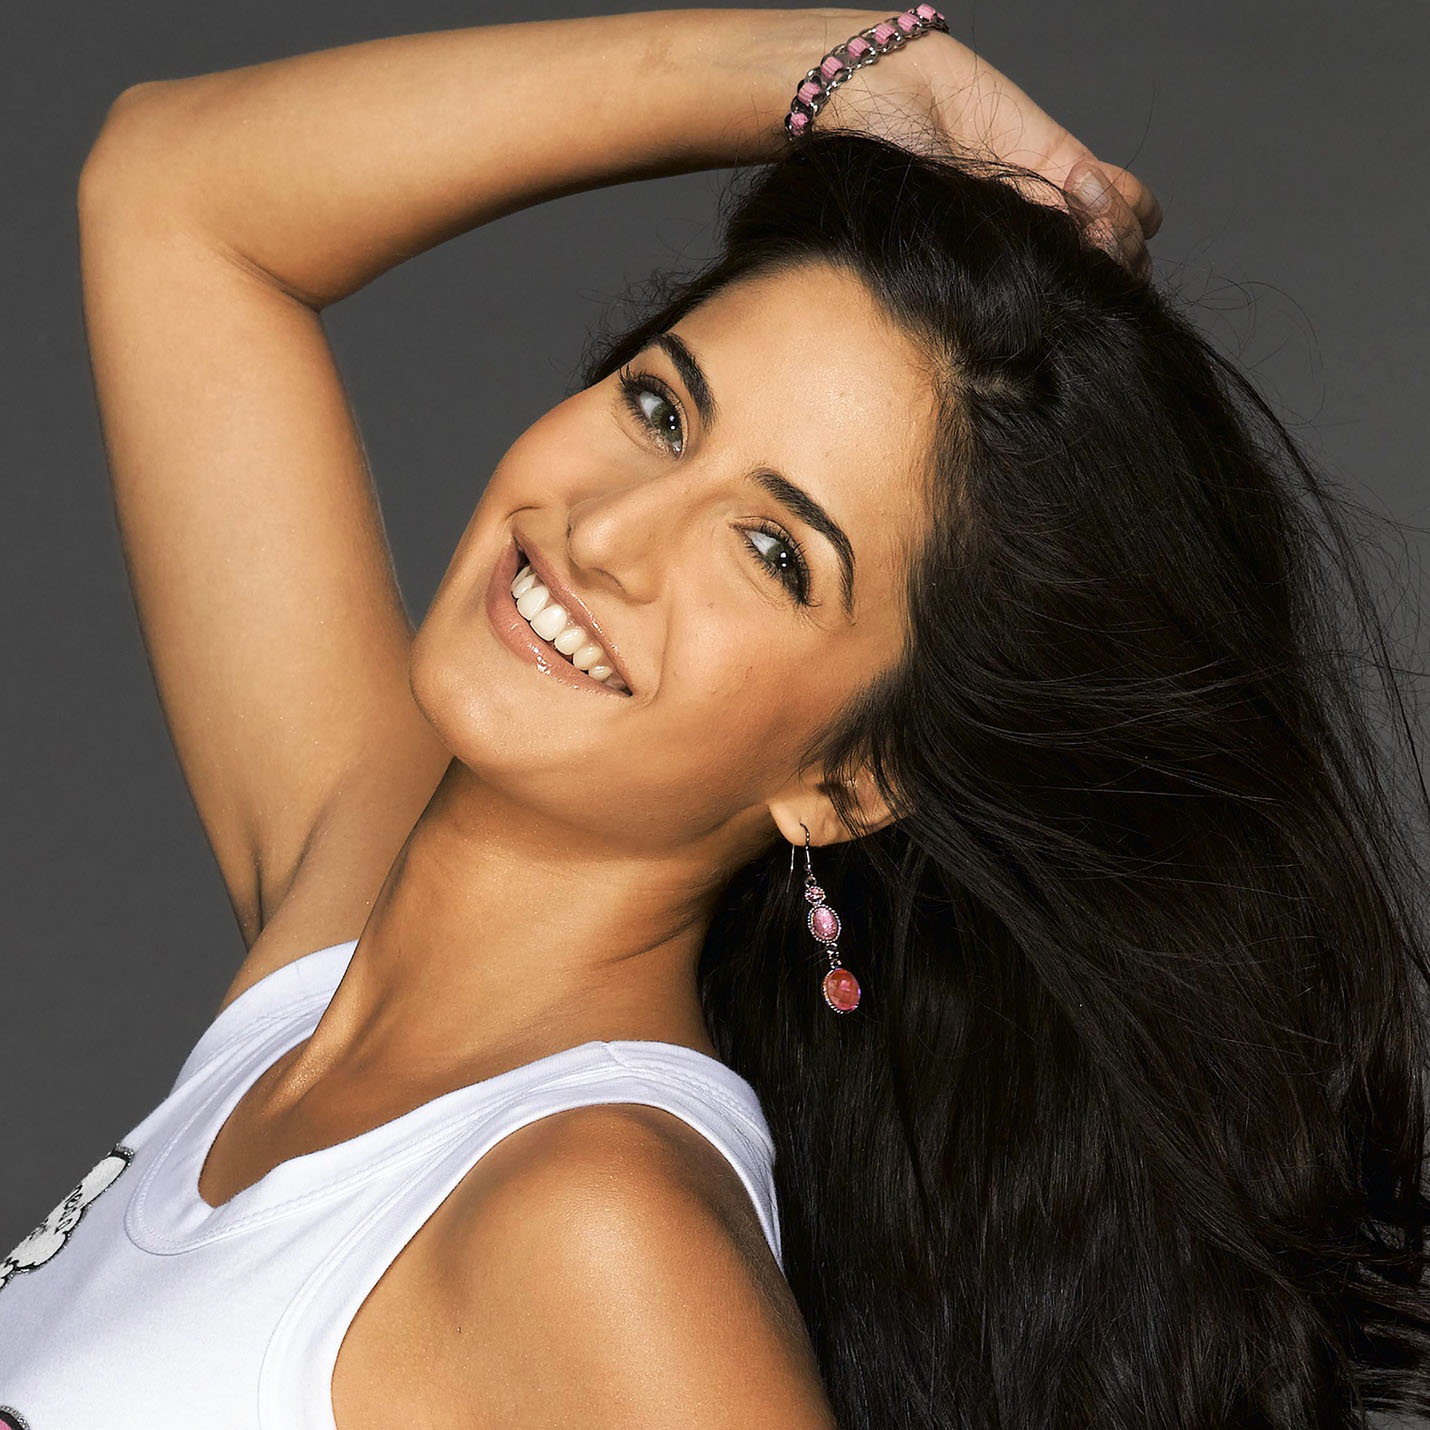
Add your image/object on at center .
Step 3:
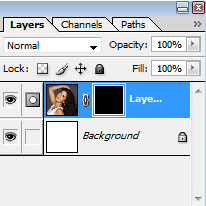
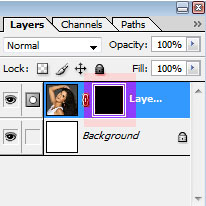
Go to Layer---> Add Layer Mask ---> Hide All.
Step 3:
Select the Square brush. (24-28 px).


Step 3:
Select the Square brush. (24-28 px).
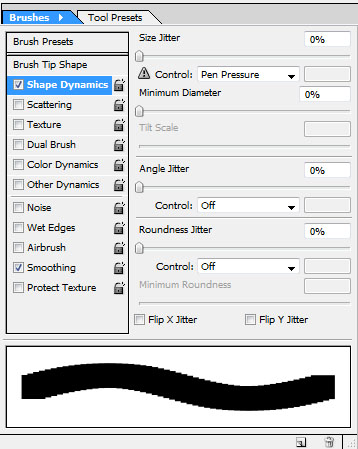
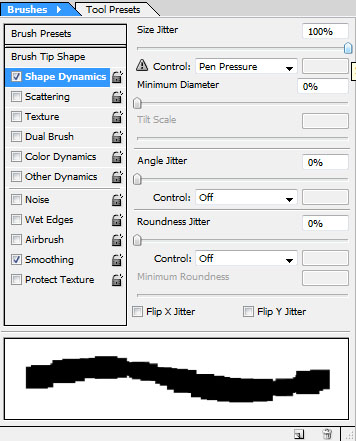
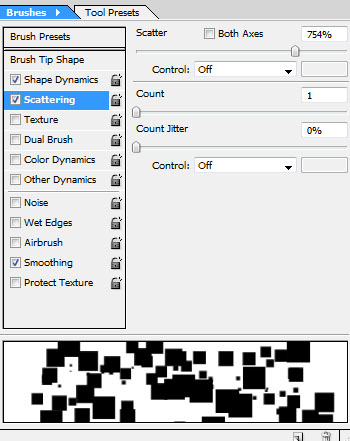
Now go to Window ---> Brushes.
You will see following window.
Select first check box of "shape dynamics", and increase site jitter to 100%.
Now select 2nd check box Scattering and increase Scattering to 750% to 760%.
Now come to image, and give strikes on the masked layer, which appears Black as shown below.
Step 4:
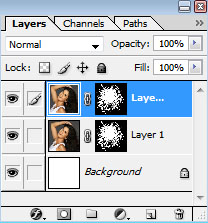
Now make a duplicate layer by pressing Ctrl+J.
Step 5:
Now go to Filter ---> blur ---> radial blur.
set blur method to zoom and amount to 40/50.
And press OK.
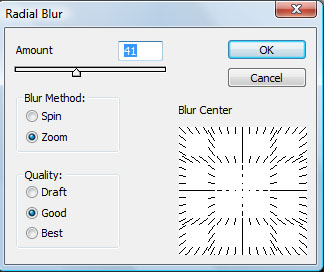
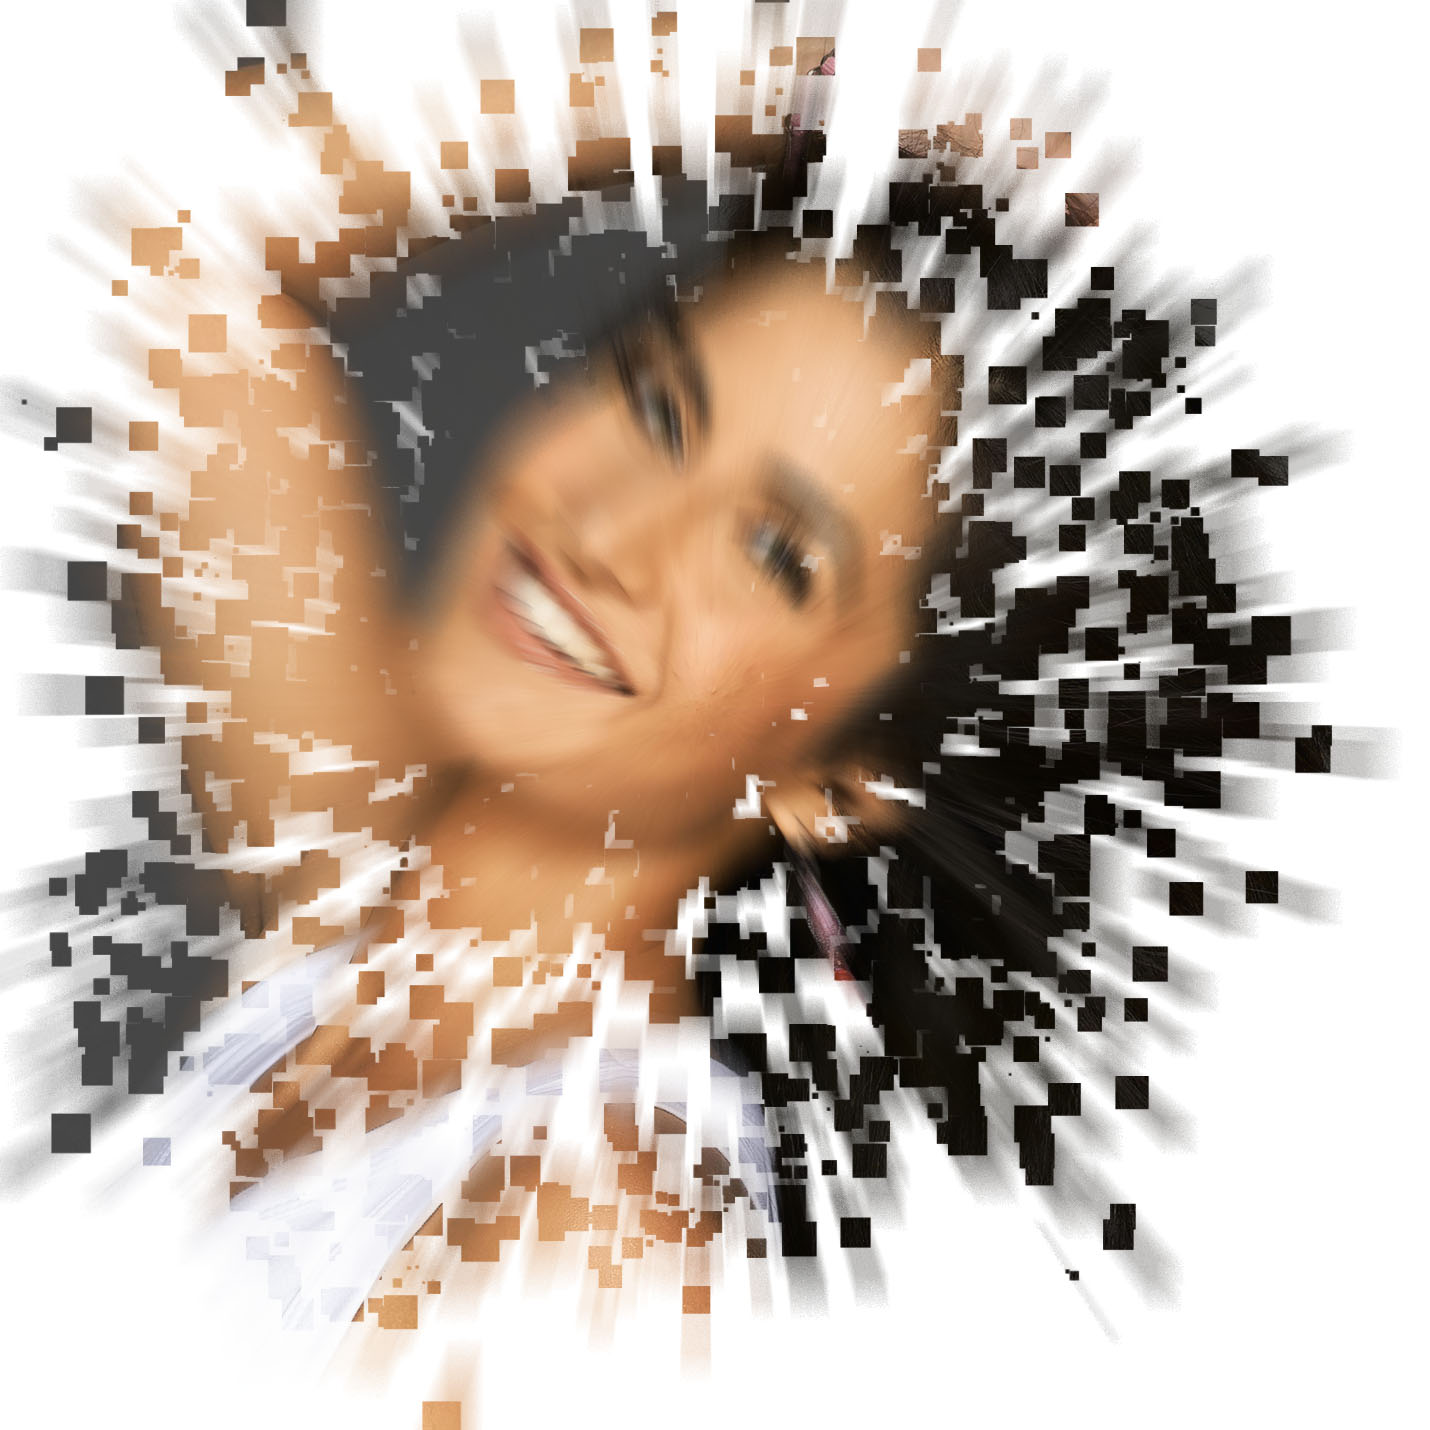
set blur method to zoom and amount to 40/50.
And press OK.
Step 6:
Now set the opacity of this layer to 50% to 60%.
Select the Eraser toll and erase some blurred area near object(face).
Select the Eraser toll and erase some blurred area near object(face).
Subscribe to:
Posts (Atom)


- Follow Us on Twitter!
- "Join Us on Facebook!
- RSS
Contact