Showing posts with label the. Show all posts
Showing posts with label the. Show all posts
Thursday, June 18, 2015
a,
an,
and,
background,
content,
create,
fill,
from,
hole,
how,
object,
pse9,
remove,
scene,
the,
to,
using
0
comments
How to remove an object from a scene and create background content to fill the hole using PSE9
Is there a tool in PSE which can help you remove an object or a person from foreground of an image by filling it with the background content?
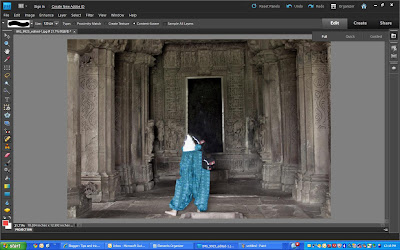
So in my source image above, I wanted to remove the girl from the temple and have just the building.
It may be achievable with clone tool, however it would really be a big time task.
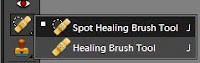
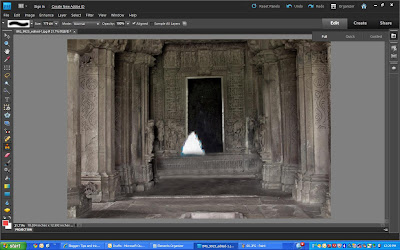
Yes, there is one which was introduced in PSE 9. So here are my initial and final images to show what this tutorial will help you achieve through this tutorial:
 |
| Initial image |
 |
| Final image |
So in my source image above, I wanted to remove the girl from the temple and have just the building.
It may be achievable with clone tool, however it would really be a big time task.
For non-complex images, it may just take seconds to fix that photo using content aware spot healing by doing just a couple of dabs
.
However, I choose an image which is complex as we need to remove a person whose background is not consistent throughout. It has the dark area inside the gate, the gate boundaries, the sculptured wall, the ground with variations in textures and colors. And spot healing from previous versions of PSE might not work since it does not have that intelligence to create content from background and fill it with it.
.
However, I choose an image which is complex as we need to remove a person whose background is not consistent throughout. It has the dark area inside the gate, the gate boundaries, the sculptured wall, the ground with variations in textures and colors. And spot healing from previous versions of PSE might not work since it does not have that intelligence to create content from background and fill it with it.
1. Open the image in Editor.
2. Select Spot healing tool from the left tool bar.
 |
| The spot healing brush properties in top properties bar |
3. Now keeping "Content-Aware" option selected in Properties panel, a keeping brugh size of the area not very big(which can be incremented and decremented using ],[ keys), start brushing(dabbing) over the object you want to remove.
So here are some tips which I have learnt on using this tool again and again :
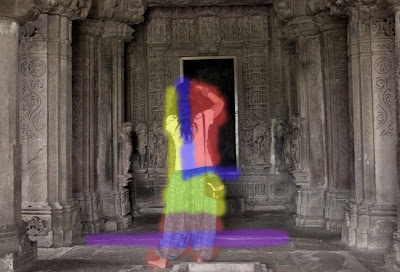
1. In the image above, for areas marked in red, I could use a bigger brush size without worrying much as the background behind the red mark is not very complex and is consistent, and I am not worried much as there are change in colors, no linear planes changing etc. So I can do this part quickly.
2. The areas marked in yellow are bit complicated as they have carvings on the wall. So would be good to start dabbing the brush with small size from the area near to the yellow area boundary in a linear manner. So if you see the carvings on the wall, they are horizontally linear. So it would be good if I start from the left near the boundary of the yellow area towards right horizonally.
3. The areas marked in blue(In L shape) is the area which should be taken care alittle meticulously since it has the frame of the door which has straight lines which need to be content created. So for this I reduced the brush size so that it did not cover the breadth of the frame and started from left such that the brush area includes the area of the existing frame(white frame area). However, this decision making may vary from image to image which would come to you as you try this tool a few times. For non-complex images, it may just take seconds to fix that photo using content aware spot healing and you may not have to do any such decision making. But for complex images, you might need a little thinking to get the best results.
4. For the area in purple, I used clone tool as it was quicker for that scenario. Spot healing content aware brushcould also have been used.
Here is my final result :
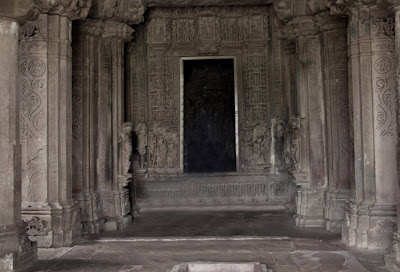
Hope this tutorial helps!!!
So here are some tips which I have learnt on using this tool again and again :
1. In the image above, for areas marked in red, I could use a bigger brush size without worrying much as the background behind the red mark is not very complex and is consistent, and I am not worried much as there are change in colors, no linear planes changing etc. So I can do this part quickly.
3. The areas marked in blue(In L shape) is the area which should be taken care alittle meticulously since it has the frame of the door which has straight lines which need to be content created. So for this I reduced the brush size so that it did not cover the breadth of the frame and started from left such that the brush area includes the area of the existing frame(white frame area). However, this decision making may vary from image to image which would come to you as you try this tool a few times. For non-complex images, it may just take seconds to fix that photo using content aware spot healing and you may not have to do any such decision making. But for complex images, you might need a little thinking to get the best results.
4. For the area in purple, I used clone tool as it was quicker for that scenario. Spot healing content aware brushcould also have been used.
Here is my final result :
Hope this tutorial helps!!!

Saturday, June 13, 2015
–,
corel,
on,
road,
text,
the,
tutorial,
x3
0
comments
Text on the Road – Corel X3 Tutorial
Text on the Road – Corel X3 Tutorial
In this tutorial we will show you how to place text on a street in Corel Draw X3.
Start a new drawing.
Then import a street photo:



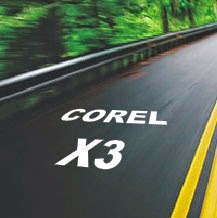
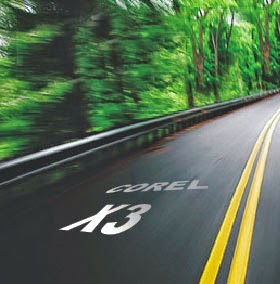


Then import a street photo:
Now type the text you want to add to the road:
Then place it over the picture:
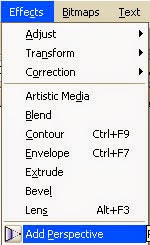
As soon as you finish, add some perspective:
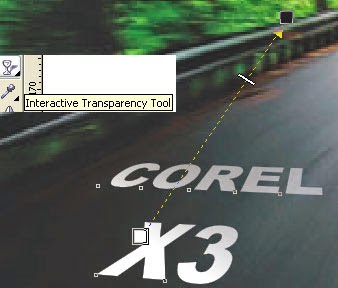
Then, add the Interactive Transparency tool to the text:
Look how cool it is looking now:
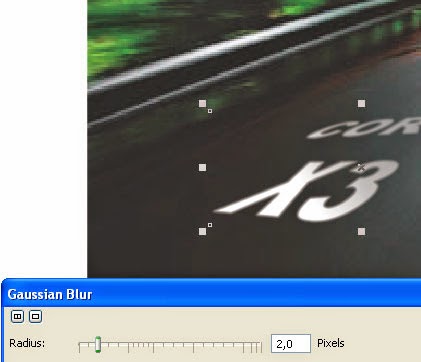
As this is an image in motion, we need to add the same motion to our text.
So lets add some Gaussian Blur:
So lets add some Gaussian Blur:
This is the result:
You can do it ...
Download the original source files from this tutorial in Zip format Here
Tuesday, May 19, 2015
better,
for,
how,
in,
making,
pse,
quick,
selection,
selections,
the,
to,
tool,
train
0
comments
How to train the quick selection tool for making better selections in PSE
Quick selection is a great tool for selecting objects in any image. It intelligently selects the object distinctly from the background by detecting the brightness, contrast and tonal changes along the objects and their backgrounds. It takes just a little mouse drag with in an object to select an background.
For example : for the image below I just dragged my mouse from point A to point B for selecting the whole apple instead of moving my mouse along the edges of the whole apple which we would require for other selection tools.
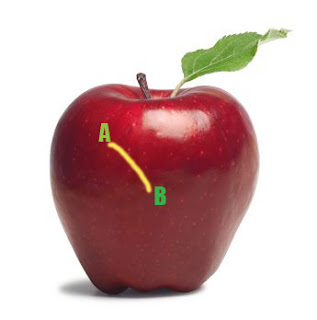
This is how my object was selected moving my mouse from point A to B (Please note I increased the brush size to 35 px from options bar after selecting the quick selection tool for making this selection) :
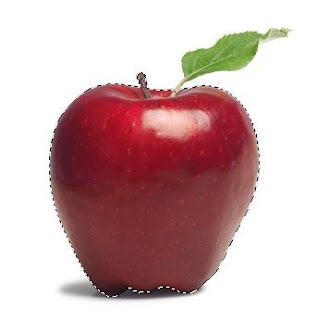
However in the above image, there is good contrast between the object to be selected and its background. So we did not need to train our quick selection tool. But for getting better results in minimum time when there is not much great color difference or contrast between our object and background, it is recommended that you train your quick selection tool.
So in an image like below, where there is not that great color contrast between yellow flower and its background, we would train our tool.

So if I move my quick selection tool from point A to B to select the yellow flower, here is what
I get as selected :
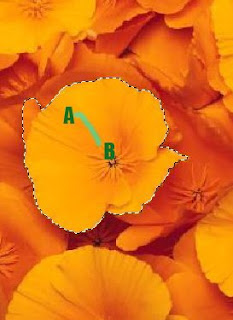
However I did not need this extra highlighted(green) part in my selection(as shown below) which was selected when I moved my mouse from point A to point B. But since there is a low contrast between the orange and the yellow here, this area too got selected.

So instead of selecting my flower in one go as shown above, I follow the steps below to get my needed selection :
1. Select a very small part of the yellow flower as shown after selecting Quick selection tool.

2. Now I will press Alt key and keeping it pressed, I click and drag my mouse over the area I did not want in the selection. So I brush my mouse over the green highlighted region shown in the second last image.
I also notice that as soon as I click Alt key my mouse cursor changes from "+" to "-" as it tell what area not to select.
Once I am done with that I leave the Alt key back and again move my mouse from point A to B as I did earlier and here is how I get my desired selection :

So here I have trained my quick selection tool not to select what areas of contrast. So if I had the similar background around the whole flower, then I would just drag my mouse once along the boundaries of the flower to tell my tool about the low contrast areas which I do not want to select.
Also keep in mind that if you have a large and random objects to be selected then you should keep subtracting the wrong selections you make as you sweep and not to defer the subtraction task in the end. This trains my tool at every step of selection and tell it what "not" to selection as it goes ahead.
I hope you find this tutorial helpful!
Read more »
For example : for the image below I just dragged my mouse from point A to point B for selecting the whole apple instead of moving my mouse along the edges of the whole apple which we would require for other selection tools.
This is how my object was selected moving my mouse from point A to B (Please note I increased the brush size to 35 px from options bar after selecting the quick selection tool for making this selection) :
However in the above image, there is good contrast between the object to be selected and its background. So we did not need to train our quick selection tool. But for getting better results in minimum time when there is not much great color difference or contrast between our object and background, it is recommended that you train your quick selection tool.
So in an image like below, where there is not that great color contrast between yellow flower and its background, we would train our tool.
So if I move my quick selection tool from point A to B to select the yellow flower, here is what
I get as selected :
However I did not need this extra highlighted(green) part in my selection(as shown below) which was selected when I moved my mouse from point A to point B. But since there is a low contrast between the orange and the yellow here, this area too got selected.
So instead of selecting my flower in one go as shown above, I follow the steps below to get my needed selection :
1. Select a very small part of the yellow flower as shown after selecting Quick selection tool.
2. Now I will press Alt key and keeping it pressed, I click and drag my mouse over the area I did not want in the selection. So I brush my mouse over the green highlighted region shown in the second last image.
I also notice that as soon as I click Alt key my mouse cursor changes from "+" to "-" as it tell what area not to select.
Once I am done with that I leave the Alt key back and again move my mouse from point A to B as I did earlier and here is how I get my desired selection :
So here I have trained my quick selection tool not to select what areas of contrast. So if I had the similar background around the whole flower, then I would just drag my mouse once along the boundaries of the flower to tell my tool about the low contrast areas which I do not want to select.
Also keep in mind that if you have a large and random objects to be selected then you should keep subtracting the wrong selections you make as you sweep and not to defer the subtraction task in the end. This trains my tool at every step of selection and tell it what "not" to selection as it goes ahead.
I hope you find this tutorial helpful!
Friday, May 1, 2015
adobe,
cs6,
how,
illustrator,
image,
in,
new,
the,
to,
trace,
use
0
comments
How to Use the New Image Trace in Adobe Illustrator CS6
Today we will learn the new features of the tracing engine in Adobe Illustrator CS6 and talk about its new functions. We will trace a photo, a sketch and a texture; then we will compare the results between Adobe Illustrator CS5 and CS6. Let’s get started!
In this tutorial I’ll use a photo a strawberry (credit to deviantART user StockProject1) ; the sketch was kindly provided by Victoria Vasilyeva and the texture (credit to deviantART user ~kingkool6).
 This allows us to use other panels and tools while tracing. Such features did not exist in Adobe Illustrator CS5 as well as in earlier releases; the setting of the tracing was made in the Tracing Options dialog box, and then it was impossible to access the other objects and interfaces.

 The new preset, "Silhouettes" allows quick creation of vector silhouettes.
 After the Expand command we get the vector object with the optimal amount of points.


 Note, in Adobe Illustrator CS6 you can set several of the Palette values. This parameter sets while the vector image is been made in color or in greyscale. As you can see, the new tracing engine in Adobe Illustrator CS6 shows better results.
 There is a new feature in Adobe Illustrator according to which you can instantly check out your original image. To do so, press and hold the eye icon near the View option.


 The overlapping method creates stacked paths, the contours of neighbor objects overlay.

The Minimum Area option corresponds to the Noise option in Adobe Illustrator CS6. This option specifies the size of the smallest areas of the initial image, which will be taken into account while tracing.
The Corner Angle option in Abode Illustrator CS5 corresponds with the Corners option in Adobe Illustrator CS6 and is been set in percentage. The higher value we set, the bigger amount of angles the final image will have.
 In Adobe Illustrator CS6 there are no such function of the tracing as the Blur and the Resample. In Adobe Illustrator CS5 the Blur function is for the reducing the number of small artifacts and smoothing the jagged edges in the final image. The Resample option allows speeding up the process of tracing for big size images, losing the quality of the output image.
 When we use the same preset in Adobe Illustrator CS6 the majority of small details disappear.
 Unfortunately, you need to change the parameters of the tracing manually in order to get the same results in Adobe Illustrator CS6.

 I’ve used different presets and operated the parameters manually, but I still couldn’t get the result which would correspond to the result that can be made in Adobe Illustrator CS5.
Read more »
In this tutorial I’ll use a photo a strawberry (credit to deviantART user StockProject1) ; the sketch was kindly provided by Victoria Vasilyeva and the texture (credit to deviantART user ~kingkool6).
Step 1
In Adobe Illustrator CS6 the settings of the tracing is in the new Image Trace panel (Window > Image Trace).Step 2
The presets have also changed between Adobe Illustrator CS5 and CS6Step 3
Let us evaluate the quality of the tracing using the same preset High Fidelity Photo in Adobe Illustrator CS5 and Adobe Illustrator CS6.Step 4
There were some changes in the Colors parameter. This parameter specifies the number of colors which the final vector image will consist of. In Adobe Illustrator CS5 the Max Colors options can be set in the number values, in Adobe Illustrator CS6 the Colors option can be set accurately in percentage.Step 5
You can get access to additional options of the settings if you press the Advanced key in the Image Trace panel. Now we have an opportunity to choose a tracing method. The Abutting method creates cutout paths. The contours of neighbor objects match.Step 6
The Path Fitting option defines the accuracy of the tracing of the initial raster image. In Adobe Illustrator CS5 the smaller value allows to create a more accurate contour, the bigger- the rough contour. In Adobe Illustrator CS6 it is vice versa, the bigger the value is the more accurate contour we get.The Minimum Area option corresponds to the Noise option in Adobe Illustrator CS6. This option specifies the size of the smallest areas of the initial image, which will be taken into account while tracing.
The Corner Angle option in Abode Illustrator CS5 corresponds with the Corners option in Adobe Illustrator CS6 and is been set in percentage. The higher value we set, the bigger amount of angles the final image will have.
Step 7
Let’s see how the new tracing engine works with sketches. Apply the preset Black & White Logo. The tracing of the sketch in Adobe Illustrator CS5 shows good results.Step 8
Let’s try to make the tracing of the texture. We will use the same Black&White Logo preset. As we can see, the result of the tracing in Adobe Illustrator CS5 looks better than in Adobe Illustrator CS6Conclusion
The new tracing engine really works good with the photos and allows quick and accurate vector silhouettes. But when you use it for tracing sketches and textures you will need to operate all the tracing processes manually, and that will not always show good result. If you work with the sketches and textures, the Live Trace feature in Adobe Illustrator CS5 shows good results when you use the presets. Have you used the trace features in Adobe CS6 yet? If so, what do you think?
Thursday, April 30, 2015
and,
artboards,
changing,
cs6,
illustrator,
in,
of,
shape,
size,
the
0
comments
Changing the size and shape of artboards in Illustrator CS6
Changing the size and shape of artboards in Illustrator CS6
 In this movie, I will show you how to change the change the shape and size of your artboards.
Now the first thing I would like you to do, just to make sure that you and I are on the same page, is to go up to the View menu, and make sure that the Smart Guides command is turned on.
If you see a check mark everythings good, if not go ahead and choose the command, you also have the keyboard shortcut of Ctrl+U and Command+U on a Mac.
What Smart Guides do is they allow you to align objects inside of your illustrationsas well as artboards on the fly.
Next step, of course, is to switch to Artboard tool, you can get by pressing Shift+O, or you can just click on it here inside the toolbox.
But before I do that, I want you to notice something.
At this point, you can see that page 1 is active because it has a black outline, whereas page 2 or Artboard 2 if you prefer is not selected nor or any of the others, because they have gray outlines.
If you click on lets say Artboard 4, you can see that it gets the black outline because
its now active and the others are inactive.
Youll also see a number 4 down here in the bottom left corner of the window.
Illustrator goes ahead and numbers Artboards automatically, in the order you create them.
You can override that however that I will show you in a later movie.
Now I will go ahead and switch to the Artboard tool and notice that Artboard 4 is highlighted.
So I just want you to see that artboard thats selected in a standard mode also become selected here inside Artboard mode.
I am going to go ahead and switch back to Artboard 1 by clicking on it and notice that
you have these handles that are surrounding the Artboard.
If you drag one of the handles then you will resize Artboard on the fly and see those green lines, those are the Smart Guides.
So I have got one Smart Guide on the far right side of artboard and another down there at
the bottom thats showing me that I have a center intersection.
So I know that Im exactly aligned to the right side of pages 2 and 6 as well as the
Now, I am going to drag this bottom handle down until I get alignment with the bottom
of those artboards, and I now have this large artboard that includes 1, 2, 5, and 6 and
has independent artboards inside of it for 2, 5, and 6, which can be a very useful way
to work if you want to have one larger artboard that includes all the artwork inside of a
document, for example, as well as independent artboards for each item.
Its a great way to organize and control the output of your artboard.
You also have some options that are available to you up here in the Options bar.
Notice that I have these orientation icon, so I can switch from Portrait to Landscape
just by clicking on it.
You can also select from preset artboard sizes, such as the popular page sizes letter here
Illustrator CS6in States and A4 in Europe and elsewhere.
Ill go ahead and select A4 for now.
You also have numerical control over the size and location of your artboard.
Lets say, I want to go ahead and switch mine back to 6x8 inches.
I would go ahead and highlight Width value, and you can do that, by the way just by clicking
on the letter next to it.
So Ill click on the W, and Ill change it to 6 in, and then press the tab key, and Ill
change the Height value which is now active to 8 in order to reset the size of that page.
Notice however, that Illustrator went ahead and resized the artboard with respect to its
center, and thats because the center reference point is selected up here in the Options bar.
If I want to position the artboard with respect to its upper left corner, I go ahead and click
on the upper left point inside of that reference matrix, and now Ill change the X value to 0,
and then Ill tab to the Y value and change it to 0 as well, and that gos ahead and restores
the original location of the page. In order to accept the work just press the Escape key
in order to return to the Black Arrow tool.
Read more »
Illustrator CS6 Tutorial Video,
I have gone ahead and restored the saved version of 8-page newsletter.ai found inside the 02_artboards folder.Now the first thing I would like you to do, just to make sure that you and I are on the same page, is to go up to the View menu, and make sure that the Smart Guides command is turned on.
If you see a check mark everythings good, if not go ahead and choose the command, you also have the keyboard shortcut of Ctrl+U and Command+U on a Mac.
What Smart Guides do is they allow you to align objects inside of your illustrationsas well as artboards on the fly.
Next step, of course, is to switch to Artboard tool, you can get by pressing Shift+O, or you can just click on it here inside the toolbox.
But before I do that, I want you to notice something.
At this point, you can see that page 1 is active because it has a black outline, whereas page 2 or Artboard 2 if you prefer is not selected nor or any of the others, because they have gray outlines.
If you click on lets say Artboard 4, you can see that it gets the black outline because
its now active and the others are inactive.
Youll also see a number 4 down here in the bottom left corner of the window.
Illustrator goes ahead and numbers Artboards automatically, in the order you create them.
You can override that however that I will show you in a later movie.
Now I will go ahead and switch to the Artboard tool and notice that Artboard 4 is highlighted.
So I just want you to see that artboard thats selected in a standard mode also become selected here inside Artboard mode.
I am going to go ahead and switch back to Artboard 1 by clicking on it and notice that
you have these handles that are surrounding the Artboard.
If you drag one of the handles then you will resize Artboard on the fly and see those green lines, those are the Smart Guides.
So I have got one Smart Guide on the far right side of artboard and another down there at
the bottom thats showing me that I have a center intersection.
So I know that Im exactly aligned to the right side of pages 2 and 6 as well as the
Illustrator CS6 Tutorial Video,
center of the bottom row of artboards.Now, I am going to drag this bottom handle down until I get alignment with the bottom
of those artboards, and I now have this large artboard that includes 1, 2, 5, and 6 and
has independent artboards inside of it for 2, 5, and 6, which can be a very useful way
to work if you want to have one larger artboard that includes all the artwork inside of a
document, for example, as well as independent artboards for each item.
Its a great way to organize and control the output of your artboard.
You also have some options that are available to you up here in the Options bar.
Notice that I have these orientation icon, so I can switch from Portrait to Landscape
just by clicking on it.
You can also select from preset artboard sizes, such as the popular page sizes letter here
Ill go ahead and select A4 for now.
You also have numerical control over the size and location of your artboard.
Lets say, I want to go ahead and switch mine back to 6x8 inches.
I would go ahead and highlight Width value, and you can do that, by the way just by clicking
on the letter next to it.
So Ill click on the W, and Ill change it to 6 in, and then press the tab key, and Ill
change the Height value which is now active to 8 in order to reset the size of that page.
Notice however, that Illustrator went ahead and resized the artboard with respect to its
center, and thats because the center reference point is selected up here in the Options bar.
If I want to position the artboard with respect to its upper left corner, I go ahead and click
on the upper left point inside of that reference matrix, and now Ill change the X value to 0,
and then Ill tab to the Y value and change it to 0 as well, and that gos ahead and restores
the original location of the page. In order to accept the work just press the Escape key
in order to return to the Black Arrow tool.
a,
arc,
cs6,
drawing,
heart,
illustrator,
in,
the,
tool,
with
0
comments
Drawing a heart with the Arc tool in Illustrator CS6
In this movie, Ill show you how to begin creating the heart outline using the Arc tool in Illustrator CS6 . Ive saved my changes as All guides.ai found inside the 04_line_art folder. Lets go ahead and switch to Arc tool, and its a pretty easy concept when you drag with a tool you can see that you create as I was saying before, a quarter ellipse. And you might imagine that this is going to serve as well for the first hump in our heart, but we are not going to start at this arbitrary location.
We are going to start right there at the intersection of the central vertical guide and the second horizontal guide down. So I will go ahead and press the Backspace key or the Delete key on the Mac, in order get rid of that bad arc. And now I will drag up on to the left, like so, while pressing the Shift key, and you want to drag until you snap to that guideline up there. And you kind of want to inch it back a little bit to the right so that the heads-up display says, a Width of 112 pts and a Height of 112 pts. And by virtue of the fact incidentally that we were pressing the Shift key were getting a perfect quarter circle. So you want to keep that Shift key down the entire time, and then you want to release your mouse button, and then release the Shift key.
In this Case Drawing a heart with the Arc tool in Illustrator CS6
Now you want to drag from that anchor point, so make sure that your cursor says the word Anchor on it. And you want to drag down into the left until you intersect with the first vertical guideline and the second horizontal guide. Now the arc will definitely go in the wrong direction just as you see on my screen. To flip it, what you do is you keep your mouse button down, and you just tap the F key. Then you go ahead and release the mouse button in order to create the second arc.
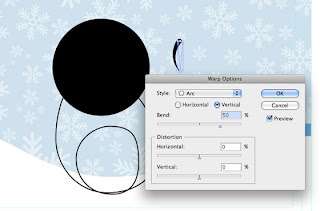
Next, we need to go ahead and draw the bottom portion of the heart, and you might be tempted to do one of these numbers, where you draw the outer lump here, and you press the F key in order to flip it, and then you draw a final arc, and you press F again, once to flip it, but that would result in one ugly looking heart. So thats not what we want. Lets go ahead and get rid of those path outlines by switching to the Black Arrow tool and notice, by the way, the Black Arrow has a keyboard shortcut of V, all you have to do is just tap the V key. And you might think of V as being an upside down arrow. So weve got the Black Arrow thats got an upside down arrow for a keyboard in Illustrator CS6 shortcut, that is the V key. And then weve got a White Arrow, Ill tell you how it works later, thats got a right side up arrow for its keyboard shortcut, which is the A key, which of course also happens to stand for arrow. All right, I am going to go ahead and switch to the Black Arrow, which allows me to select entire path outlines, which is what these things are called inside of Illustrator.
Notice that at this point Im seeing a bounding box around my selected arc. The bounding box extensibly makes it easy to scale and rotate a graphic. But in my experience it gets in the way of getting actual work done, and there are better ways to scale and rotate, as Ill show you in a future chapter. So I am going to advise that you turn the bounding box off, and Im definitely doing so. By going up to the View menu and choosing the Hide Bounding Box command. If you ever need the Bounding Box in the future just choose this command again and of course, its got a keyboard shortcut Ctrl+ Shift+B, or Command+Shift+B on a Mac.
Now I am going to draw this dotted marquee in order to partially select these two path outlines and that will select them both, and then Ill press the Backspace key or the Delete key on a Mac, to get rid of them. Instead what we want to do is go ahead and switch back to the Arc tool in Illustrator CS6 here, and you want to drag from the last anchor point there, all the way down to the intersection of the middle vertical guide and the fourth horizontal guide down.So its not the long guide, its the shorter one just above it. And you want to make sure you see the word Intersect, so youre intersecting those guidelines, and then tap the F key if necessary in order to send the arc in the other direction, and then release.
Now of course, Arc tool in Illustrator CS6 Tutorial where our heart concerned, that doesnt look any better than one I showed you before. We are going to make it look way better by manually modifying this arc in the very next movie.
Read more »
We are going to start right there at the intersection of the central vertical guide and the second horizontal guide down. So I will go ahead and press the Backspace key or the Delete key on the Mac, in order get rid of that bad arc. And now I will drag up on to the left, like so, while pressing the Shift key, and you want to drag until you snap to that guideline up there. And you kind of want to inch it back a little bit to the right so that the heads-up display says, a Width of 112 pts and a Height of 112 pts. And by virtue of the fact incidentally that we were pressing the Shift key were getting a perfect quarter circle. So you want to keep that Shift key down the entire time, and then you want to release your mouse button, and then release the Shift key.
In this Case Drawing a heart with the Arc tool in Illustrator CS6
Now you want to drag from that anchor point, so make sure that your cursor says the word Anchor on it. And you want to drag down into the left until you intersect with the first vertical guideline and the second horizontal guide. Now the arc will definitely go in the wrong direction just as you see on my screen. To flip it, what you do is you keep your mouse button down, and you just tap the F key. Then you go ahead and release the mouse button in order to create the second arc.
Next, we need to go ahead and draw the bottom portion of the heart, and you might be tempted to do one of these numbers, where you draw the outer lump here, and you press the F key in order to flip it, and then you draw a final arc, and you press F again, once to flip it, but that would result in one ugly looking heart. So thats not what we want. Lets go ahead and get rid of those path outlines by switching to the Black Arrow tool and notice, by the way, the Black Arrow has a keyboard shortcut of V, all you have to do is just tap the V key. And you might think of V as being an upside down arrow. So weve got the Black Arrow thats got an upside down arrow for a keyboard in Illustrator CS6 shortcut, that is the V key. And then weve got a White Arrow, Ill tell you how it works later, thats got a right side up arrow for its keyboard shortcut, which is the A key, which of course also happens to stand for arrow. All right, I am going to go ahead and switch to the Black Arrow, which allows me to select entire path outlines, which is what these things are called inside of Illustrator.
Notice that at this point Im seeing a bounding box around my selected arc. The bounding box extensibly makes it easy to scale and rotate a graphic. But in my experience it gets in the way of getting actual work done, and there are better ways to scale and rotate, as Ill show you in a future chapter. So I am going to advise that you turn the bounding box off, and Im definitely doing so. By going up to the View menu and choosing the Hide Bounding Box command. If you ever need the Bounding Box in the future just choose this command again and of course, its got a keyboard shortcut Ctrl+ Shift+B, or Command+Shift+B on a Mac.
Now I am going to draw this dotted marquee in order to partially select these two path outlines and that will select them both, and then Ill press the Backspace key or the Delete key on a Mac, to get rid of them. Instead what we want to do is go ahead and switch back to the Arc tool in Illustrator CS6 here, and you want to drag from the last anchor point there, all the way down to the intersection of the middle vertical guide and the fourth horizontal guide down.So its not the long guide, its the shorter one just above it. And you want to make sure you see the word Intersect, so youre intersecting those guidelines, and then tap the F key if necessary in order to send the arc in the other direction, and then release.
Now of course, Arc tool in Illustrator CS6 Tutorial where our heart concerned, that doesnt look any better than one I showed you before. We are going to make it look way better by manually modifying this arc in the very next movie.
artboard,
cs6,
illustrator,
in,
introducing,
panel,
the
0
comments
Introducing the Artboard panel in Illustrator cs6
In this movie Ill how you how to delete and organize artboards from the Artboards panel.Illustrator CS6 Tutorial Video | |
| Ive gone ahead and saved this document 12-page mess.ai because it is a 12-page mess after all. | |
 Lets say I want to tidy things up here, so we end up with ten identically sized artboards, Lets say I want to tidy things up here, so we end up with ten identically sized artboards, | |
| all of which are absolutely in order. | |
| Lets say I make some additional modifications to what Ive got so far. | |
| Ill go ahead and switch over to the Artboard tool, and then Ill Alt-click or Option-click | |
| on this Artboard 4 here in order to select it independently of the Uberboard, and Ill | |
| drag it down to the lower right corner. | |
| Then Ill Alt-click or Option-click on Artboard 8 and move it up to this location. | |
| And now lets say I want to add another artboard, but Im going to do so from the Artboard panel. | |
| Ill go up to the Window menu which lists all the panels inside Illustrator cs6, which well | |
| discuss in more detail in a later chapter. | |
| Ill drop down to this command right there Artboard and click on it and that brings up | |
| Artboards panel over here in the lower right region of the screen by default. | |
| Im going to drag up on the top of the panel so I can see every one of my 12 artboards so far. | |
| Then Im going to drop down this little page icon which allows me to create a new artboard, | |
| thats exactly the same size as the selected artboard. | |
| So Ill go ahead and click on it. | |
| We end up with a new artboard way over there in the top right section of the screen. | |
| In order to see it better, Ill go up to the View menu and choose Fit All in Window, or | |
| you can press Ctrl+Alt+0, or Command+Option+0 on a Mac. | |
| And thats one of the many navigation functions thats available to you in Illustrator, all | |
| of which well discuss in more detail in the next chapter, and Im going to go ahead and | |
| drag this artboard into its new location. | |
| Now what I want to do is get rid of the Uberboard here, as well as these two little artboards. | |
| Well go ahead and Alt-click a couple of times, itd be an Option-click a couple of times | |
| there on the one thats number 11. | |
| But its reading as Artboard 4, and Ill just call it miniboard 1 so that we can keep track of it. | |
| Ill do the same with this one. | |
| Ill go ahead and Alt-click on it, Option-click on a Mac, and change its name to miniboard 2. | |
| And thats just so we can make sense of these artboards here inside the Artboards panel. | |
| What you think you might be able to do is with one of the boards selected you could | |
| Shift-click on another artboard to add it to the selection, because Shift-clicking does | |
| add to a selection elsewhere inside Illustrator cs6 | |
| Illustrator CS6 Tutorial Video It doesnt work here however inside the Artboard mode. | |
| Instead you end up drawing a new very tiny artboard, which obviously is not what we want. | |
| However, you can select multiple artboards from the Artboards panel. | |
| If I click on Uberboard, and then Shift- click on miniboard 2, notice that I select that | |
| range of artboards right there. | |
| And then I could add the nonadjacent Artboard 8, which is that tiny thing I just created | |
| a moment ago, by Ctrl-clicking on it that would be a Command-click on the Mac. | |
| So Shift-clicking on artboards inside the panel selects multiple adjacent artboards, | |
| whereas Ctrl-clicking, or Command-clicking adds a nonadjacent artboard to the selection. | |
| Now rather than pressing the Backspace key or the Delete key on the Mac, which would | |
| select just the one artboard that appears to be selected here inside the Document window, | |
| instead you go ahead and drag any one of the selected artboards on to the trashcan, and | |
| that will go ahead and get rid of them. | |
| Now lets make some sense of this document here. | |
| Obviously the numbers are fairly wrong at this point, and were missing one. | |
| So Im going to click on the Type tool to select it, or I could press the T key, and | |
| then Ill go ahead and select the 8 and make it 4; select the 4, make it a 5; select the 5, make it a 6. | |
| So a lot of busy work here. Select the 6, make it a 7; the 7, make it an 8. | |
| Go ahead and select that final 4 and make it a 0. | |
| And then Ill return to my Black Arrow tool just by clicking on it, and you can see that | |
| Illustrator CS6 Tutorial Video | |
| So Im going to go up to the Edit menu and choose the Copy command or press Ctrl+C, or | |
| Command+C on the Mac, and then Ill click on this ninth page right there, and Ill go | |
| up to the Edit menu, and Ill choose this command, Paste in Front, which has a keyboard | |
| shortcut of Ctrl+F, Command+F on a Mac. | |
| That goes ahead and aligns the number to that artboard, and then Ill press the T key to | |
| switch back to my Type tool, go ahead and select that 0, change it to a 9, and then | |
| lets similarly modify the artboard. | |
| So Ill go ahead and click on the Artboard tool to switch away from the Type tool. | |
| Notice that we have Artboard 1 through 3 just fine but then everything becomes a mess as | |
| of this Artboard 8 which should be 4. | |
| So Ill go ahead and click on it to make it active, and Ill change its name to Artboard 4. | |
| Then Ill click on this Artboard 4 copy 2, and Ill change its name to Artboard 5, and | |
| Ill click on Artboard 5 and change its name to Artboard 6. | |
| I know a lot busy work, but this is the kind of stuff you do routinely when youre working | |
| with multiple artboards inside of Illustrator. | |
| It can be a little cumbersome, a little labor-intensive as well, but you do have a great deal of flexibility. | |
| So Im changing the names of all these artboards to match their numbers essentially, but that | |
| doesnt really take care of a problem because Ive got Artboard 1, 2 and 3 according to | |
| the little numbers up there in the upper left- hand corner followed by 8, 10, 5, 6, 7, 9, and 4. | |
| So the artboards arent in the right order, and this can be a problem. | |
| Im going to double-click on Artboard 1 here inside the Artboards panel which will zoom | |
| me in on that page. | |
| And then I can advance to the next page by clicking on this little Next button down here | |
| in the lower left-hand corner of the window. Thatll take me to 2, and then the 3. | |
| And then if I click that Next button again, I will go to what Im thinking is Artboard | |
| 10, but its really numbered 4. | |
| Now I should mention you also have a Previous button if you want to go back. | |
| If you want to do this from the keyboard, you press Shift+Page Down to go to the next | |
| page, or you press Shift+Page Up to go to the previous page. | |
| But for any of this to work the pages need to be in the right order. | |
| What Im going to do is go back up to the View menu and again choose Fit All in Window | |
| in order to zoom out from my artboards. Illustrator CS6 Tutorial Video | |
| Notice that they appear in this wrong order here inside the Artboards panel, and its | |
| the order inside the panel that determines the real order of those pages. | |
| So if I want 10 to be the last page, I need to go ahead and drag Artboard 10 to the end of the list. | |
| Notice you can also select an artboard such as 9 which is out of place, and I could nudge | |
| it down by just clicking on the Move Down icon here at the bottom of the Artboard panel. | |
| 4 and 5 are adjacent to each other, so Ill click on one Shift-click on the other, then | |
| Ill drag one of these pages and notice, this is being interpreted as a double-click for | |
| some reason, which is why we just zoomed in on the page. | |
| But Ill go ahead and drag both of them up the list, so we now have 1, 2, 3, 4, 5, 6 in sequential order. | |
| And so that means now that Im looking at Page 4, I could press Shift+Page Down to advance | |
| to Page 5, Shift+Page Down again to go to 6, 7, 8, 9, and 10, which has a 0 on it. | |
| Again, a little bit labor-intensive, a lot of busy work going on there, but thats how | |
| you delete and manage your artboards from the Artboards panel. |
adobe,
and,
cs6,
down,
illustrator,
keys,
page,
the,
up,
using
0
comments
Adobe Illustrator CS6 Using the Page Up and Page Down keys
In this movie, I am going to show you how to get around a document using the Page Up and Page Down keys.
I am going to expect even the biggest shortcut fanatic to remember all of these.
Just remember this Page Up and Page Down combined with any of the modifier keys, does something in Illustrator cs6 .
So lets go ahead and zoom in quite a bit here, and then Ill press the Page Up key, and notice that I move almost a full screen upward.
And then if I press Page Down, I move almost a full screen downward.
If I want to move in smaller increments, then I press Alt+Page Up, this would be Option+Page Up on the Mac, or Alt+Page Down, this would be Option+Page Down on the Mac.
What if I want to move to the right? Well, then Ill press Ctrl+Page Down, thats Command+Page Down on the Mac.
If I want to move to the left, its Ctrl+Page Up, or Command+Page Up.
To move in smaller increments, once again, you add the Alt key.
So its Ctrl+Alt+Page Down, to move in small increments to the right, and Ctrl+Alt+Page
Illustrator CS6 Tutorial
Up, or Command+Option+Page up on the Mac, to move in smaller increments to the left.Now of course, that leaves the Shift key, and you may recall from the previous chapter that the Shift key combined with Page UP and Page Down actually moves you between artboards.
So Shift+Page Up, will take you to the previous artboard, as were seeing here.
And in my case, I am going all the way back to the first one.
And then Shift+Page Down is going to move me to the next artboard.
If I press Ctrl+Shift+Page Up, or Command+Shift+ Page Up on the Mac, I go to the first artboard,
and if I press Ctrl+Shift+Page Down, or Command+Shift +Page Down on the Mac, I go to last artboard, which
in my case is the big artboard that encompasses all the other ones.
And that for those of you who are interested is how you get around a document, using the Page Up and Page Down keys, combined with every modifier key you got.
adobe,
cs6,
how,
illustrator,
image,
in,
new,
the,
to,
trace,
use
1 comments
How to Use the New Image Trace in Adobe Illustrator CS6
Today we will learn the new features of the tracing engine in Adobe Illustrator CS6 and talk about its new functions. We will trace a photo, a sketch and a texture; then we will compare the results between Adobe Illustrator CS5 and CS6. Let’s get started!
In this tutorial I’ll use a photo a strawberry (credit to deviantART user StockProject1) ; the sketch was kindly provided by Victoria Vasilyeva and the texture (credit to deviantART user ~kingkool6).
This allows us to use other panels and tools while tracing. Such features did not exist in Adobe Illustrator CS5 as well as in earlier releases; the setting of the tracing was made in the Tracing Options dialog box, and then it was impossible to access the other objects and interfaces.
The new preset, "Silhouettes" allows quick creation of vector silhouettes.
After the Expand command we get the vector object with the optimal amount of points.
Note, in Adobe Illustrator CS6 you can set several of the Palette values. This parameter sets while the vector image is been made in color or in greyscale. As you can see, the new tracing engine in Adobe Illustrator CS6 shows better results.
There is a new feature in Adobe Illustrator according to which you can instantly check out your original image. To do so, press and hold the eye icon near the View option.
The overlapping method creates stacked paths, the contours of neighbor objects overlay.
The Minimum Area option corresponds to the Noise option in Adobe Illustrator CS6. This option specifies the size of the smallest areas of the initial image, which will be taken into account while tracing.
The Corner Angle option in Abode Illustrator CS5 corresponds with the Corners option in Adobe Illustrator CS6 and is been set in percentage. The higher value we set, the bigger amount of angles the final image will have.
In Adobe Illustrator CS6 there are no such function of the tracing as the Blur and the Resample. In Adobe Illustrator CS5 the Blur function is for the reducing the number of small artifacts and smoothing the jagged edges in the final image. The Resample option allows speeding up the process of tracing for big size images, losing the quality of the output image.
When we use the same preset in Adobe Illustrator CS6 the majority of small details disappear.
Unfortunately, you need to change the parameters of the tracing manually in order to get the same results in Adobe Illustrator CS6.
I’ve used different presets and operated the parameters manually, but I still couldn’t get the result which would correspond to the result that can be made in Adobe Illustrator CS5.
Read more »
In this tutorial I’ll use a photo a strawberry (credit to deviantART user StockProject1) ; the sketch was kindly provided by Victoria Vasilyeva and the texture (credit to deviantART user ~kingkool6).
Step 1
In Adobe Illustrator CS6 the settings of the tracing is in the new Image Trace panel (Window > Image Trace).Step 2
The presets have also changed between Adobe Illustrator CS5 and CS6Step 3
Let us evaluate the quality of the tracing using the same preset High Fidelity Photo in Adobe Illustrator CS5 and Adobe Illustrator CS6.Step 4
There were some changes in the Colors parameter. This parameter specifies the number of colors which the final vector image will consist of. In Adobe Illustrator CS5 the Max Colors options can be set in the number values, in Adobe Illustrator CS6 the Colors option can be set accurately in percentage.Step 5
You can get access to additional options of the settings if you press the Advanced key in the Image Trace panel. Now we have an opportunity to choose a tracing method. The Abutting method creates cutout paths. The contours of neighbor objects match.Step 6
The Path Fitting option defines the accuracy of the tracing of the initial raster image. In Adobe Illustrator CS5 the smaller value allows to create a more accurate contour, the bigger- the rough contour. In Adobe Illustrator CS6 it is vice versa, the bigger the value is the more accurate contour we get.The Minimum Area option corresponds to the Noise option in Adobe Illustrator CS6. This option specifies the size of the smallest areas of the initial image, which will be taken into account while tracing.
The Corner Angle option in Abode Illustrator CS5 corresponds with the Corners option in Adobe Illustrator CS6 and is been set in percentage. The higher value we set, the bigger amount of angles the final image will have.
Step 7
Let’s see how the new tracing engine works with sketches. Apply the preset Black & White Logo. The tracing of the sketch in Adobe Illustrator CS5 shows good results.Step 8
Let’s try to make the tracing of the texture. We will use the same Black&White Logo preset. As we can see, the result of the tracing in Adobe Illustrator CS5 looks better than in Adobe Illustrator CS6Conclusion
The new tracing engine really works good with the photos and allows quick and accurate vector silhouettes. But when you use it for tracing sketches and textures you will need to operate all the tracing processes manually, and that will not always show good result. If you work with the sketches and textures, the Live Trace feature in Adobe Illustrator CS5 shows good results when you use the presets. Have you used the trace features in Adobe CS6 yet? If so, what do you think?
Subscribe to:
Posts (Atom)


- Follow Us on Twitter!
- "Join Us on Facebook!
- RSS
Contact