Showing posts with label 9. Show all posts
Showing posts with label 9. Show all posts
Friday, June 19, 2015
9,
a,
for,
free,
getting,
glare,
how,
of,
person,
portrait,
pse,
spectacled,
to,
use
0
comments
How to use PSE 9 for getting glare free portrait of a spectacled person
A very common problem while taking portraits of a spectacled person is the glare in the lens that results in hiding the eyes. The best way is to take two pictures of the same person one with spectacles and one without spectacles and then correcting the glare in PSE 9 as shown below.
So here was the portraits that were shot, one with spectacles and one without spectacles.


We will be using layers masks of PSE 9 to correct the glare. The same can though be achieved using PSE 8 magnetic lasso tool as well. However I prefer layer masks in PSE 9 as they give me flexibility of using opacity and transparency of the pen and eraser tools to give more realistic results.
1. Open both the images in PSE 9.
2. Select the image without spectacles in workspace and using rectangular marquee select the area around the eyes as shown below.
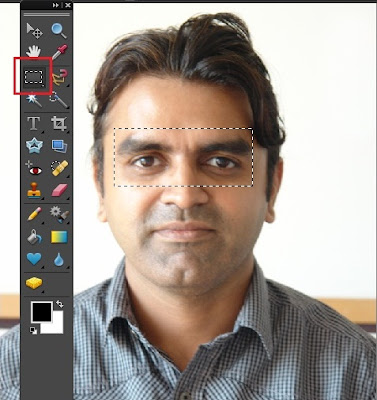
Right click the selection made and select Layer via Copy . A new layer gets created in the Layer palette as shown:

3. Once done, select Move tool from tool bar and drag it over the other image(with spectacles) in the project bin. The dragged layer now gets created in the spectacle image as well as shown.

4. Now we would reposition this portion of the layer above background layer such that the forehead lines and the nose line overlap over each other. Doing this I realized that one image had the head tilted while the other had the head straight up. So we will first transform it using Control+T and would rotate it a bit so that both the layers can be inlined properly.

In the above image I have rotated the upper layer a bit so that the nose line of the person match.
5. Now we would create a copy of the background layer by selecting it and dragging it over the new layer icon in the layer palette or just press Control+J selecting the background layer.
Once done, move the background copy layer on the top by dragging it above the layer on the top. Now the layer with eyes we dragged from other image goes below the spectacles and we see following in the layers palette and the editing workspace :

6. Select the background copy layer and go to Layer> Layer Mask>Reveal All.
This will create a white mask next to the background copy layer as shown in the Layer palette.
Select the brush tool from tools bar and make the foreground color as black in the color swatch.
Now reduce the opacity of the brush from the top bar to somewhere around 50%. Brush over the area of the eyes inside the spectacles.
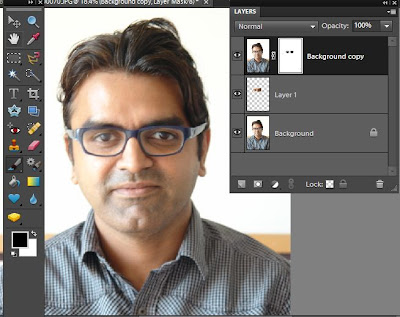
If any extra areas are brushed, that can be reverted using the eraser tool or by just making the foreground color white and rubbing it over the extra areas painted.
If we do not reduce the opacity while brushing then the mask is totally removed over the areas inside spectacles which looks as if there are no glasses in the spectacles. So in order to give realistic look of the lenses, the eyes are brushed with reduced opacity and keeping unbrushed areas near the edges to leave some glare there.
Here is my final output :
Here are the initial and edited images :
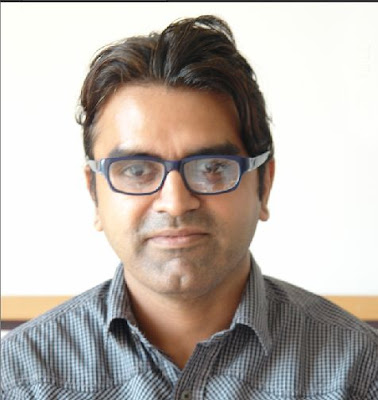
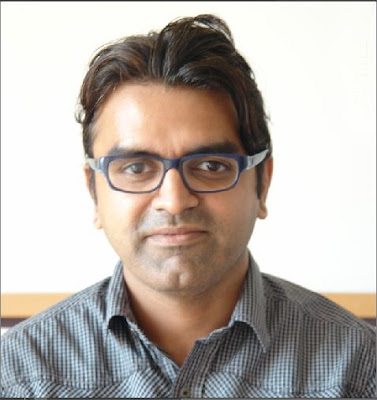
If any extra areas are brushed, that can be reverted using the eraser tool or by just making the foreground color white and rubbing it over the extra areas painted.
If we do not reduce the opacity while brushing then the mask is totally removed over the areas inside spectacles which looks as if there are no glasses in the spectacles. So in order to give realistic look of the lenses, the eyes are brushed with reduced opacity and keeping unbrushed areas near the edges to leave some glare there.
Here is my final output :
Here are the initial and edited images :

Friday, June 12, 2015
9,
for,
how,
in,
layer,
masks,
precise,
pse,
selections,
to,
use
0
comments
How to use Layer Masks for precise selections in PSE 9
There is a wonderful addition amongst the rich set of features in PSE 9 - Layer masks. This was something which was missing in PSE 8. It is a wonderful tool which helps in achieving a lot of good results in different editing operations. This tool is specially helpful for people like me who arent that precise in selection tools like lasso,quick selection etc. However, are more comfortable with the paint brush and eraser.
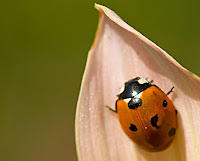
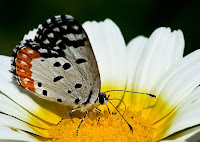 In this tutorial, I will be using Layer Masks to move one object from one image and place it on other precisely without using any of the other selection tools in PSE like Lasso, quick selection etc.
I have the following two pictures : one is butterfly on a white flower and other is a lady bug on a pink leaf. Now I want to place the lady bug from the second picture on the flower leaf of the first picture, next to the butterfly.
1. I opened both the images in PSE 9 Editor.
2. Now I keep the image of butterfly in display in the editing workspace.
Select the Move tool from the tools bar and drag the ladybug image from the project bin below over to the butterfly image in the workspace.
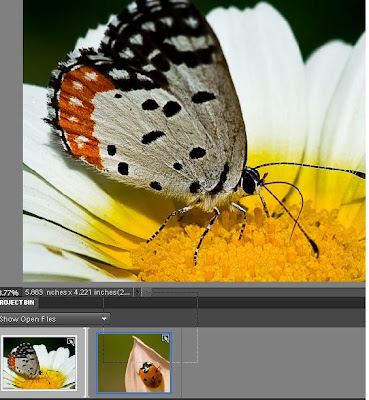
3. Now as you see in the image below, the lady bug image comes over the butterfly image occupying a lot of space. Also you would notice that there is a new layer formed in the layers palette which is that of the lady bug image.
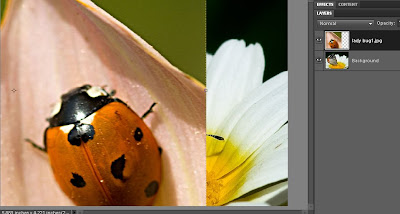
Just drag one of the corners of the lady bug image inwards to reduce its size.
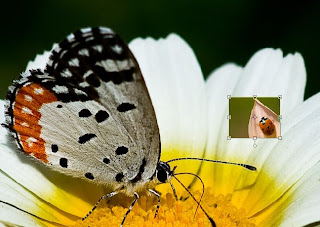
Now one can rotate the image of the lady bug by dragging the corner of the image keeping Control key pressed and revolving it through the corners like this.
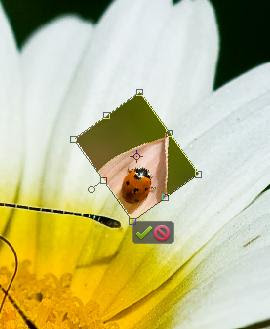
Click the commit green button when you think that the orientation is correct.
4. Now select the lady bug layer in the layers palette and go to Layer> Layer Mask> Reveal All.
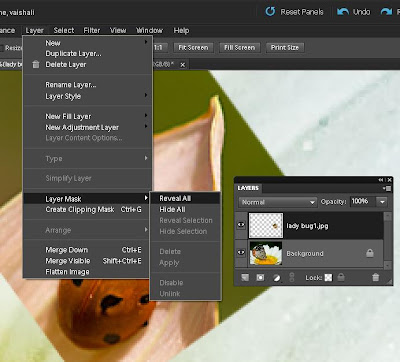
As you do this you would see that there is one white mask that got created in layers palette.
5. Now select the Brush tool from the tools bar and black color selected as foreground color in the color swatch (as shown below). Now brush over the rest of the area of the lady bug layer leaving just the lady bug. This will remove the pink and green background of the ladybug in the layer.
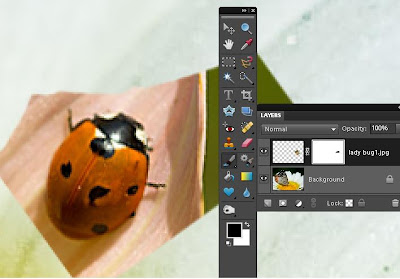
As you click and drag the mouse with the paint brush you would notice that some black color gets painted in the white mask in the layers palette. And you would see the pink leaf disappearing.
In case you mistakingly paint any unwanted area or some extra area, you can correct it by changing the foreground color in the color swatch to white and paint over that area again. So you can keep switching between black and white foreground colors in the color swatch to correct your selection.
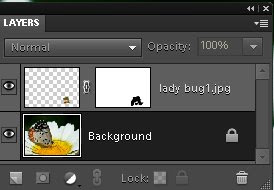
Also for best results, zoom the image to 200-300% and reduce the brush size when you brushing around the corners of the lady bug to get precision.
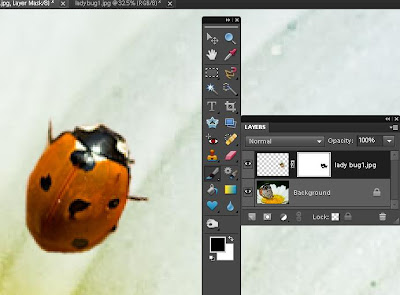
Once you are done, select zoom tool and right click -Fit to screen.
6. Now select the move tool again and move the lady bug over the white flower and change its orientation as per your needs. You may transform it using Control+Shift+Alt and dragging the corners.
Here is my final result ;
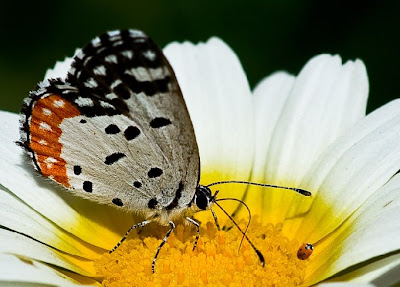
Layer Masks can be used in several other workflows like selective editing in a picture or applying filters to some part of the image etc.
Hope you would find it useful too.
Read more »
In this tutorial, I will be using Layer Masks to move one object from one image and place it on other precisely without using any of the other selection tools in PSE like Lasso, quick selection etc.I have the following two pictures : one is butterfly on a white flower and other is a lady bug on a pink leaf. Now I want to place the lady bug from the second picture on the flower leaf of the first picture, next to the butterfly.
1. I opened both the images in PSE 9 Editor.
2. Now I keep the image of butterfly in display in the editing workspace.
Select the Move tool
from the tools bar and drag the ladybug image from the project bin below over to the butterfly image in the workspace.3. Now as you see in the image below, the lady bug image comes over the butterfly image occupying a lot of space. Also you would notice that there is a new layer formed in the layers palette which is that of the lady bug image.
Just drag one of the corners of the lady bug image inwards to reduce its size.
Click the commit green button when you think that the orientation is correct.
4. Now select the lady bug layer in the layers palette and go to Layer> Layer Mask> Reveal All.
As you do this you would see that there is one white mask that got created in layers palette.
5. Now select the Brush tool from the tools bar and black color selected as foreground color in the color swatch (as shown below). Now brush over the rest of the area of the lady bug layer leaving just the lady bug. This will remove the pink and green background of the ladybug in the layer.
As you click and drag the mouse with the paint brush you would notice that some black color gets painted in the white mask in the layers palette. And you would see the pink leaf disappearing.
In case you mistakingly paint any unwanted area or some extra area, you can correct it by changing the foreground color in the color swatch to white and paint over that area again. So you can keep switching between black and white foreground colors in the color swatch to correct your selection.
Once you are done, select zoom tool and right click -Fit to screen.
6. Now select the move tool again and move the lady bug over the white flower and change its orientation as per your needs. You may transform it using Control+Shift+Alt and dragging the corners.
Here is my final result ;
Layer Masks can be used in several other workflows like selective editing in a picture or applying filters to some part of the image etc.
Hope you would find it useful too.
Monday, May 18, 2015
9,
create,
how,
pse,
reflections,
subtle,
to,
using
0
comments
How to create subtle reflections using PSE 9
Its so easy and cool to create reflections using PSE 9. It is one of the new guided edit features which is easy to follow with the instructions laid through the workflow. I am also following the steps described in the workflow to demonstrate the creation of a reflection :
1. Open any image in PSE 9 Editor that you want to create reflections of. I picked this image as when i clicked this one, I felt there was a lake missing the the silhouette.
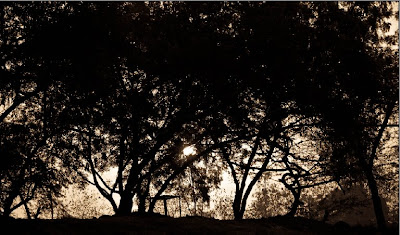
2. Click on Guided Edit tab>Fun Edits> Reflections.
3. Click on the first button : Add Reflection. Here is the output you see after that :
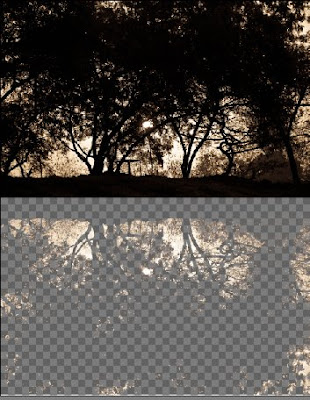
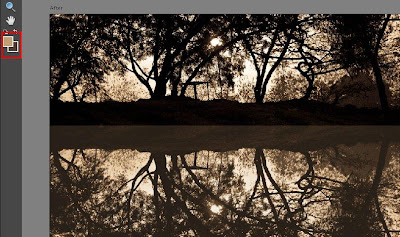
4. Click on the Eye dropper tool and select one of the colors to be filled as background for the reflection. For this image I chose the mustard color as you can see from the color swatch by clicking on one of the areas with this color on the image. And as I click Fill background, I see an output as follows :
5. In the next step, you get an option to select either Floor, Glass or Water reflection. I chose Water Reflection for this particular image.
It will prompt for adding Ocean Ripple filter, followed by Motion blur to give some realistic effect.
I tried in 768 % of amount for Ocean ripple effect and 7 as distance in Motion blur.
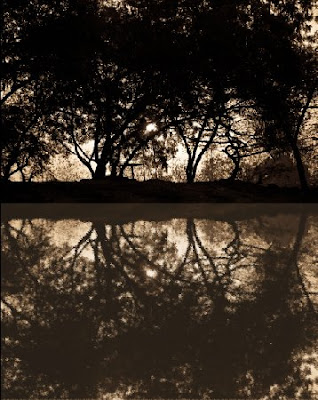
6. Adjust the Reflection intensity as per your needs. I increased it from 80 to 90.
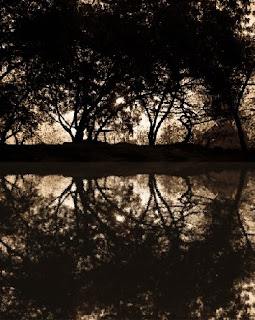
7. Click on Add Distortion. I clicked it twice to make my reflection shorter that the actual image.
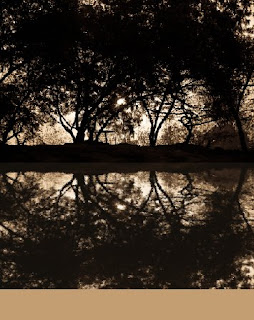
Rest of the area after shortening of reflection gets filled by your foreground color in the color swatch(the background you selected for reflection earlier)
8. Now crop this extra area in the next step using the next button Crop.
9. Once cropped you can add gradient to give more realistic look to your image. here is my final output.
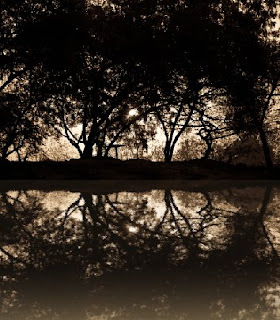
If you are not satisfied with the gradient applied with this button, you may go to full edit and select the top most layer, edit the gradient itself choosing gradient tool and selecting Edit button from top bar.
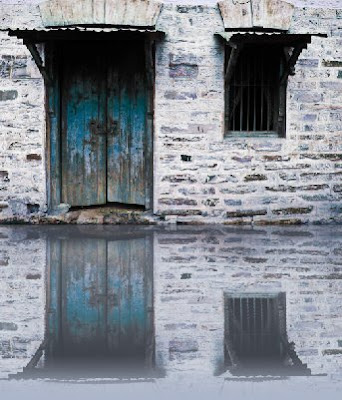
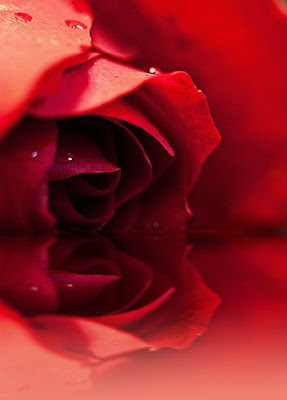
One more example of the reflection created using this feature :
Read more »
1. Open any image in PSE 9 Editor that you want to create reflections of. I picked this image as when i clicked this one, I felt there was a lake missing the the silhouette.
2. Click on Guided Edit tab>Fun Edits> Reflections.
3. Click on the first button : Add Reflection. Here is the output you see after that :
4. Click on the Eye dropper tool and select one of the colors to be filled as background for the reflection. For this image I chose the mustard color as you can see from the color swatch by clicking on one of the areas with this color on the image. And as I click Fill background, I see an output as follows :
5. In the next step, you get an option to select either Floor, Glass or Water reflection. I chose Water Reflection for this particular image.
It will prompt for adding Ocean Ripple filter, followed by Motion blur to give some realistic effect.
I tried in 768 % of amount for Ocean ripple effect and 7 as distance in Motion blur.
7. Click on Add Distortion. I clicked it twice to make my reflection shorter that the actual image.
Rest of the area after shortening of reflection gets filled by your foreground color in the color swatch(the background you selected for reflection earlier)
8. Now crop this extra area in the next step using the next button Crop.
9. Once cropped you can add gradient to give more realistic look to your image. here is my final output.
If you are not satisfied with the gradient applied with this button, you may go to full edit and select the top most layer, edit the gradient itself choosing gradient tool and selecting Edit button from top bar.
One more example of the reflection created using this feature :
Saturday, May 16, 2015
9,
a,
create,
hard,
how,
portrait,
pse,
rock,
style,
to,
using
0
comments
How to create a portrait hard rock style using PSE 9
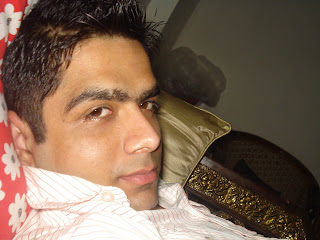
2. Create a copy of the background layer by pressing Control+J
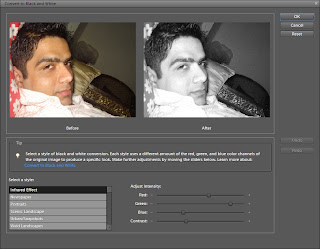
3. Now select the copy of the background layer and go to Enhance>Convert to Black and White.The following dialog will pop up. You may choose any preset available in the dialog or making changes using the sliders. Click Ok
4. Now Select this background copy and rename the layer as Overlay. Keeping this layer selected, change the blending mode of this layer to Overlay from the combo box.

6. Now select Burn tool from toolsbar and brush it over the highlights in the resultant image. You may try the combo box options with the blur tool on top toolbar - Highlights, mid tones, shadows.

Here are my initial and final images :

Subscribe to:
Posts (Atom)


- Follow Us on Twitter!
- "Join Us on Facebook!
- RSS
Contact