Showing posts with label for. Show all posts
Showing posts with label for. Show all posts
Friday, June 19, 2015
9,
a,
for,
free,
getting,
glare,
how,
of,
person,
portrait,
pse,
spectacled,
to,
use
0
comments
How to use PSE 9 for getting glare free portrait of a spectacled person
A very common problem while taking portraits of a spectacled person is the glare in the lens that results in hiding the eyes. The best way is to take two pictures of the same person one with spectacles and one without spectacles and then correcting the glare in PSE 9 as shown below.
So here was the portraits that were shot, one with spectacles and one without spectacles.


We will be using layers masks of PSE 9 to correct the glare. The same can though be achieved using PSE 8 magnetic lasso tool as well. However I prefer layer masks in PSE 9 as they give me flexibility of using opacity and transparency of the pen and eraser tools to give more realistic results.
1. Open both the images in PSE 9.
2. Select the image without spectacles in workspace and using rectangular marquee select the area around the eyes as shown below.
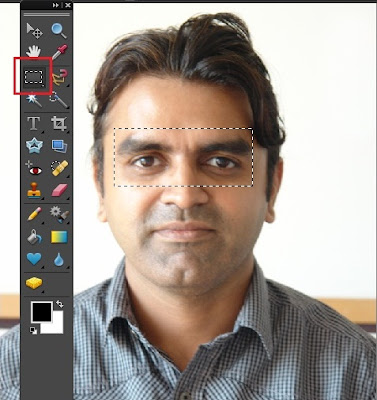
Right click the selection made and select Layer via Copy . A new layer gets created in the Layer palette as shown:

3. Once done, select Move tool from tool bar and drag it over the other image(with spectacles) in the project bin. The dragged layer now gets created in the spectacle image as well as shown.

4. Now we would reposition this portion of the layer above background layer such that the forehead lines and the nose line overlap over each other. Doing this I realized that one image had the head tilted while the other had the head straight up. So we will first transform it using Control+T and would rotate it a bit so that both the layers can be inlined properly.

In the above image I have rotated the upper layer a bit so that the nose line of the person match.
5. Now we would create a copy of the background layer by selecting it and dragging it over the new layer icon in the layer palette or just press Control+J selecting the background layer.
Once done, move the background copy layer on the top by dragging it above the layer on the top. Now the layer with eyes we dragged from other image goes below the spectacles and we see following in the layers palette and the editing workspace :

6. Select the background copy layer and go to Layer> Layer Mask>Reveal All.
This will create a white mask next to the background copy layer as shown in the Layer palette.
Select the brush tool from tools bar and make the foreground color as black in the color swatch.
Now reduce the opacity of the brush from the top bar to somewhere around 50%. Brush over the area of the eyes inside the spectacles.
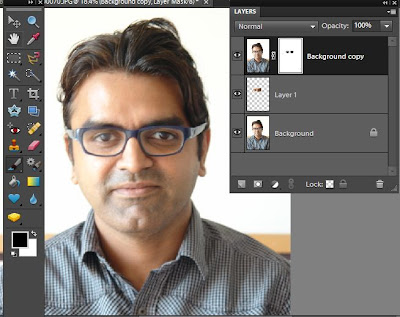
If any extra areas are brushed, that can be reverted using the eraser tool or by just making the foreground color white and rubbing it over the extra areas painted.
If we do not reduce the opacity while brushing then the mask is totally removed over the areas inside spectacles which looks as if there are no glasses in the spectacles. So in order to give realistic look of the lenses, the eyes are brushed with reduced opacity and keeping unbrushed areas near the edges to leave some glare there.
Here is my final output :
Here are the initial and edited images :
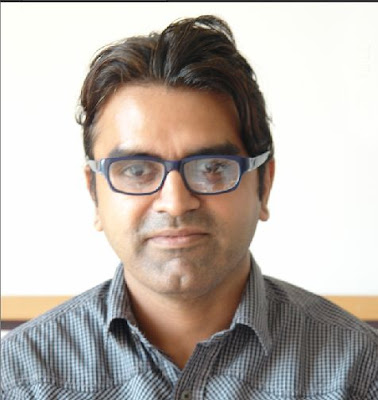
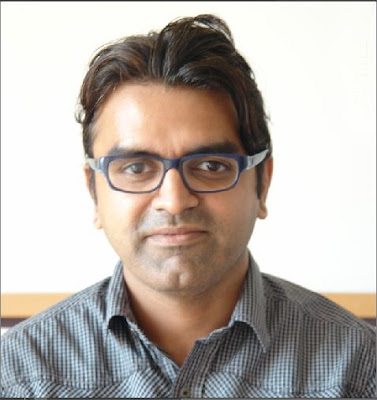
If any extra areas are brushed, that can be reverted using the eraser tool or by just making the foreground color white and rubbing it over the extra areas painted.
If we do not reduce the opacity while brushing then the mask is totally removed over the areas inside spectacles which looks as if there are no glasses in the spectacles. So in order to give realistic look of the lenses, the eyes are brushed with reduced opacity and keeping unbrushed areas near the edges to leave some glare there.
Here is my final output :
Here are the initial and edited images :

Friday, June 12, 2015
9,
for,
how,
in,
layer,
masks,
precise,
pse,
selections,
to,
use
0
comments
How to use Layer Masks for precise selections in PSE 9
There is a wonderful addition amongst the rich set of features in PSE 9 - Layer masks. This was something which was missing in PSE 8. It is a wonderful tool which helps in achieving a lot of good results in different editing operations. This tool is specially helpful for people like me who arent that precise in selection tools like lasso,quick selection etc. However, are more comfortable with the paint brush and eraser.
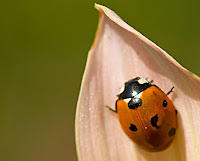
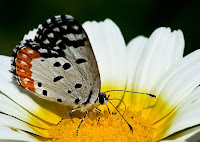 In this tutorial, I will be using Layer Masks to move one object from one image and place it on other precisely without using any of the other selection tools in PSE like Lasso, quick selection etc.
I have the following two pictures : one is butterfly on a white flower and other is a lady bug on a pink leaf. Now I want to place the lady bug from the second picture on the flower leaf of the first picture, next to the butterfly.
1. I opened both the images in PSE 9 Editor.
2. Now I keep the image of butterfly in display in the editing workspace.
Select the Move tool from the tools bar and drag the ladybug image from the project bin below over to the butterfly image in the workspace.
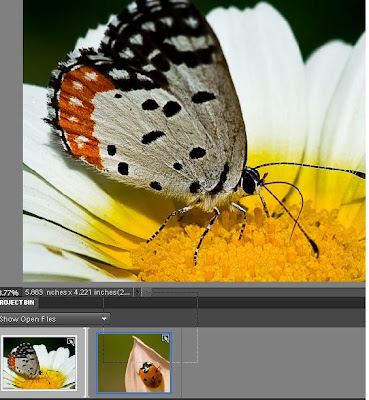
3. Now as you see in the image below, the lady bug image comes over the butterfly image occupying a lot of space. Also you would notice that there is a new layer formed in the layers palette which is that of the lady bug image.
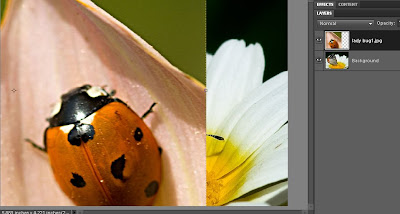
Just drag one of the corners of the lady bug image inwards to reduce its size.
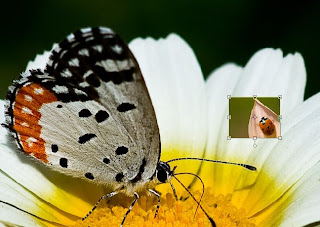
Now one can rotate the image of the lady bug by dragging the corner of the image keeping Control key pressed and revolving it through the corners like this.
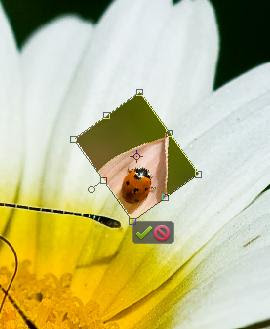
Click the commit green button when you think that the orientation is correct.
4. Now select the lady bug layer in the layers palette and go to Layer> Layer Mask> Reveal All.
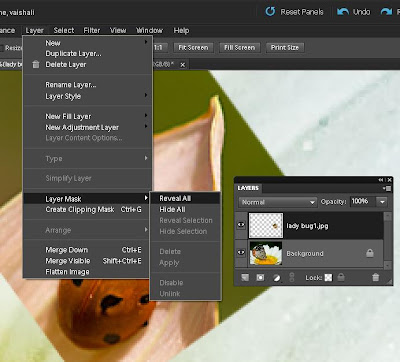
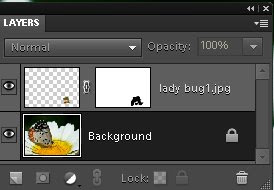
As you do this you would see that there is one white mask that got created in layers palette.
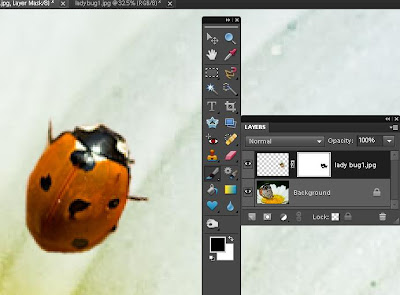
5. Now select the Brush tool from the tools bar and black color selected as foreground color in the color swatch (as shown below). Now brush over the rest of the area of the lady bug layer leaving just the lady bug. This will remove the pink and green background of the ladybug in the layer.
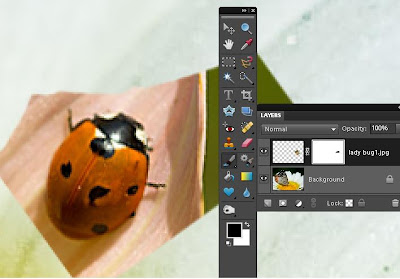
As you click and drag the mouse with the paint brush you would notice that some black color gets painted in the white mask in the layers palette. And you would see the pink leaf disappearing.
In case you mistakingly paint any unwanted area or some extra area, you can correct it by changing the foreground color in the color swatch to white and paint over that area again. So you can keep switching between black and white foreground colors in the color swatch to correct your selection.
Also for best results, zoom the image to 200-300% and reduce the brush size when you brushing around the corners of the lady bug to get precision.
Once you are done, select zoom tool and right click -Fit to screen.
6. Now select the move tool again and move the lady bug over the white flower and change its orientation as per your needs. You may transform it using Control+Shift+Alt and dragging the corners.
Here is my final result ;
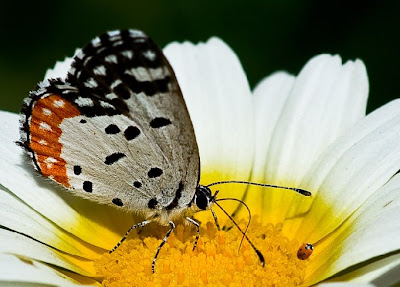
Layer Masks can be used in several other workflows like selective editing in a picture or applying filters to some part of the image etc.
Hope you would find it useful too.
Read more »
In this tutorial, I will be using Layer Masks to move one object from one image and place it on other precisely without using any of the other selection tools in PSE like Lasso, quick selection etc.I have the following two pictures : one is butterfly on a white flower and other is a lady bug on a pink leaf. Now I want to place the lady bug from the second picture on the flower leaf of the first picture, next to the butterfly.
1. I opened both the images in PSE 9 Editor.
2. Now I keep the image of butterfly in display in the editing workspace.
Select the Move tool
from the tools bar and drag the ladybug image from the project bin below over to the butterfly image in the workspace.3. Now as you see in the image below, the lady bug image comes over the butterfly image occupying a lot of space. Also you would notice that there is a new layer formed in the layers palette which is that of the lady bug image.
Just drag one of the corners of the lady bug image inwards to reduce its size.
Click the commit green button when you think that the orientation is correct.
4. Now select the lady bug layer in the layers palette and go to Layer> Layer Mask> Reveal All.
As you do this you would see that there is one white mask that got created in layers palette.
5. Now select the Brush tool from the tools bar and black color selected as foreground color in the color swatch (as shown below). Now brush over the rest of the area of the lady bug layer leaving just the lady bug. This will remove the pink and green background of the ladybug in the layer.
As you click and drag the mouse with the paint brush you would notice that some black color gets painted in the white mask in the layers palette. And you would see the pink leaf disappearing.
In case you mistakingly paint any unwanted area or some extra area, you can correct it by changing the foreground color in the color swatch to white and paint over that area again. So you can keep switching between black and white foreground colors in the color swatch to correct your selection.
Once you are done, select zoom tool and right click -Fit to screen.
6. Now select the move tool again and move the lady bug over the white flower and change its orientation as per your needs. You may transform it using Control+Shift+Alt and dragging the corners.
Here is my final result ;
Layer Masks can be used in several other workflows like selective editing in a picture or applying filters to some part of the image etc.
Hope you would find it useful too.
Tuesday, May 19, 2015
better,
for,
how,
in,
making,
pse,
quick,
selection,
selections,
the,
to,
tool,
train
0
comments
How to train the quick selection tool for making better selections in PSE
Quick selection is a great tool for selecting objects in any image. It intelligently selects the object distinctly from the background by detecting the brightness, contrast and tonal changes along the objects and their backgrounds. It takes just a little mouse drag with in an object to select an background.
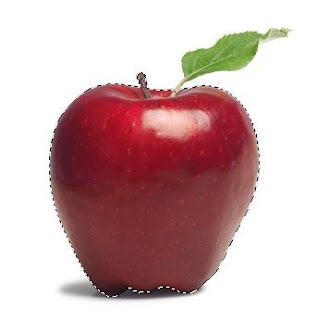
For example : for the image below I just dragged my mouse from point A to point B for selecting the whole apple instead of moving my mouse along the edges of the whole apple which we would require for other selection tools.
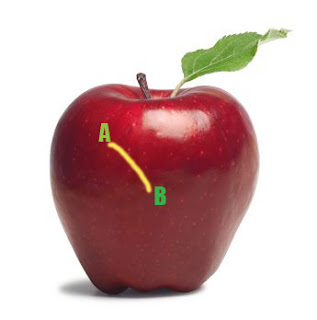
This is how my object was selected moving my mouse from point A to B (Please note I increased the brush size to 35 px from options bar after selecting the quick selection tool for making this selection) :
However in the above image, there is good contrast between the object to be selected and its background. So we did not need to train our quick selection tool. But for getting better results in minimum time when there is not much great color difference or contrast between our object and background, it is recommended that you train your quick selection tool.
So in an image like below, where there is not that great color contrast between yellow flower and its background, we would train our tool.
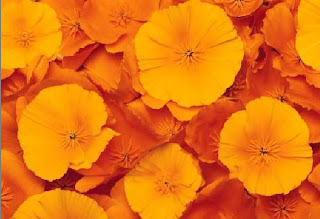
So if I move my quick selection tool from point A to B to select the yellow flower, here is what
I get as selected :
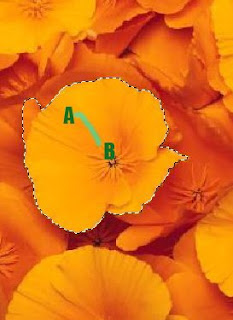
However I did not need this extra highlighted(green) part in my selection(as shown below) which was selected when I moved my mouse from point A to point B. But since there is a low contrast between the orange and the yellow here, this area too got selected.
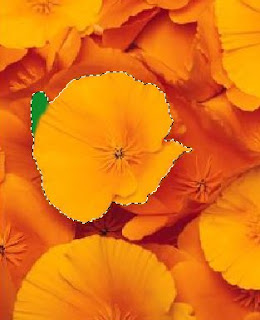
So instead of selecting my flower in one go as shown above, I follow the steps below to get my needed selection :
1. Select a very small part of the yellow flower as shown after selecting Quick selection tool.
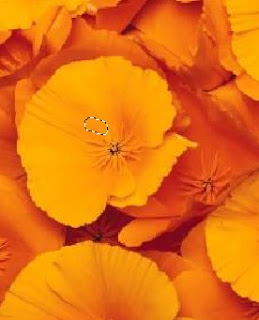
2. Now I will press Alt key and keeping it pressed, I click and drag my mouse over the area I did not want in the selection. So I brush my mouse over the green highlighted region shown in the second last image.
I also notice that as soon as I click Alt key my mouse cursor changes from "+" to "-" as it tell what area not to select.
Once I am done with that I leave the Alt key back and again move my mouse from point A to B as I did earlier and here is how I get my desired selection :
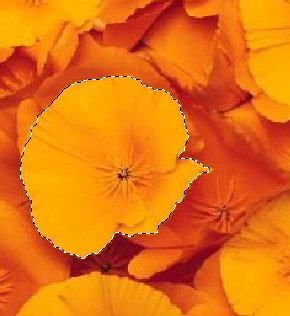
So here I have trained my quick selection tool not to select what areas of contrast. So if I had the similar background around the whole flower, then I would just drag my mouse once along the boundaries of the flower to tell my tool about the low contrast areas which I do not want to select.
Also keep in mind that if you have a large and random objects to be selected then you should keep subtracting the wrong selections you make as you sweep and not to defer the subtraction task in the end. This trains my tool at every step of selection and tell it what "not" to selection as it goes ahead.
I hope you find this tutorial helpful!
Read more »
For example : for the image below I just dragged my mouse from point A to point B for selecting the whole apple instead of moving my mouse along the edges of the whole apple which we would require for other selection tools.
This is how my object was selected moving my mouse from point A to B (Please note I increased the brush size to 35 px from options bar after selecting the quick selection tool for making this selection) :
However in the above image, there is good contrast between the object to be selected and its background. So we did not need to train our quick selection tool. But for getting better results in minimum time when there is not much great color difference or contrast between our object and background, it is recommended that you train your quick selection tool.
So in an image like below, where there is not that great color contrast between yellow flower and its background, we would train our tool.
So if I move my quick selection tool from point A to B to select the yellow flower, here is what
I get as selected :
However I did not need this extra highlighted(green) part in my selection(as shown below) which was selected when I moved my mouse from point A to point B. But since there is a low contrast between the orange and the yellow here, this area too got selected.
So instead of selecting my flower in one go as shown above, I follow the steps below to get my needed selection :
1. Select a very small part of the yellow flower as shown after selecting Quick selection tool.
2. Now I will press Alt key and keeping it pressed, I click and drag my mouse over the area I did not want in the selection. So I brush my mouse over the green highlighted region shown in the second last image.
I also notice that as soon as I click Alt key my mouse cursor changes from "+" to "-" as it tell what area not to select.
Once I am done with that I leave the Alt key back and again move my mouse from point A to B as I did earlier and here is how I get my desired selection :
So here I have trained my quick selection tool not to select what areas of contrast. So if I had the similar background around the whole flower, then I would just drag my mouse once along the boundaries of the flower to tell my tool about the low contrast areas which I do not want to select.
Also keep in mind that if you have a large and random objects to be selected then you should keep subtracting the wrong selections you make as you sweep and not to defer the subtraction task in the end. This trains my tool at every step of selection and tell it what "not" to selection as it goes ahead.
I hope you find this tutorial helpful!
Thursday, May 14, 2015
beginner,
for,
photoshop,
tutorials,
x6
0
comments
Tutorials Photoshop x6 for Beginner
Tutorials Photoshop x6 for Beginner (Part 1)
1 - Getting Started


2 - Basic Editing


3 - Interface Introduction


4 - All Selection Tools

5 - Brushes-_Painting





06 - Masking
07 - Color Filling
08 - Transformations

09 - Cool Selection Technique

10 - Resolution Explanation

Tuesday, May 12, 2015
book,
for,
photographers,
photoshop
0
comments
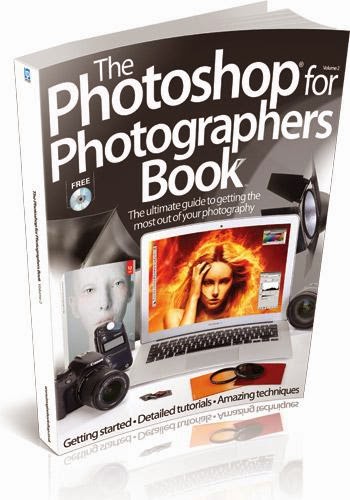
Photoshop For Photographers Book
Photoshop For Photographers Book
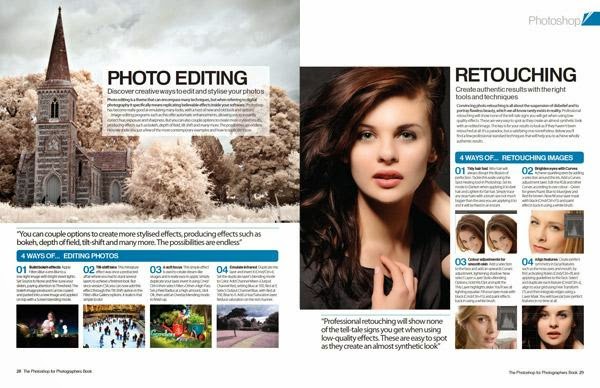
Get the most out of your photography by mastering Photoshop’s essential tools, filters and features with Photoshop for Photographers’ easy-to-follow step-by-step tutorials. This bookazine has 228 pages

Portrait
- Retouch your people pictures to perfection.
Landscape
- Produce and edit your best ever landscapes.
Black & White
- Create monochromatic masterpieces.
Architecture
- Shoot and edit beautiful buildings from around the world.
Also inside...
Ultimate guides
- The ultimate guide to Photoshop
- The ultimate guide to photography
Portrait
- Perfect portraits on location
- 20 great tips for portrait photographs
- Master the Clone Stamp tool
- Use the Refine Edge tool
- Turn a photo into a sketch
- Photomontage your photographs
- Clone composites
- Fake a light leak
- Remove red-eye
Landscape
- Shoot stunning landscape photos
- 20 great tips for landscapes
- Fix exposure
- Build a new landscape
- Get the Lomo look
- Edit your photographs with histograms
Black & White
- Master monochrome photography
- 20 great tips for black and whites
- Convert images to black and white
- Get a classic effect with gradient maps
- Hand tint black-and-white images
- Emphasise the eyes
- Achieve high-key effects
Architecture
- Master architecture photography
- 20 great tips for incredible interiors
- Fix barrel distortion with Lens Correction
- Edit colours with the Photo Filter tool
- Make a silhouette
- Create line art
- Get sketching
Macro
- Capture striking macro shots
- 20 great tips for photographing flowers
- Merge textures and photos
- Make a magic selection
- Make a macro mosaic
- Rescue dull shots with Brightness/Contrast
Wildlife
- Capture perfect wildlife pictures
- 20 great tips for wildlife
- Master the lighting effects filter
- Capture perfect pet portraits
- Design animal hybrids
Low light
- Perfect low-light photographs
- 20 great tips for low light
- Add drama with Dodge and Burn
- Blend the light
- Fake a star trail
- Set off some digital fireworks
- Create a sunset using gradient maps
- Fix noise with the Reduce Noise filter
Still life
- Paint with light
- 20 great tips for still-life photography
- 20 great tips for photographing food
- Re-create realistic shadows
- Experiment with Masks
- Inject a new colour
Travel
- Document the streets
- 20 great tips for travel captures
- Transform a cityscape
- Paint a travel photograph
- Control HDR with layers
- Create a wood effect painting
Creative
- Create a comic book effect
- Produce smoke art
- Add impact to your photos
- Miniaturise your photos
- Fake a motion blur
- Add a fisheye effect to your shots
- Turn photos into 3D images
- Make a vintage travel poster
- Add a retro filter to your shots
Free with this bookazine...
- The ultimate creative tools to help you learn Photoshop.
- All the tutorial files you need.
- Video guides from the pros
- 30 creative stock images

Subscribe to:
Posts (Atom)


- Follow Us on Twitter!
- "Join Us on Facebook!
- RSS
Contact