Showing posts with label a. Show all posts
Showing posts with label a. Show all posts
Friday, June 19, 2015
9,
a,
for,
free,
getting,
glare,
how,
of,
person,
portrait,
pse,
spectacled,
to,
use
0
comments
How to use PSE 9 for getting glare free portrait of a spectacled person
A very common problem while taking portraits of a spectacled person is the glare in the lens that results in hiding the eyes. The best way is to take two pictures of the same person one with spectacles and one without spectacles and then correcting the glare in PSE 9 as shown below.
So here was the portraits that were shot, one with spectacles and one without spectacles.


We will be using layers masks of PSE 9 to correct the glare. The same can though be achieved using PSE 8 magnetic lasso tool as well. However I prefer layer masks in PSE 9 as they give me flexibility of using opacity and transparency of the pen and eraser tools to give more realistic results.
1. Open both the images in PSE 9.
2. Select the image without spectacles in workspace and using rectangular marquee select the area around the eyes as shown below.
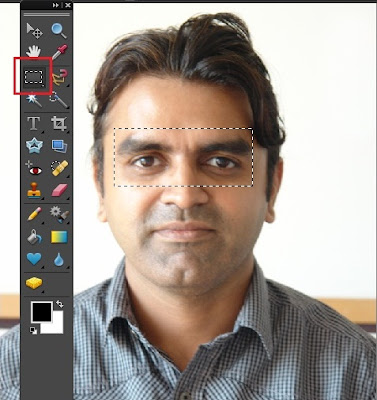
Right click the selection made and select Layer via Copy . A new layer gets created in the Layer palette as shown:

3. Once done, select Move tool from tool bar and drag it over the other image(with spectacles) in the project bin. The dragged layer now gets created in the spectacle image as well as shown.

4. Now we would reposition this portion of the layer above background layer such that the forehead lines and the nose line overlap over each other. Doing this I realized that one image had the head tilted while the other had the head straight up. So we will first transform it using Control+T and would rotate it a bit so that both the layers can be inlined properly.

In the above image I have rotated the upper layer a bit so that the nose line of the person match.
5. Now we would create a copy of the background layer by selecting it and dragging it over the new layer icon in the layer palette or just press Control+J selecting the background layer.
Once done, move the background copy layer on the top by dragging it above the layer on the top. Now the layer with eyes we dragged from other image goes below the spectacles and we see following in the layers palette and the editing workspace :

6. Select the background copy layer and go to Layer> Layer Mask>Reveal All.
This will create a white mask next to the background copy layer as shown in the Layer palette.
Select the brush tool from tools bar and make the foreground color as black in the color swatch.
Now reduce the opacity of the brush from the top bar to somewhere around 50%. Brush over the area of the eyes inside the spectacles.
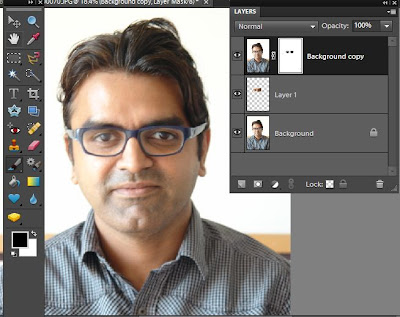
If any extra areas are brushed, that can be reverted using the eraser tool or by just making the foreground color white and rubbing it over the extra areas painted.
If we do not reduce the opacity while brushing then the mask is totally removed over the areas inside spectacles which looks as if there are no glasses in the spectacles. So in order to give realistic look of the lenses, the eyes are brushed with reduced opacity and keeping unbrushed areas near the edges to leave some glare there.
Here is my final output :
Here are the initial and edited images :


If any extra areas are brushed, that can be reverted using the eraser tool or by just making the foreground color white and rubbing it over the extra areas painted.
If we do not reduce the opacity while brushing then the mask is totally removed over the areas inside spectacles which looks as if there are no glasses in the spectacles. So in order to give realistic look of the lenses, the eyes are brushed with reduced opacity and keeping unbrushed areas near the edges to leave some glare there.
Here is my final output :
Here are the initial and edited images :

Thursday, June 18, 2015
a,
an,
and,
background,
content,
create,
fill,
from,
hole,
how,
object,
pse9,
remove,
scene,
the,
to,
using
0
comments
How to remove an object from a scene and create background content to fill the hole using PSE9
Is there a tool in PSE which can help you remove an object or a person from foreground of an image by filling it with the background content?
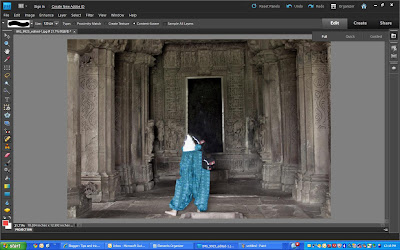
So in my source image above, I wanted to remove the girl from the temple and have just the building.
It may be achievable with clone tool, however it would really be a big time task.
Yes, there is one which was introduced in PSE 9. So here are my initial and final images to show what this tutorial will help you achieve through this tutorial:
 |
| Initial image |
 |
| Final image |
So in my source image above, I wanted to remove the girl from the temple and have just the building.
It may be achievable with clone tool, however it would really be a big time task.
For non-complex images, it may just take seconds to fix that photo using content aware spot healing by doing just a couple of dabs
.
However, I choose an image which is complex as we need to remove a person whose background is not consistent throughout. It has the dark area inside the gate, the gate boundaries, the sculptured wall, the ground with variations in textures and colors. And spot healing from previous versions of PSE might not work since it does not have that intelligence to create content from background and fill it with it.
.
However, I choose an image which is complex as we need to remove a person whose background is not consistent throughout. It has the dark area inside the gate, the gate boundaries, the sculptured wall, the ground with variations in textures and colors. And spot healing from previous versions of PSE might not work since it does not have that intelligence to create content from background and fill it with it.
1. Open the image in Editor.
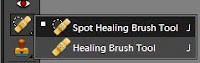
2. Select Spot healing tool from the left tool bar.
 |
| The spot healing brush properties in top properties bar |
3. Now keeping "Content-Aware" option selected in Properties panel, a keeping brugh size of the area not very big(which can be incremented and decremented using ],[ keys), start brushing(dabbing) over the object you want to remove.
So here are some tips which I have learnt on using this tool again and again :
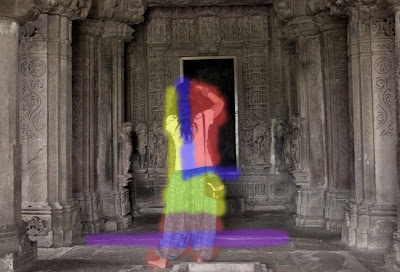
1. In the image above, for areas marked in red, I could use a bigger brush size without worrying much as the background behind the red mark is not very complex and is consistent, and I am not worried much as there are change in colors, no linear planes changing etc. So I can do this part quickly.
2. The areas marked in yellow are bit complicated as they have carvings on the wall. So would be good to start dabbing the brush with small size from the area near to the yellow area boundary in a linear manner. So if you see the carvings on the wall, they are horizontally linear. So it would be good if I start from the left near the boundary of the yellow area towards right horizonally.
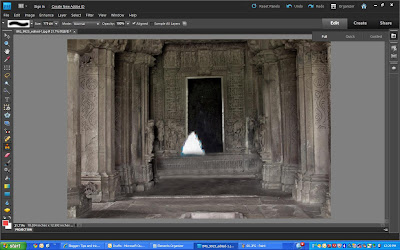
3. The areas marked in blue(In L shape) is the area which should be taken care alittle meticulously since it has the frame of the door which has straight lines which need to be content created. So for this I reduced the brush size so that it did not cover the breadth of the frame and started from left such that the brush area includes the area of the existing frame(white frame area). However, this decision making may vary from image to image which would come to you as you try this tool a few times. For non-complex images, it may just take seconds to fix that photo using content aware spot healing and you may not have to do any such decision making. But for complex images, you might need a little thinking to get the best results.
4. For the area in purple, I used clone tool as it was quicker for that scenario. Spot healing content aware brushcould also have been used.
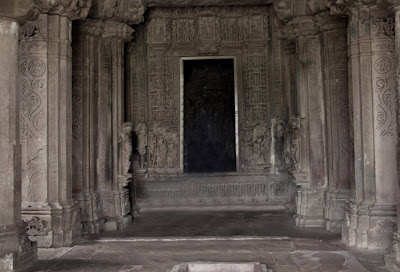
Here is my final result :
Hope this tutorial helps!!!
So here are some tips which I have learnt on using this tool again and again :
1. In the image above, for areas marked in red, I could use a bigger brush size without worrying much as the background behind the red mark is not very complex and is consistent, and I am not worried much as there are change in colors, no linear planes changing etc. So I can do this part quickly.
3. The areas marked in blue(In L shape) is the area which should be taken care alittle meticulously since it has the frame of the door which has straight lines which need to be content created. So for this I reduced the brush size so that it did not cover the breadth of the frame and started from left such that the brush area includes the area of the existing frame(white frame area). However, this decision making may vary from image to image which would come to you as you try this tool a few times. For non-complex images, it may just take seconds to fix that photo using content aware spot healing and you may not have to do any such decision making. But for complex images, you might need a little thinking to get the best results.
4. For the area in purple, I used clone tool as it was quicker for that scenario. Spot healing content aware brushcould also have been used.
Here is my final result :
Hope this tutorial helps!!!
Saturday, May 23, 2015
a,
bring,
eyes,
focus,
how,
in,
more,
on,
potrait,
pse,
to,
using
1 comments
How to bring more focus on eyes in a potrait using PSE
1. Select Background layer in layers palette
2. Select the complete eye area ( including the white part ) using any selection tool (i used quick selection tool). Right click over the selected portion and say Layer via Copy. Name this layer in layers palette as Eyes by double clicking the layer in the palette.
3. Now select the background layer again and make a selection for the eye ball regions only. And right click and select Layer via Copy and name this layer as Eye ball.
4. Now Conrol+Click on the layer Eyes to show the eyes selected in the image. Click on Background layer and Select Inverse from right click on image area followed by Layer via Copy. Name this new layer as Blur. This constitutes the whole image except the eye region.
5. Now select the layer Blur and Filter>Blur>Gaussian Blur. Modify the blur to something like 2.5 or lesser. This is done to rest of the image leaving eyes so that eyes are prominent in the image. Click Ok. You can later on modify the opacity of the layer making it more transparent if you want to decrease the blur effect. You can do that by selecting this layer in the layer palette and moving the opacity slider on right top of layers palette.
6. Now select the layer Eyes. Go to Enhance>Adjust Sharpness. Now make changes to the amount and radius. Click Ok. You can vary the sliders as per your needs and preview it side by side in image area or preview area in the dialog. Do not oversharpen as it makes the eyes look artificial.
7. Now select only the layer Eye ball and select Enhance >Unsharp mask.
I changed the amount to near 50% and radius to near 16. This details out the pattern inside the eye ball and brings more focus to the eye region.
8. You can now also increase the saturation of this layer by Enhance>Adjust color>Adjust Hue/Saturation. You can select the Grrens from the combo box if you obly want to saturate the Green of the eyes using the Saturation slider.
Click Ok.
Here are the initial and the final images :


(Click to have larger views to see differences)
Saturday, May 16, 2015
9,
a,
create,
hard,
how,
portrait,
pse,
rock,
style,
to,
using
0
comments
How to create a portrait hard rock style using PSE 9

2. Create a copy of the background layer by pressing Control+J
3. Now select the copy of the background layer and go to Enhance>Convert to Black and White.The following dialog will pop up. You may choose any preset available in the dialog or making changes using the sliders. Click Ok
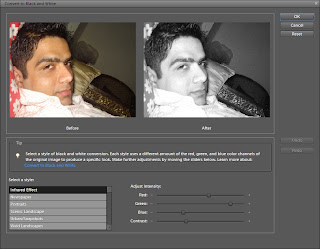
4. Now Select this background copy and rename the layer as Overlay. Keeping this layer selected, change the blending mode of this layer to Overlay from the combo box.

6. Now select Burn tool from toolsbar and brush it over the highlights in the resultant image. You may try the combo box options with the blur tool on top toolbar - Highlights, mid tones, shadows.

Here are my initial and final images :

Thursday, April 30, 2015
a,
adobe,
and,
cs6,
from,
illustrator,
navigating,
numerically,
panel
0
comments
Adobe Illustrator CS6 Navigating numerically and from a panel
Now lets say you want to magnify your illustration on screen, but none of the standard zoom increments
 are really working for you.
For example, here I am taken in the illustration wide and if I press Ctrl+Plus, or Command+Plus on the Mac, then Ill zoom to 100%.
And if I do it again, Ill zoom to 150% and then 200% and then 300% and so on.
So weve got some pretty big increments going on and these are the exact same increments we get with the Zoom tool and with the other zooming techniques.
Im going to go ahead and press Ctrl+1, or Command+1 on the Mac, to zoom out to 100%.Illustrator cs6
If you want to dial in a custom zoom value then you can drop down here to this zoom option thats listed in the very bottom left corner of the document window.
Click on it, and then instead of entering a value, which you can do if you like, but my preferred method of working here is to press the Up arrow key in order to zoom in increments of one so you have very tight control.
You can also press the Shift Up arrow to move in 10% increments.
Illustrator CS6 Tutorial
And so at 120%, Im thinking Im zoomed in a little bit too far, Ill go ahead and take that down by pressing the Down arrow key until I reduce that value to 116% and that looks good to me.Now as I say, the other option of course is to dial in your own value.
For example, I could go ahead and zoom in to 2400%.
Now the problem becomes when youre this far zoomed into an illustration its difficult to get your bearings, you may not necessarily know where you are.
In that case, you want to bring up the Navigator panel, and you do that by going up to the Window menu and choosing the Navigator command, and then youll see this panel thats showing you your entire Illustrator cs6 and a tiny red thing right there that shows you the portion of theIllustrator cs6 that youre seeing right now.
All right, Im going to go ahead and expand this panel, like so so that I can see my Illustrator cs6 in a little more detail.
And by the way, working this way is great if you have two monitors, so you can go ahead and throw the Navigator panel on one monitor and of course have your document window open up in another.
Illustrator CS6 Tutorial
Anyway at this point, I could scroll inside the Illustrator cs6 by dragging this guy to a different location, or if I prefer I can just click somewhere in the illustration.You also have these zoom controls right here, so you can click on the little mountain to zoom out incrementally, or you can click on the big mountain to zoom in, you can also drag this zoom slider.
The only problem with this slider from my vantage point is it doesnt really show you a dynamic zoom, so you have to pause while youre dragging in order to update the screen.
It is a final way to work.
You can press and hold the Ctrl key or the Command key on the Mac, that will change your cursor to a little magnifying glass, and then you can drag around the portion of the Illustrator cs6 that you want to zoom.
As soon as you release Illustrator cs6 will show you that region on screen.
And then of course if the Navigator panel is getting too big for you, you can go ahead and drag a quarter or one of the sides in order to make it smaller.
And thats how you zoom to any degree you desire as well as get around using the Navigator panel here in Illustrator cs6 .
a,
arc,
cs6,
drawing,
heart,
illustrator,
in,
the,
tool,
with
0
comments
Drawing a heart with the Arc tool in Illustrator CS6
In this movie, Ill show you how to begin creating the heart outline using the Arc tool in Illustrator CS6 . Ive saved my changes as All guides.ai found inside the 04_line_art folder. Lets go ahead and switch to Arc tool, and its a pretty easy concept when you drag with a tool you can see that you create as I was saying before, a quarter ellipse. And you might imagine that this is going to serve as well for the first hump in our heart, but we are not going to start at this arbitrary location.
We are going to start right there at the intersection of the central vertical guide and the second horizontal guide down. So I will go ahead and press the Backspace key or the Delete key on the Mac, in order get rid of that bad arc. And now I will drag up on to the left, like so, while pressing the Shift key, and you want to drag until you snap to that guideline up there. And you kind of want to inch it back a little bit to the right so that the heads-up display says, a Width of 112 pts and a Height of 112 pts. And by virtue of the fact incidentally that we were pressing the Shift key were getting a perfect quarter circle. So you want to keep that Shift key down the entire time, and then you want to release your mouse button, and then release the Shift key.
In this Case Drawing a heart with the Arc tool in Illustrator CS6
Now you want to drag from that anchor point, so make sure that your cursor says the word Anchor on it. And you want to drag down into the left until you intersect with the first vertical guideline and the second horizontal guide. Now the arc will definitely go in the wrong direction just as you see on my screen. To flip it, what you do is you keep your mouse button down, and you just tap the F key. Then you go ahead and release the mouse button in order to create the second arc.
Next, we need to go ahead and draw the bottom portion of the heart, and you might be tempted to do one of these numbers, where you draw the outer lump here, and you press the F key in order to flip it, and then you draw a final arc, and you press F again, once to flip it, but that would result in one ugly looking heart. So thats not what we want. Lets go ahead and get rid of those path outlines by switching to the Black Arrow tool and notice, by the way, the Black Arrow has a keyboard shortcut of V, all you have to do is just tap the V key. And you might think of V as being an upside down arrow. So weve got the Black Arrow thats got an upside down arrow for a keyboard in Illustrator CS6 shortcut, that is the V key. And then weve got a White Arrow, Ill tell you how it works later, thats got a right side up arrow for its keyboard shortcut, which is the A key, which of course also happens to stand for arrow. All right, I am going to go ahead and switch to the Black Arrow, which allows me to select entire path outlines, which is what these things are called inside of Illustrator.
Notice that at this point Im seeing a bounding box around my selected arc. The bounding box extensibly makes it easy to scale and rotate a graphic. But in my experience it gets in the way of getting actual work done, and there are better ways to scale and rotate, as Ill show you in a future chapter. So I am going to advise that you turn the bounding box off, and Im definitely doing so. By going up to the View menu and choosing the Hide Bounding Box command. If you ever need the Bounding Box in the future just choose this command again and of course, its got a keyboard shortcut Ctrl+ Shift+B, or Command+Shift+B on a Mac.
Now I am going to draw this dotted marquee in order to partially select these two path outlines and that will select them both, and then Ill press the Backspace key or the Delete key on a Mac, to get rid of them. Instead what we want to do is go ahead and switch back to the Arc tool in Illustrator CS6 here, and you want to drag from the last anchor point there, all the way down to the intersection of the middle vertical guide and the fourth horizontal guide down.So its not the long guide, its the shorter one just above it. And you want to make sure you see the word Intersect, so youre intersecting those guidelines, and then tap the F key if necessary in order to send the arc in the other direction, and then release.
Now of course, Arc tool in Illustrator CS6 Tutorial where our heart concerned, that doesnt look any better than one I showed you before. We are going to make it look way better by manually modifying this arc in the very next movie.
Read more »
We are going to start right there at the intersection of the central vertical guide and the second horizontal guide down. So I will go ahead and press the Backspace key or the Delete key on the Mac, in order get rid of that bad arc. And now I will drag up on to the left, like so, while pressing the Shift key, and you want to drag until you snap to that guideline up there. And you kind of want to inch it back a little bit to the right so that the heads-up display says, a Width of 112 pts and a Height of 112 pts. And by virtue of the fact incidentally that we were pressing the Shift key were getting a perfect quarter circle. So you want to keep that Shift key down the entire time, and then you want to release your mouse button, and then release the Shift key.
In this Case Drawing a heart with the Arc tool in Illustrator CS6
Now you want to drag from that anchor point, so make sure that your cursor says the word Anchor on it. And you want to drag down into the left until you intersect with the first vertical guideline and the second horizontal guide. Now the arc will definitely go in the wrong direction just as you see on my screen. To flip it, what you do is you keep your mouse button down, and you just tap the F key. Then you go ahead and release the mouse button in order to create the second arc.
Next, we need to go ahead and draw the bottom portion of the heart, and you might be tempted to do one of these numbers, where you draw the outer lump here, and you press the F key in order to flip it, and then you draw a final arc, and you press F again, once to flip it, but that would result in one ugly looking heart. So thats not what we want. Lets go ahead and get rid of those path outlines by switching to the Black Arrow tool and notice, by the way, the Black Arrow has a keyboard shortcut of V, all you have to do is just tap the V key. And you might think of V as being an upside down arrow. So weve got the Black Arrow thats got an upside down arrow for a keyboard in Illustrator CS6 shortcut, that is the V key. And then weve got a White Arrow, Ill tell you how it works later, thats got a right side up arrow for its keyboard shortcut, which is the A key, which of course also happens to stand for arrow. All right, I am going to go ahead and switch to the Black Arrow, which allows me to select entire path outlines, which is what these things are called inside of Illustrator.
Notice that at this point Im seeing a bounding box around my selected arc. The bounding box extensibly makes it easy to scale and rotate a graphic. But in my experience it gets in the way of getting actual work done, and there are better ways to scale and rotate, as Ill show you in a future chapter. So I am going to advise that you turn the bounding box off, and Im definitely doing so. By going up to the View menu and choosing the Hide Bounding Box command. If you ever need the Bounding Box in the future just choose this command again and of course, its got a keyboard shortcut Ctrl+ Shift+B, or Command+Shift+B on a Mac.
Now I am going to draw this dotted marquee in order to partially select these two path outlines and that will select them both, and then Ill press the Backspace key or the Delete key on a Mac, to get rid of them. Instead what we want to do is go ahead and switch back to the Arc tool in Illustrator CS6 here, and you want to drag from the last anchor point there, all the way down to the intersection of the middle vertical guide and the fourth horizontal guide down.So its not the long guide, its the shorter one just above it. And you want to make sure you see the word Intersect, so youre intersecting those guidelines, and then tap the F key if necessary in order to send the arc in the other direction, and then release.
Now of course, Arc tool in Illustrator CS6 Tutorial where our heart concerned, that doesnt look any better than one I showed you before. We are going to make it look way better by manually modifying this arc in the very next movie.
a,
adobe,
cs6,
detail,
honing,
illustrator,
in,
specific,
tutorial
0
comments
Adobe Illustrator CS6 Tutorial Honing in a specific detail
In this movie Ill show you how to zoom with more control using the Zoom tool as well as
In this movie Ill show you how to zoom with more control using the Zoom tool as well as a Special Scroll Wheel Trick.
Now the problem with Ctrl+Plus, or Command+ Plus on a Mac, it is that youre zooming in on the center of whatever you are seeing on screen.
 And right now, the center of my screen is this dot at the top of the first colon and thats why I chose to draw my little bacteria there because after all, thats the dead center of the artboard.
However, what if you want to zoom in on, lets say, a more appealing detail.
Well, thats when you to take advantage of the Zoom tool.
So Im going to press Ctrl+Alt+0, or Command+Opt +0 on a Mac, this is a Zoom tool right there.
If youre looking at the Single Column tool Box its going to be the very last tool on the list.
It has a keyboard shortcut of Z and if I select the tool, and then click on some other detail in the illustration.
For example, Ill go ahead click on this bottom left pen cursor.
You can see that Illustrator not only zooms but it also goes ahead and centers that detail on screen.
Adobe
Illustrator CS6 Tutorial
| Now that I could switch to another if I want to just by clicking again, and then clicking | |||||||||||||||
| once more to zoom in even further, to zoom out you press and hold the Alt key or the | |||||||||||||||
| Option key on a Mac, and then you click. | |||||||||||||||
| And again, you are going to center the location of the newly zoomed screen each time you click with this tool. | |||||||||||||||
| Now the tool is so incredibly useful in my opinion that you really want to learn a keyboard shortcut for it. | |||||||||||||||
| You dont to have one has to switch to the Zoom tool every five seconds in order to magnify a detail. | |||||||||||||||
| So here is what you do. Illustrator cs6 | |||||||||||||||
| Again I will press Ctrl+Alt+0, or Command+Opt+ 0 on a Mac, to go ahead and center my artwork. | |||||||||||||||
| I will switch back to the black error tool to get to the Zoom tool on the fly you press | |||||||||||||||
| Ctrl+spacebar, thats Command+spacebar on a Mac, then you just go ahead and click to zoom on in. | |||||||||||||||
| If you want to zoom out, you have the Alt or Option key so thats Ctrl+Alt+spacebar here | |||||||||||||||
| on a PC, or Command+Opt+spacebar on the Mac, and then of course you click to zoom out. | |||||||||||||||
Here is another great thing you can do with the Zoom tool if you press Ctrl+spacebar, Illustrator cs6Illustrator CS6 Tutorial
|
a,
adobe,
cs6,
document,
illustrator,
or,
panning,
scrolling
0
comments
Adobe Illustrator CS6 Scrolling or panning a document
In this movie, I will show you how to scroll or if you prefer pan your Illustrator cs6
.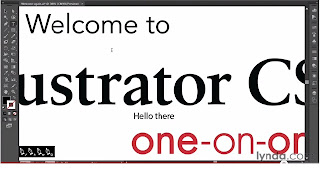
So here I am zoomed in on a detail, but I want to be able to scroll around a little bit.
Take a look at a different detail at this exact zoom level.
You can take advantage of the scroll bars down here at the bottom and along the right side of the Document window.
But the better way to work is to get the Hand tool.
So if I switch to the Hand tool which has a keyboard shortcut of H, then I can just drag my Illustrator cs6 around as much as I like.
Of course, you dont want to have to go running after the Hand tool every time you need to scroll.
So heres a better way to work.
I will switch back to my black arrow tool, and then I will press and hold the spacebar. Notice that gets me the Hand tool as long as the spacebar is down, and then I can drag the document as much as I want.
Now, what happens though, if youve got live text? Now, none of the text in this document is live, by the way.
I use special fonts that arent on your system so I had to convert everything to outlines.
Illustrator CS6 Tutorial
But lets just go ahead and create some text.
Ill switch to the Type tool, which I can do of course, by pressing the T key.
And Ill click inside the document, and I will just enter the word Hello.
Now if I try to press the spacebar and scroll at this point, I will enter a space character of course.
So one option is to press the Escape key so the text is no longer active, and then you can spacebar-drag, but because I pressed the Escape key I am back to the Black arrow tool so.
Now if want to do some more text editing Id have to switch back to my Type tool, and then click after that space character and enter some more text.
Here is the way I work, when I have live text.
I will just go head and scroll using the Scroll wheel.
So obviously scrolling down moves you down, scrolling up moves you up.
If you want to move more quickly, its a Shift+ Scroll down or a Shift+Scroll up, if you want to
move back and forth then you press the Ctrl key, or the Command key on the Mac, and you scroll down to go right, scroll up to go left, if you want to move more quickly its Ctrl+Shift
on a PC, or Command+Shift on the Mac, scroll down to go right and scroll up to go left. Also, by the way, those of you with Macintosh trackpads, you can use that two finger swipe as well.
Illustrator will respond to that, and thats probably the easiest way to work on that platform.
So there you have it, the myriad ways to scroll or pan a document here inside Illustrator cs6
Wednesday, April 29, 2015
a,
creating,
cs6,
document,
illustrator,
in,
new,
tutorial
0
comments
Creating a new document in Illustrator CS6 Tutorial

I am just going to paste in a name I created in advance because I am a terrible typist. The next option allows you to select from a few predefined Profiles all of which will dial in settings inside this dialog box. So if you intend to create a document for Commercial Reproduction then you select Print. If youre trying to dummy up a web page then you select Web. If you want to create a document for a device such as an iPad or iPhone then you have got this Devices option and so forth. I am going to go ahead and switch to Device for a second so that you can see that we have a lot of different devices to select from. In the case of iPad however the information is little out of date. If youre designing for an iPad 3, then you want a Width 1536 pixels and a Height of 2048, much higher resolution than the earlier iPads.
a,
adobe,
and,
artboards,
cs6,
document,
illustrator,
its,
tutorial,
zooming
0
comments
Adobe Illustrator CS6 Tutorial Zooming a document and its artboards
In this movie, I will show you how to zoom in and out in Illustrator cs6..
And the idea is this, sometimes you are going to want to magnify portions of your illustration
in order to fine-tune adjustments, and other times you are going to want to zoom out so that you can take in your entire artwork at a time.
I am working inside of a document called Welcome again.ai found inside the 03_navigation folder.
 If I go up to the Window menu and choose Artboards command, you can see that this document contains
a total of six Artboards.
So we have the central Welcome screen, and then we have renderings of a bunch of paint tool cursors.
These are the new paint tool cursors in Illustrator cs6 and then finally I have got this big
Artboard that contains everything.
I just wanted you to see that because these Artboards will become important in a moment.
In the meantime though, you zoom in and out from an Illustrationright here located in the View menu.
Now notice that each one of them has a keyboard shortcut.
I find that folks fall into a couple of different categories where shortcuts are concerned.
They either love them and they use them all the time that would be me, by the way.
Illustrator CS6 Tutorial Video
Thats why I mentioned them as I am going through these movies. Other folks just hate them especially when they are first trying to come to terms with a piece of software.
So tell you this you can use keyboard shortcuts or not but I do recommend that you at least
learn these shortcuts here.
Because that will help you move more quickly through the software, also it allows you to
spend less time on focusing on the mechanics of Illustrator and more time and energy on your artwork.
So if you want to zoom in, you can choose the Zoom In command as I am doing here but you are better of using the keyboard shortcut which are easy to remember Ctrl+Plus, or Command+Plus
on the Mac, and you can see that thats zooming me in incrementally.
If I want to Zoom Out, I press Ctrl+Minus, or Command+Minus on the Mac, and again that
zooms me out incrementally.
Notice that I am viewing the Illustration right now at 100%.
Now extensively, this is Illustration showing you Artboard at the sizable print.
However, it is not really accurate and the reason is Illustrator is assuming your screen
resolution is 72 pixels per inch which dates way back to those old 1984 Macintosh boxes,
Illustrator CS6 Tutorial Video
that just isnt the case anymore.
Your screen is more likely to have a resolution in a neighborhood of 100 to 120 pixels per
inch, in which case the Artboards is actually going to print larger than it appears at 100%.
So thats just something to bear in mind.
Now if this were a program like Photoshop, and we kept zooming in from 100% then we would
get bigger and bigger pixels, but Illustrator cs6 is working with vectors, and it is rendering
those vectors to your screen on the fly and as a result we get greater and greater detail
as we zoom in, and you can see that you can zoom in all the way to 6400%, which is a sufficient
level of magnification to see a large bacteria, which is why I have gone ahead and drawn a
little bacteria, right here an Illustration.
Thats how big the largest bacteria are.
So Illustrator really allows you to hone in on that detail.
Now if you want to return to the 100% percent view at any point in time, you just
Ctrl+1, or Command+1 on the Mac.
Illustrator CS6 Tutorial Video
You may also remember from the previous chapter that if you want to zoom in on a specific
Artboard, all you have to do is double-click on that Artboard here inside the Artboards panel.
Another way to work, if I press Ctrl+Alt+0, or Command+Option+0 on the Mac, to go all the way out and take in my entire artwork at a time.
I can click on any one of these Artboards to make it active, and then press Ctrl+0, or Command+0 on the Mac, to zoom in on it, and just as with double-clicking on an Artboard,
here inside the Artboards panel, Ctrl+0, or Command+ 0 goes ahead and fits the Artboard on the screen.
And incidentally, if you ever need to refresh your memory on the shortcuts, all you need
to do is go up to the View menu and check out these five commands right there. These are the shortcuts that Ive mentioned.
Ctrl+Plus, or Command+Plus to Zoom In, Ctrl+Minus, or Command+Minus to Zoom Out, Ctrl+0, or Command+0
to fit the Artboard in the window, Ctrl+Alt+0, or Command+Options+0 on the Mac, to fit everything,
the entire document inside the window, and then Ctrl+1, or Command+1 on the Mac, to go
to the Actual Size which is the 100% view. And thats how you zoom in and out from an Illustration. from the keyboard inside Illustrator cs6
a,
adobe,
book,
classroom,
cs6,
illustrator,
in,
pdf,
tutorial
1 comments
Adobe Illustrator CS6 Tutorial PDF Classroom in a Book
Adobe Illustrator CS6 Tutorial Pdf Classroom in a Book
2012 | PDF + EPUB | 480 pages | 181 MB

Creative professionals seeking the fastest, easiest, most comprehensive way to learn Adobe Illustrator CS6 choose Adobe Illustrator CS6 Classroom Pdf in a Book from the Adobe Creative Team at Adobe Press. The 15 project-based lessons in this book show readers step-by-step the key techniques for working in Illustrator CS6 and how to create vector artwork for virtually any project and across multiple media: print, websites, interactive projects, and video.
in addition to learning the key elements of the Illustrator interface, this completely revised CS6 edition covers the new tracing engine with improved shape and color recognition, a new pattern toolset with on-artboard controls and one-click tiling, a completely overhauled performance engine and modernized user interface for working more efficiently and intuitively, and more.
“The Classroom in a Book series is by far the best training material on the market. Everything you need to master the software is included: clear explanations of each lesson, step-by-step instructions, and the project files for the students.” —Barbara Binder, Adobe Certified Instructor, Rocky Mountain Training
Classroom in a Book®, the best-selling series of hands-on software training workbooks, helps you learn the features of Adobe software quickly and easily. Classroom in a Book offers what no other book or training program does—an official training series from Adobe Systems Incorporated, developed with the support of Adobe product experts.
Read more »
2012 | PDF + EPUB | 480 pages | 181 MB
Creative professionals seeking the fastest, easiest, most comprehensive way to learn Adobe Illustrator CS6 choose Adobe Illustrator CS6 Classroom Pdf in a Book from the Adobe Creative Team at Adobe Press. The 15 project-based lessons in this book show readers step-by-step the key techniques for working in Illustrator CS6 and how to create vector artwork for virtually any project and across multiple media: print, websites, interactive projects, and video.
in addition to learning the key elements of the Illustrator interface, this completely revised CS6 edition covers the new tracing engine with improved shape and color recognition, a new pattern toolset with on-artboard controls and one-click tiling, a completely overhauled performance engine and modernized user interface for working more efficiently and intuitively, and more.
“The Classroom in a Book series is by far the best training material on the market. Everything you need to master the software is included: clear explanations of each lesson, step-by-step instructions, and the project files for the students.” —Barbara Binder, Adobe Certified Instructor, Rocky Mountain Training
Adobe Illustrator CS6 Tutorial PDF Classroom in a Book (2012)
Classroom in a Book®, the best-selling series of hands-on software training workbooks, helps you learn the features of Adobe software quickly and easily. Classroom in a Book offers what no other book or training program does—an official training series from Adobe Systems Incorporated, developed with the support of Adobe product experts.
Adobe Illustrator CS6 Tutorial PDF Download
Friday, April 3, 2015
a,
create,
effect,
glowing,
in,
liquid,
photoshop,
splash,
text,
water,
with
1 comments
Create a Glowing Liquid Text with Water Splash Effect in Photoshop

Ground texture
Water pattern image
Water splash brush
Step 1
Create a new document sized 1280px * 800px with black background. Load the Ground Texture stock image into Photoshop, and select a piece of the ground as shown below:

Copy and paste the selection onto our document, use a soft eraser to remove the edges and some parts of the ground as shown below:

Add the following 3 adjustm
ent layers on top of the ground texture layer:
Black and White

Levels

Curves

Create a new layer on top and add some cloud effect over the ground with either a cloud brush or the cloud filter – this adds some dramatic effect into it:

Step 2
We will now add some text onto the document – I used the “Freestyle Script” font (should come with Photoshop):
Apply the following layer blending options to this text layer:
Bevel and Emboss

Color Overlay

Outer Glow

and you will have the following effect:

Step 3
We add some water pattern over the text – download the water pattern pack and choose one of the images, select a portion of it with any selection tool:
Copy and paste the selection over the text and set it as a clipping mask to the text layer:

We will go back to the water images and select a piece again, then copy and paste the selection and put it below the text layer, use the liquify filter’s forward warping tool to make it into a pattern as shown below:

This step can be a bit and you will probably need to have a few tries before getting it right. The effect below is the one you’re aiming to achieve:

Step 4
Load the water splash brush into Photoshop and paint some splash around the text, use a soft eraser to fade the edges of the splash for depth:
We will fine tune the colour effect a bit with the following image adjustment layer on top:
Selective Color
Cyans

Whites

Neutrals

Layer mask on the selective colour adjustment layer:

Curves

Layer mask on this curves adjustment layer:

Color Balance


and you will have the following final image: (click to enlarge)

That’s it for this tutorial! Hope you enjoy it and find it useful! Till next time, have a great day!
 Writer : Tommy Kurniawan
Hello! My name is Tommy. Im a blogger, I love graphics design and now i went to Architechture Technical Senior High School. | Facebook |
Source : PSDVault
Subscribe to:
Posts (Atom)


- Follow Us on Twitter!
- "Join Us on Facebook!
- RSS
Contact