Background – Anarasha-StockModel – BugidifinoBirds – MadetobeuniqueBokeh – Regularjane
Step 1
Download the Backgrounds pack and open in Photoshop the background number 5. Double click on the layer to unlock it. Flip the image horizontally (CTRL + T > Flip Horizontally). Crop the part we want to be the base of our work.
Step 2
We want to give to the background some contrast. Duplicate the background twice (CTRL + J). Set the first duplicated background to Screen to enhance the lights. Set the second to Multiply to enhance the shadows. This is what you will have.
Step 3
Extract the Lady from the background (I used the Quick Selection Tool + Refine Edges, but everyone has their own best method). I previously smudged the model skin, but this is not the aim of this tutorial and it doesn’t affect the final result. Put her in a new layer above the backgrounds layers.
Step 4
Now we have to blend the Lady with the Background. I desaturated a bit the lady and removed some of brightness. To do that add a Hue / Saturation Adjustment Layer only for the Lady and set the Saturation to -19 and Lightness to -8.
Step 5
Now we work on the colors. Add a Color Balance Adjustment Layer only to the Lady and put these settings:
Shadows > +14 +7 -16Midtones > +11 +7 0Highlights > +10 +5 -5
Step 6
We want to blend more everything. Open the pack containing the bokeh and add the number 2 in a new layer above everything. Rotate it like in the picture below (CTRL + T).
Step 7
Set the Bokeh to Soft Light. Opacity and Fill to 75%.
Step 8
Add a Gradient Map Adjustment Layer and choose the one you see below from the presets.
Step 9
Set the Gradient Map to Soft Light with Opacity and Fill to 80%.
Step 10
Add another Gradient Map and set it like below.
Step 11
Set the Gradient Map to Soft Light with Opacity and Fill 80%.
Step 12
Let’s work now on shadows and lights. First of all we need to make the background darker. Add a Brightness / Contrast Adjustment Layer above the 3 backgrounds and put:
Brightness -54 and Contrast +48This is so far what you’ll have.
Step 13
Create a new layer below the Lady and paint with white below her, going out her edges.
Set the layer to Soft Light.
Step 14
Create a layer below the one you have just done. Pick the color #572e07. With the Gradient tool (linear – #572e07 to transparent) make a gradient like the image below.
Set the layer to Multiply with Opacity and Fill at 80%.
Step 15
Create a new layer below the one containing the bokeh texture and add the flying bird.
Step 16
Add a Hue / Saturation Adjustment Layer only for the bird. Check ‘Colorize’ and put these settings:
Hue 44Saturation 15
Step 17
Create a new layer over the Hue/Sat you edited in the previous step. Pick the color #ffe7ba and with a soft round brush paint something like the image below.
Set the layer to Soft Light with Opacity 81% and Fill 87%.
Step 18
Create a new layer above everything and paint with yellow tones some lights as shown before. (I used mostly #efd981, #f6d373 and #f6d373).
Set the layer to Soft Light with Opacity 60% and Fill 80%.
Step 19
Create a new Layer and paint some light where shown below as you did in the previous step. I did it with color #fff3b0.
Set the layer to Soft Light.
Step 20
Create a new layer and we’re going to do the same as before. This time we’ll add some shadows. Pick a dark color from the background (not pure Black) and paint something like you see below in the image.
Set the layer to Soft Light.
Step 21
Create a new layer and fill it with 50% Gray (Edit > Fill > 50% Gray). Set the layer to Overlay. Now we have to Burn and Dodge. I used two different Range: Midtones and Highlights.
Burn: Range > Midtones, Exposure > 10% (It’s where you see dark parts)Dodge: Range > Midtones, Exposure > 10% (It’s where there is white)Where you see lighter white I used Dodge with same settings but putting Range: Highlights. Below you can see where I painted shadows and lights.
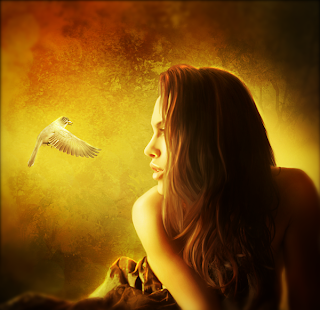
And this is the result.
Step 22
Unify the whole work with CTRL+ALT+SHIFT+ E. Go to Filter and choose Lens Correction. Choose the Custom menu and where you see ‘Vignette’ put -50 in the Amount.
Step 23
Duplicate last layer. Go to Filter > Other > High Pass and put 1 px. Set the Layer to Overlay. You can put the value you want, it depends on your taste. Just make some tries until you are happy with the result.
Step 24
Unify the whole work with CTRL+ALT+SHIFT+ E. Go to Filter > Gaussian Blur and add some blur (usually 10px is good).
Step 25
Add a mask to this layer. Choose a big round brush and pick black color. Paint on the mask to make the picture comes back again but leaving the corners blurred. Imagine to paint like a big circle.
Final Results
![final-results[5]](https://lh3.googleusercontent.com/blogger_img_proxy/AEn0k_sZxmJ5Hv0ptVjpL-Z8VgqYTaEEO9OO7twb6HqdS_EOY0JgpJA80UcV8Mrj7CaICmg52JBCcv7QU_3Ru_L8xYhvJ8LKwYk0jSJhd_jQkeFcqof-R-KpK5LHNLjZHuJVPAXkNhGfAtkmP9ava6KeWsj-Kkiy=s0-d "final-results[5]")
Author : Fabrizio Panattoni

![step-001[3]](https://lh3.googleusercontent.com/blogger_img_proxy/AEn0k_tDTQ9rlGQ6enQU9I5JGJV3El7Di5mCA5uK5dVPx4LsUNH8f6QWzq-0h8iYU8_ru_40TFR1PZqeR3IB-AMq7R1q7pjePElYb3edenKhiTp7-rpfHq6oSwJZ68kOPnb3dJTlo-cSiTLTK2TEspdV=s0-d "step-001[3]")
![step-002[3]](https://lh3.googleusercontent.com/blogger_img_proxy/AEn0k_teUIzbTaOk5MPIKhxgwf5MzQJDopOVn4z7He6ta1VS9ZefOrbTsShIlO-upBxZIkoKcrA1Sf15aS2PQ7ooopoLRGMk8ns1q-LryoWCgrmrw3IhZZRUEnrHOazC95yUI0e5hUO1hs39ctkGv8UCVg=s0-d "step-002[3]")
![step-003[3]](https://lh3.googleusercontent.com/blogger_img_proxy/AEn0k_vjRZ3S9SG1PXglOvKuhKAvTpiftAfBLp8DOM4wGxbTf08WxL6cQDT9FNiTv_i-x8Q5tHwpGz4IJyNdlSvDWazYNEqm33KJ0ZNDHkVbT-gZTYfJ3-DU-DCQ4w5K4emyzcXRmmCxumnPsPszgzCI=s0-d "step-003[3]")
![step-004a[3]](https://lh3.googleusercontent.com/blogger_img_proxy/AEn0k_v0n46qLX0mguf4vij7kBEsBbluGnV_bEL0Qk7HTS4vuwqsWzlFWL_wDjezEbkqjJIoYeHOMwgRKjyZ_KWWp0mLPOgQEw1RXFXHlQM7VavOjmt_MaOHtSs2kUy4q2kfCcOojh7FJDQKxHbcX5jnWA=s0-d "step-004a[3]")
![step-004b[3]](https://lh3.googleusercontent.com/blogger_img_proxy/AEn0k_vKn6FWyVB-lxzsiD92g6Tdapl492GAiKHc6-5xo6FHPK1G14_JwrjZyXL0ke6dAlWYwHBDo7jERb1crT2Y5JoVKgrArdZCojhQ72nwBfhK4wqU_qd8OCVwNJB1J9MrmJ-7m0g8P2GedrX0KUaq_ck=s0-d "step-004b[3]")
![step-004c[3]](https://lh3.googleusercontent.com/blogger_img_proxy/AEn0k_sK0ZUKChQ3l8A1Ic6cPfC1wpNoNDrz30RHEliC7c0z5AAF8iqBEEGFICX0kWaK5ZN1DFf5FAoen-70otuZgWI68dwdtkaAjeq5B8kxoPaXdknxfr0nSxTigj5yNOaH7xDl-PGTNHKFfSw=s0-d "step-004c[3]")
![step-004d[3]](https://lh3.googleusercontent.com/blogger_img_proxy/AEn0k_v1YBqgwiDWio9e2HnrIer7Pfy_GnZan2lg0WGvCuIxLsssQhWBaG4yLds4ze9O5yO7N4piSID95kCbGaf0UNICkpmNNcr4PZ14bsa63qHDPrhpKi6XIjTBrM0_HwAat6Qk2UpIIEBLcG5hlzQ2cTA=s0-d "step-004d[3]")
![step-004e[3]](https://lh3.googleusercontent.com/blogger_img_proxy/AEn0k_uAEL9sIDB2_I1tPwiHGk4sIPVaagOBDBoO7UHuh6WZSDMtLmXzD2gcoqCt__wPFKoQBiicgQVWu97pnHn5RdGsXq9vWmvKx3iWpMyYv1nltjCMJoKiXDINLjqcqY4ln0qudMg9qn11AOLEdXsR-A=s0-d "step-004e[3]")
![step-005[3]](https://lh3.googleusercontent.com/blogger_img_proxy/AEn0k_vpeCdhLu5wBXN3fKGZBDks5alt3vFyeXL_5dk7tddRcn9TGnFWMnvL_vdnVCyy-kTyuj3zhRfmKjXW5Yd-d7hnVZUbDmuVW563pAnRFgqXanGbdVCPz_UjG3KgBICO97HXm4s_qaTa2cGUAeKP=s0-d "step-005[3]")
![step-006[3]](https://lh3.googleusercontent.com/blogger_img_proxy/AEn0k_syOzERbC_4l2sXeLLmqDwgM06KtmjoZMKWySYINUeyW5UKqeTto34VhVC_BAU0mECIWb_mCuLeCID-1yW0w9j5gb7nn883S-NrZ7eslZFY1BnfST8HRgDoNOgZ81bxOIG10ssFFTzXg-IoBhm9=s0-d "step-006[3]")
![step-007[2]](https://lh3.googleusercontent.com/blogger_img_proxy/AEn0k_ubFmZlU1Tls6sweuBqIVISWtFHOuS43Zdqj9FqH9yGawZ4jf_-jcp3fR5fWV7YsU8SaeZSddphKCAS-J-6B4tgXi-ndE7qecCYyrL81bB6PBvr6OVIeFK3spnH3B8gct-YtwI_8jW3GCU-iRtO=s0-d "step-007[2]")
![step-008[1]](https://lh3.googleusercontent.com/blogger_img_proxy/AEn0k_u1VjIFS4XIMuS_QefT27FTQLyk2PLMeWYUiG0kyXiN_yBfcX0a_RdJ4AyrLfsPqJrIEI5Was_8jY-VXMignM5HYMdX_biDUAz2_7QmGKRO_4jptkaWEd3k7-rFzqqOXSX2S3laiKLQBg7IRx-b=s0-d "step-008[1]")
![step-009[1]](https://lh3.googleusercontent.com/blogger_img_proxy/AEn0k_v4ApnfgErOFyHmV0iHLXeRfpRc7kHt1EKYCds9F0n7Fvu0SH6FPDkldKTuTP_uoeJGNLArSY0xxnXIyUDjEXmoD46c6rA_4vDYvodlvNs3h3JVWYaEQ_-nWb748sQhx9Nw9XfD1t3RSOb4dPor=s0-d "step-009[1]")
![step-010[1]](https://lh3.googleusercontent.com/blogger_img_proxy/AEn0k_tD2DN-LUaXBOrUEZS1Uy8Sbc_WU3pHrLx0VQ8gZjosSXnxpycyn72NXJbDyBzvOWPVElQpLDxrxbQwsxPJv_wd028uxyMWUOBxJecUGJEClPxMy8HCtmEuaj-fmO0cAvOmDcsd5-nUVu21z6IbNA=s0-d "step-010[1]")
![step-011[1]](https://lh3.googleusercontent.com/blogger_img_proxy/AEn0k_taVrkPq4CdDaAn9UGo2FV8LAYrWAumkoy2AGerDtHUJKI18QVS2gT6WoL77vP8Tiz0_iJMuPLEZY3Pbz1zmoyeJzA43SVLY4t6GF-1k9kuxNF86l01FcW7OshtXqzSr6zfemiIdj5JMua6demQnQ=s0-d "step-011[1]")
![step-012[1]](https://lh3.googleusercontent.com/blogger_img_proxy/AEn0k_tLkzzeyXlMfPScIVBBsw1wv5Ro3si096lV8GYbHCno08WH54DbGi4p8eA15SnIn6rbQo-O__qpbj1JpUkBEWWruu4Ncf6rFGNaDULIW3lqrxfTLwDZCtnlAg5yBnjZ5EzmNNJzqhHe_dpH116-Rw=s0-d "step-012[1]")
![step-013[1]](https://lh3.googleusercontent.com/blogger_img_proxy/AEn0k_swAMCERgz1mCSpFS8UWe3vLSk6w21Ppf7S0pClNUyiZdzDbhl_HEa66yn588fgOlMpZSGmrXx-20ZWmMNXbdQwTUXncfv3sE9GTXIaeE0F94r3M7dpww7xLXsWYFaPATPrWji169DYge0X5VEbgw=s0-d "step-013[1]")
![step-014[1]](https://lh3.googleusercontent.com/blogger_img_proxy/AEn0k_tDUG8VGmqw4rLEdWukqJOK0EyeBLFTJfcP5rIfL-iFKtjE0XmhlC01airIKVIMaZ_DOZdSQ6j31mfP3hbQr8XE9yWrZb9W00SEPRCuypXbGPZL8HH0Y7uSWUkpP5Aqobo1pqtSkQdqz7jkA1K0=s0-d "step-014[1]")
![step-015[1]](https://lh3.googleusercontent.com/blogger_img_proxy/AEn0k_vNffbRRzITV5e83S7_CMV14w6yWAm2YAjCpnLK9N34cDZx3gHc_73mKpk4mlGXcTUEeVFbpEqNiwsNokwDJWAbUaT8NWcVBv3unqkATUfQr01ZnEZyI1Vavd6KiZUJcmiZCiqumACPbBqZlwfI-A=s0-d "step-015[1]")
![step-016[1]](https://lh3.googleusercontent.com/blogger_img_proxy/AEn0k_tsnUMUnbrYn-JtL5WPRjcur_CrE9Ek_JOASFYOTqivf6U4EpOflnQJEUB867yCenj6xlIP4qgssupPCp75HifbxqiKdD8Fm11zFZSvpynWjMGRspL2pZKftYplVwE4is4Ozyk_uIgDJ8J5dXQW6Q=s0-d "step-016[1]")
![step-017[1]](https://lh3.googleusercontent.com/blogger_img_proxy/AEn0k_uqHt0lQf6FNUJ4l95uz2NnPO-xtPZKHMDfDU3FkiL-HITudgAGD91wViNi7QVyW850EVfbvOA6HtW5nVKwT_ceM0Mq5NVWH2hoHm3DqFyAdYLP0r0lyvACyJv5Hy3kwu8cQ_3dmu5y8VTtpDbjbg=s0-d "step-017[1]")
![step-018[1]](https://lh3.googleusercontent.com/blogger_img_proxy/AEn0k_s14MVZy2nvhOCXtIbgl2XGztwBAuDyTTWp1ULJ4mER8vSvbvexcAX350yGtg7fSU6xtY0-8bEd4xEIJYqRbMiRIS1WFMEJtfG1ceooU4jfJKA15P0OgH3RA5DfiTEceUAlct1QFORQfmUuD-Bw1w=s0-d "step-018[1]")
![step-020[1]](https://lh3.googleusercontent.com/blogger_img_proxy/AEn0k_vNEQRFpioZNoCzXm_uS3D32oMYo8pI_unOC4BGicCUsS_NxlMVYd5UIB4tzlWyyvDDgqcZtNb86aiWxBZJObBtTwUDB8s6qubff85O3LgjVX8qFrkB3n1fAsGejrt0lhZr_IcoGN0_zyaBVNdbcw=s0-d "step-020[1]")
![step-021[1]](https://lh3.googleusercontent.com/blogger_img_proxy/AEn0k_tNs2K9PxEMns3_CkOXVjYKfXad4pNeKGO9QUuCIvp2hvcIG6pLrHb18PLKtXx2G3c5JIJkHVSA_52S2HFr9yxWhH0SYOW59pb1j5-TN2qH5yxGDj0MZlfXhreI6HVWizHqLatI_MKqjcM-yYNH1w=s0-d "step-021[1]")
![step-022[1]](https://lh3.googleusercontent.com/blogger_img_proxy/AEn0k_sNSOYJnRSr3exbCv1q7UumCivC8wxy_--UlvjY8GFqy0s0KdMsmjIJUcrDutnTZRaTHsDVjaPcxMuYxdMd1FYGXujzcV5Ln7J8qd80FsQgSplbp37gD0uV3vCG8D0JJbINswGLwhp575U47FyPfg=s0-d "step-022[1]")
![step-023[1]](https://lh3.googleusercontent.com/blogger_img_proxy/AEn0k_v9QewQNIjhoEJ3uJmEz3TZ9Rzk5bS7tphZvyC7gFCs0esiEGnTA4uqakScgiytqBUFs72esQ2pD6Ndd2P_DoOGGxycnY7Ls3VyNsC2OmlUEywhR5Q-Xvp1zgs7iVDNTAd0nNhLVEYsaU4NNg4rlg=s0-d "step-023[1]")
![step-024[1]](https://lh3.googleusercontent.com/blogger_img_proxy/AEn0k_uBefEDWJU2kcY1wJl3j0lwe0s1jmzbq4C7GlN39T8BPcnhYz02YGdvwWf2tdOsw9G9ALRF-SLJ5oPnNEYEOrQbbDQ_bJfoyW9Un4lJIGVU8mP2XU4H_o2PUnM0HrcbchL7k93OrovhuxnX1AcFXA=s0-d "step-024[1]")
![step-025[1]](https://lh3.googleusercontent.com/blogger_img_proxy/AEn0k_sbTpbYDlClNAQk38bLjkYUE3R8QDzW6JMnCMfbDgLV1toN9aWFxjvP9GvZPu86s_HUdB12FQXM5QHI6gH0gPmIJZ2zbyyRX1OgPJQR_KtGoMXnyHj-2CkdI0BS0pB_eq8kteqR21B6hrhPTnX8gQ=s0-d "step-025[1]")
![step-026[1]](https://lh3.googleusercontent.com/blogger_img_proxy/AEn0k_uCZMndMzHxyqgglroLKhcBRm7TNOH1NG6vUR8yoazNP2Ecl9ccxMnvEXBqW5iGs5mABTArsOY0M4juT_J40cfVcffZOo3MMjyfILQOxPXoQLgxrVo4agD1UPamBloeinN76X3WKLgZrRVfd3uG=s0-d "step-026[1]")
![step-027[1]](https://lh3.googleusercontent.com/blogger_img_proxy/AEn0k_vuDvs6HCx2nLaycsc474JB-gLWOQGddAz3QCGFxfvSmOizfbeIIYs5dbLvP-naTIXLc_NcARfkMAHD7fLe-56Go9DuWVdge5IP_a05HXz6fNavql8xe1D85rOVu6lt5twmcaQgddfLhLc1wMo9SA=s0-d "step-027[1]")
![step-028[1]](https://lh3.googleusercontent.com/blogger_img_proxy/AEn0k_vTUf3_AcrGIlByis2NTnR5yhQyYBe_-zskooDLmOnxDBlWLix9Q9_MLzs5g1vu3OqR5J6EbF4TWbv2ud_yYmpugi9pAgAr02UePXD_U_sbdmYx22GUCCTvSdJXUE-sBP-g4jFJp-DfLC-StWKeDg=s0-d "step-028[1]")
![step-029[1]](https://lh3.googleusercontent.com/blogger_img_proxy/AEn0k_ufb9M1cI-Y5jt-U5RVtizF9I955j4n3aWsVGykSVsi3Ue86a_GaxnrpxFFgUSKu4EetGpoQJvreKLws2TsaLgrobZQKX9b3xXp-6gZ2rIkWP-irs_Nc-yH3lvG9nHOO9U6_O7D_Vj3hT0ytuHHdQ=s0-d "step-029[1]")
![step-030[1]](https://lh3.googleusercontent.com/blogger_img_proxy/AEn0k_uVRskRg4s_4f8gfex7TBopJl_MhPeswNjG1z9uTV7jsZ1L4mzLLB6Nod8YECaZbHrMJxeEGsRX1_NHr4tH3lE7tB9K14Kuek0ntEVjg-lg11wWRcijRaiX1Mr5F3sS24K5u_em4GPfp-s6pf1WSQ=s0-d "step-030[1]")
 About The Writer


- Follow Us on Twitter!
- "Join Us on Facebook!
- RSS
Contact