Showing posts with label picture. Show all posts
Showing posts with label picture. Show all posts
Friday, May 15, 2015
create,
how,
picture,
pse10,
stacks,
to,
using
1 comments
How to create picture stacks using PSE10
The following two pictures illustrates the "Picture Stack" effect available in PSE10.
This new feature in PSE 10 allows you to get this effect in a couple of minutes<probably less than that>.
Here are the steps :
1. Open the source image in Editor.
2. Go to Guided Edits
3. In the Photo Play category, select "Picture Stack"
4. The next screen appears showing three steps :
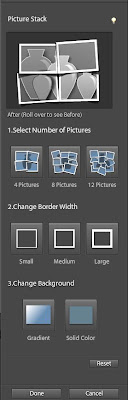
In first step, you can choose the number of pictures in the stack you would like to see. The options are 4, 8, 12.
Once you select that, you can select border width of each photo frame. Teh three options are : Small, Medium and large.
The third ioption allows you to fill the background areas which are shown behind the frames with a solid color or gradient.
In these three clicks your output is ready.
However you may tweak the results like rotating any picture stack or moving it to a different orientation etc in the Full edit.
Select the Move tool in full edit and use it for moving any picture stack to a different position and commit the operation.
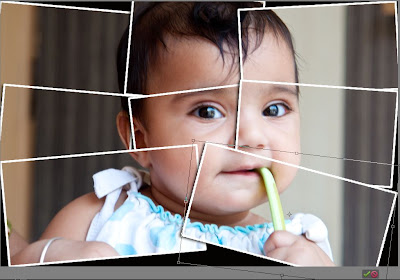
Once commited, the result would appear as shown :
Let me know if you find this useful!
 |
| Original image |
 |
| After Picture stack effect was added |
This new feature in PSE 10 allows you to get this effect in a couple of minutes<probably less than that>.
Here are the steps :
1. Open the source image in Editor.
2. Go to Guided Edits
3. In the Photo Play category, select "Picture Stack"
 |
| 2nd option in the category. |
4. The next screen appears showing three steps :
In first step, you can choose the number of pictures in the stack you would like to see. The options are 4, 8, 12.
Once you select that, you can select border width of each photo frame. Teh three options are : Small, Medium and large.
The third ioption allows you to fill the background areas which are shown behind the frames with a solid color or gradient.
In these three clicks your output is ready.
However you may tweak the results like rotating any picture stack or moving it to a different orientation etc in the Full edit.
Select the Move tool in full edit and use it for moving any picture stack to a different position and commit the operation.
Once commited, the result would appear as shown :
 |
| Final result |
Let me know if you find this useful!

Pixelated Picture
Final view
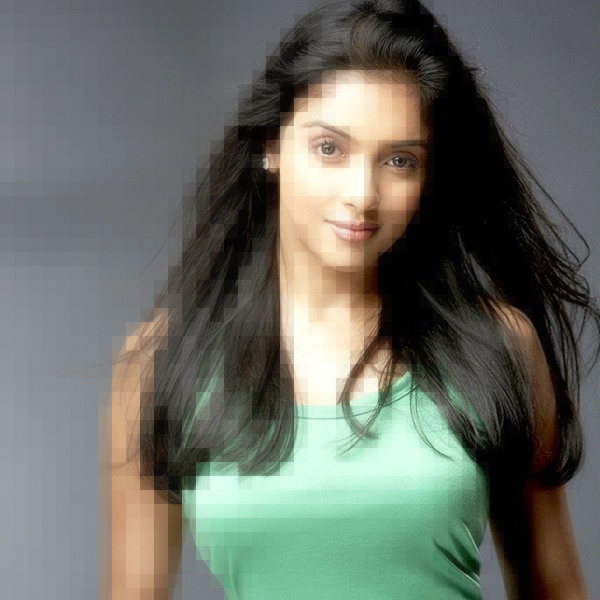
Step 1:
Take a Image to Pixelate.

Make a duplicate layer by pressing Ctrl+J.
Take a Image to Pixelate.
Make a duplicate layer by pressing Ctrl+J.
Step 2:
Go to Filter ---> Pixelate ---> Mosaic
And set cell size to 15 ---> hit OK.
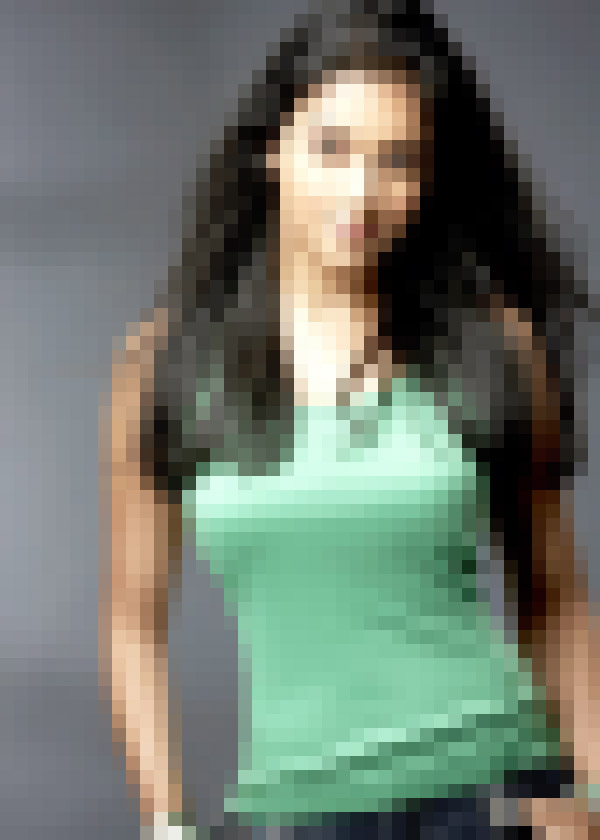
Go to Layer ---> Add Layer Mask ---> Reveal All
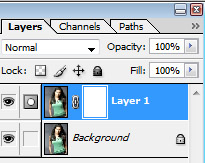
Step 3:
Select Gradient fill tool and select the black-white color..and hit OK.
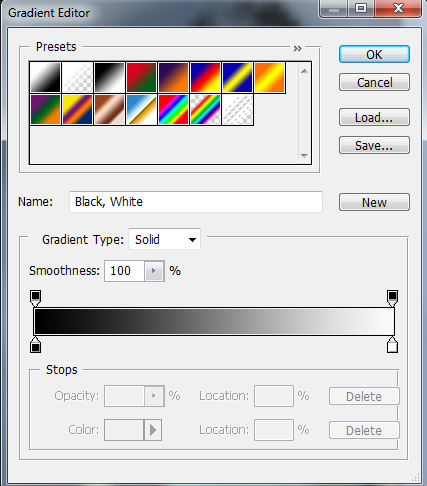
Step 4:
Now drag the cursor from left to right on image...
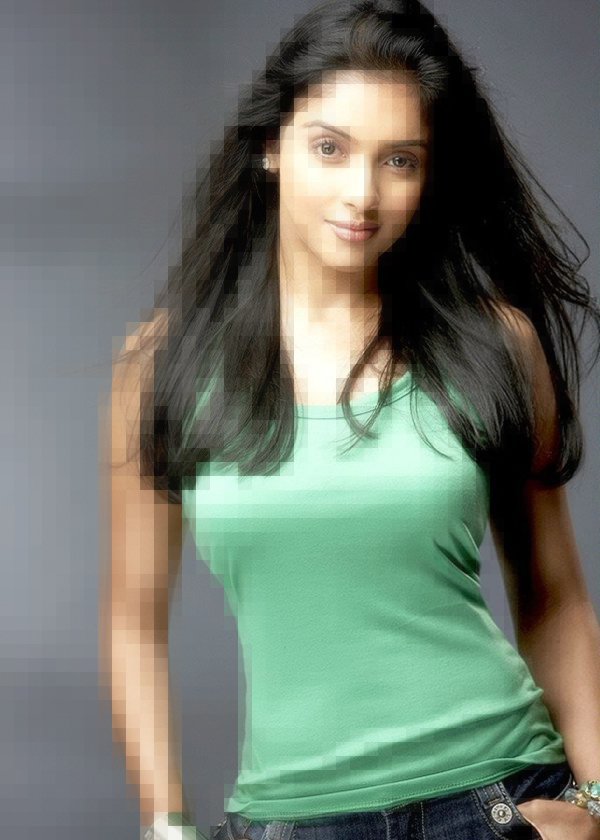
Now drag the cursor from left to right on image...
Done..!!
Wednesday, March 18, 2015
best,
effect,
gothic,
make,
photo,
picture
0
comments
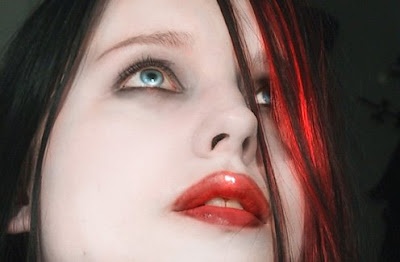
Make Gothic Picture Best Photo Effect
To get started, pick a picture you want to manipulate, or use this same one.
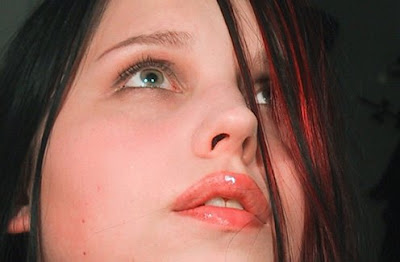
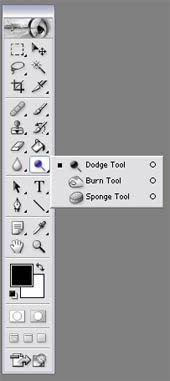
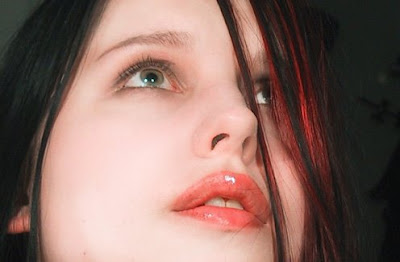
1. Use the tool named Dodge Tool to get a whiter effect over the skin. You can find it in the left tool bar.
I usually use that tool in a %45 exposure.
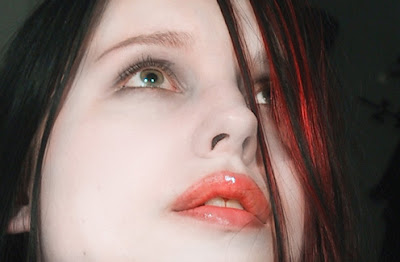
2. Now we will desaturate the skin color with the Sponge Tool also in the left tool bar. %100 flow.
Look for it in the same place where the Dodge Tool is, you just have to click over it, and you will see another two options hidden in the same place. (my english sucks, I know it, but try to follow…)
Now that the skin looks dead enough, will work on the eyes.
3. Now pick the Dodge Tool again, and apply it over the eyes.
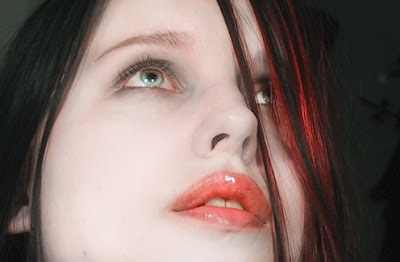
4. Pick a color you like for the eyes. I like light blue…
Use the color with an opacity of %18, we dont want to lose all the little details of the eye.
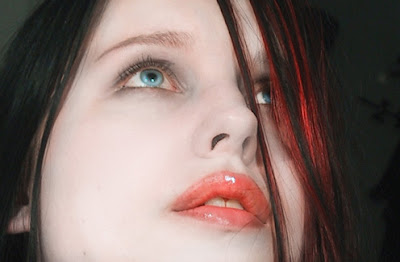
5. If you want to add more light to the eye, use a regular brush, white color, and select Mode: Color Dodge %35 opacity.
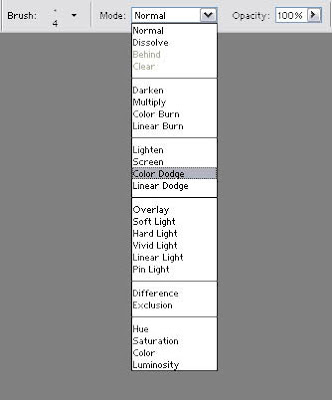
Like this…
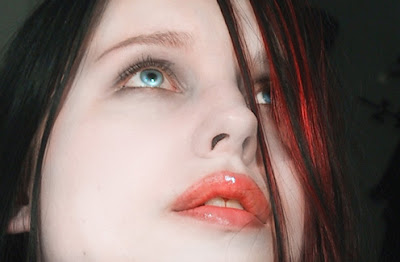
6. Now the make up…
Black color, opacity %18, and apply it around the eye a few times. Darker in the center, and softer on the edges.
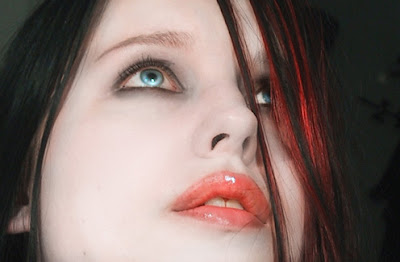
7. You can also work on the mouth with the Burn Tool also placed below the Dodge Tool.
This tool is very good when you need to add shadows or you want something to look darker. Also, dont forget to use the Blur Tool to correct the skin, and make it look softer and silky.
Read more »
1. Use the tool named Dodge Tool to get a whiter effect over the skin. You can find it in the left tool bar.
I usually use that tool in a %45 exposure.
2. Now we will desaturate the skin color with the Sponge Tool also in the left tool bar. %100 flow.
Look for it in the same place where the Dodge Tool is, you just have to click over it, and you will see another two options hidden in the same place. (my english sucks, I know it, but try to follow…)
Now that the skin looks dead enough, will work on the eyes.
3. Now pick the Dodge Tool again, and apply it over the eyes.
4. Pick a color you like for the eyes. I like light blue…
Use the color with an opacity of %18, we dont want to lose all the little details of the eye.
5. If you want to add more light to the eye, use a regular brush, white color, and select Mode: Color Dodge %35 opacity.
Like this…
6. Now the make up…
Black color, opacity %18, and apply it around the eye a few times. Darker in the center, and softer on the edges.
7. You can also work on the mouth with the Burn Tool also placed below the Dodge Tool.
This tool is very good when you need to add shadows or you want something to look darker. Also, dont forget to use the Blur Tool to correct the skin, and make it look softer and silky.
First, Select the picture that you want to make more clearly.
This is my picture, Its not good :
1. Before do anything, for safe, we create other layer by Press CTR + j to Duplicate Layer .

2. Use Filter -> Sharpen -> Unsharp Mask. In this step, we make a picture more clear.
With parameters:
Amount : 75 %
Radius: 1.5 pixels
Threshold: 0 levels
3. Next, we use Filter -> Blur -> Surface Blur. As follow:
Radius: 10 pixels
Threshold: 10 levels
We have result of 3 steps above:

Then, we will use 4 tools of Image -> Adjustment: Brightness/Contrast , Color Balance , Levels and Curves.
5. Brightness/Contrast: with parameters
Brightness: -5
Contrast: +5
6. Color Balance:
Check Preserve Luminosity (if it is unchecked)
Select Shadows and set parameters into Color Levels: -25 -5 -7
Select Midtones and set parameters into Color Levels: -15 +11 -31
Select Highlights and set parameters into Color Levels: -5 +5 +5
7. Levels (or CTR + L)
Channels : RGB
Input Levels: 6 0.88 235
Out Levels: 0 255
8. Continue with Levels:
Channels : RGB
Input Levels: 0 1.00 255
Out Levels: 0 245
9. Curves: You set as figure :
First, with Channel: RGB

Channel: Red

Channel : Green

Channel : Blue

10. Final, we have a new picture

Read more »
This is my picture, Its not good :
1. Before do anything, for safe, we create other layer by Press CTR + j to Duplicate Layer .
2. Use Filter -> Sharpen -> Unsharp Mask. In this step, we make a picture more clear.
With parameters:
Amount : 75 %
Radius: 1.5 pixels
Threshold: 0 levels
3. Next, we use Filter -> Blur -> Surface Blur. As follow:
Radius: 10 pixels
Threshold: 10 levels
We have result of 3 steps above:
Then, we will use 4 tools of Image -> Adjustment: Brightness/Contrast , Color Balance , Levels and Curves.
5. Brightness/Contrast: with parameters
Brightness: -5
Contrast: +5
6. Color Balance:
Check Preserve Luminosity (if it is unchecked)
Select Shadows and set parameters into Color Levels: -25 -5 -7
Select Midtones and set parameters into Color Levels: -15 +11 -31
Select Highlights and set parameters into Color Levels: -5 +5 +5
7. Levels (or CTR + L)
Channels : RGB
Input Levels: 6 0.88 235
Out Levels: 0 255
8. Continue with Levels:
Channels : RGB
Input Levels: 0 1.00 255
Out Levels: 0 245
9. Curves: You set as figure :
First, with Channel: RGB
Channel: Red
Channel : Green
Channel : Blue
10. Final, we have a new picture
Monday, March 16, 2015
high,
make,
more,
pass,
picture,
sharpening,
with
0
comments
Make Picture More Sharpening With High Pass
While debates continue over which of Photoshops two main sharpening filters is better, "Unsharp Mask" or the new (as of CS2) "Smart Sharpen", one method of sharpening images remains not only highly effective but also much easier to use than either of those sharpening filters, and thats by using Photoshops High Pass filter.
The reason the High Pass filter technique works so well at sharpening images is because any areas in the image which are not an edge are left untouched. The only areas that have sharpening applied to them are the edges, which is exactly what you want, and also what all of those confusing options in the "Unsharp Mask" and "Smart Sharpen" filters are trying to help you achieve.
With the High Pass filter, you can often get better results than either of the sharpening filters can give you without fumbling around with confusing options. In this Photoshop tutorial, well look at how to use it.
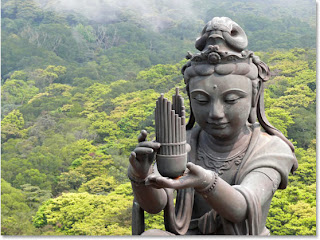
Heres the image Ill be using for this tutorial:
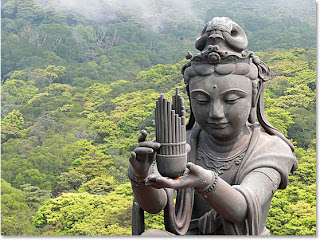
Heres how it will look after sharpening it with the High Pass filter:
Lets get started.
Step 1: Duplicate The Background Layer
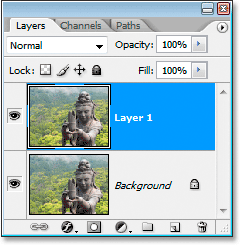
The first thing we need to do is duplicate the Background layer, so Ill do that using the quick keyboard shortcut Ctrl+J (Win) / Command+J (Mac). I can see in my Layers palette now that I have my original Background layer at the bottom, which contains my original pixel information, and the duplicate of it, which Photoshop automatically names "Layer 1", above:
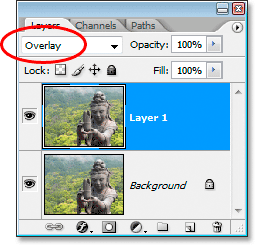
Step 2: Change The Blend Mode Of The Duplicate Layer To "Overlay"
Next, we need to change the blend mode of the duplicate layer from "Normal" to "Overlay". The reason is that the High Pass filter is going to turn all non-edge areas of the image into neutral gray, and the Overlay blend mode leaves all neutral gray areas alone, which means no sharpening will be applied to any of those areas. So to do that, go up to the Blend Mode options in the top left corner of the Layer Styles dialog box, click on the down-pointing arrow to the right of the word "Normal", and select Overlay from the list:
Your image will now appear to have way too much contrast, as we can see here with mine:
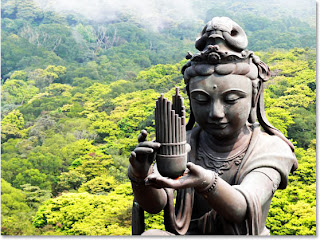
Dont worry, its only temporary. Were changing the blend mode now so that we can see a preview of our sharpening being applied with the High Pass filter, which well do next.
Step 3: Apply The "High Pass" Filter To The Duplicate Layer
Now that we have the blend mode set to Overlay, which is going to allow us to see a preview of what were doing, we can apply the High Pass filter. To do that, go up to the Filter menu at the top of the screen, choose Other down near the bottom, and then choose High Pass. This brings up the High Pass filter dialog box:
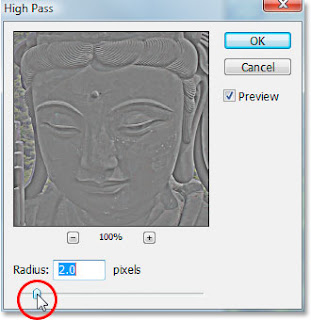
Photoshops High Pass filter is very simple to use. It has a slider bar at the bottom to increase or decrease the intensity of the filter (the "Radius" value), as well as an input box if youd prefer to type a value directly into it, and thats all there is to it except for the large preview area and the "Preview" checkbox in the top right corner. Definitely much simpler than "Unsharp Mask" or "Smart Sharpen".
To sharpen your image with the High Pass filter, keep an eye on your image in the document window and adjust the Radius value by dragging the slider bar left or right. As you drag towards the right, youll be adding more sharpening, and as you drag to the left, youll be reducing the amount of sharpening. Youre going to want to start off with a very low radius value, somewhere between 2-5 pixels, and even that may be too much depending on the pixel dimensions of your image. Im using a small version of the image for this tutorial, and I can already see that 2 pixels is too high. If you go too high, youll begin to see a halo effect around the edges of your image, and you want to avoid that, so back off on the radius value by dragging the slider bar to the left once the halos begin to appear.
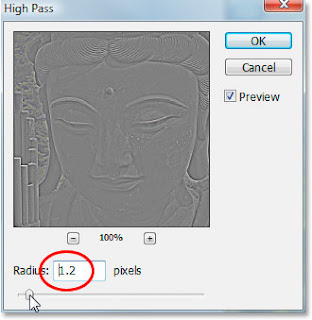
For my image, and again Im using a small version of the photo for this tutorial, Im going to set my Radius value to 1.2 pixels, which gives me a nice amount of sharpening around the edges in the image without sharpening any non-edge areas:
Heres my image after sharpening it with a radius value of 1.2 pixels:
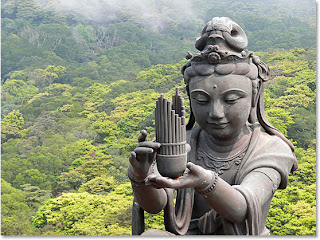
If youre working on a larger image, which you probably area if the image came out of your digital camera, youll most likely end up using a higher radius value, but again, dont go too far. Lower pixel values work best.
Theres a couple of things we can do now to fine-tune the sharpening, which well look at next.
Step 4: Change The Blend Mode To "Soft Light" Or "Hard Light" If Needed To Adjust Sharpening
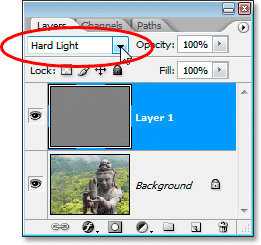
Now that weve applied our sharpening to the image, one of the ways we can fine-tune it is by changing the blend mode of our duplicate Background layer. Right now, were using the "Overlay" blend mode, which is sort of the "average" amount of sharpening. If you want to increase the sharpening amount, go back up to the Blend Mode options in the top left corner of the Layers palette, click on the down-pointing arrow to the right of the word "Overlay" and change the blend mode to Hard Light:
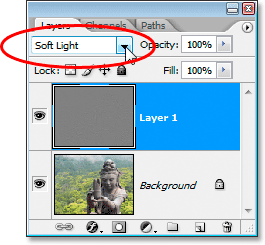
If you want to reduce the amount of sharpening, change the blend mode from "Overlay" to Soft Light, again by clicking on the down-pointing arrow in the top left of the Layers palette and selecting "Soft Light" from the list:
For comparison, heres the same image using all three blend modes to adjust the sharpening. The image on the left is using Soft Light, the one in the middle is set to Overlay, and the one on the right is set to Hard Light:
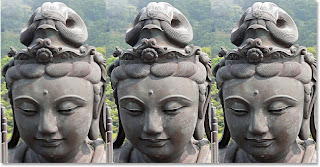
The difference may not be easy to see on your monitor with these low resolution images, but if youre working on larger images, the difference between the three blend modes will be more apparent.
Step 5: Reduce The Sharpening Amount By Lowering The Layer Opacity
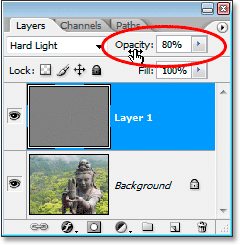
Another simple way to fine-tune the sharpening is by adjusting the duplicate layers opacity value. Lowering the opacity value will reduce the amount of sharpening. Youll find the Opacity option in the top right corner of the Layers palette, directly beside the blend mode options. Im going to set my blend mode to Hard Light and then lower the opacity of the layer to 80%:
Here, after lowering the opacity, is my final result:
Read more »
The reason the High Pass filter technique works so well at sharpening images is because any areas in the image which are not an edge are left untouched. The only areas that have sharpening applied to them are the edges, which is exactly what you want, and also what all of those confusing options in the "Unsharp Mask" and "Smart Sharpen" filters are trying to help you achieve.
With the High Pass filter, you can often get better results than either of the sharpening filters can give you without fumbling around with confusing options. In this Photoshop tutorial, well look at how to use it.
Heres the image Ill be using for this tutorial:
Heres how it will look after sharpening it with the High Pass filter:
Lets get started.
Step 1: Duplicate The Background Layer
The first thing we need to do is duplicate the Background layer, so Ill do that using the quick keyboard shortcut Ctrl+J (Win) / Command+J (Mac). I can see in my Layers palette now that I have my original Background layer at the bottom, which contains my original pixel information, and the duplicate of it, which Photoshop automatically names "Layer 1", above:
Step 2: Change The Blend Mode Of The Duplicate Layer To "Overlay"
Next, we need to change the blend mode of the duplicate layer from "Normal" to "Overlay". The reason is that the High Pass filter is going to turn all non-edge areas of the image into neutral gray, and the Overlay blend mode leaves all neutral gray areas alone, which means no sharpening will be applied to any of those areas. So to do that, go up to the Blend Mode options in the top left corner of the Layer Styles dialog box, click on the down-pointing arrow to the right of the word "Normal", and select Overlay from the list:
Your image will now appear to have way too much contrast, as we can see here with mine:
Dont worry, its only temporary. Were changing the blend mode now so that we can see a preview of our sharpening being applied with the High Pass filter, which well do next.
Step 3: Apply The "High Pass" Filter To The Duplicate Layer
Now that we have the blend mode set to Overlay, which is going to allow us to see a preview of what were doing, we can apply the High Pass filter. To do that, go up to the Filter menu at the top of the screen, choose Other down near the bottom, and then choose High Pass. This brings up the High Pass filter dialog box:
Photoshops High Pass filter is very simple to use. It has a slider bar at the bottom to increase or decrease the intensity of the filter (the "Radius" value), as well as an input box if youd prefer to type a value directly into it, and thats all there is to it except for the large preview area and the "Preview" checkbox in the top right corner. Definitely much simpler than "Unsharp Mask" or "Smart Sharpen".
To sharpen your image with the High Pass filter, keep an eye on your image in the document window and adjust the Radius value by dragging the slider bar left or right. As you drag towards the right, youll be adding more sharpening, and as you drag to the left, youll be reducing the amount of sharpening. Youre going to want to start off with a very low radius value, somewhere between 2-5 pixels, and even that may be too much depending on the pixel dimensions of your image. Im using a small version of the image for this tutorial, and I can already see that 2 pixels is too high. If you go too high, youll begin to see a halo effect around the edges of your image, and you want to avoid that, so back off on the radius value by dragging the slider bar to the left once the halos begin to appear.
For my image, and again Im using a small version of the photo for this tutorial, Im going to set my Radius value to 1.2 pixels, which gives me a nice amount of sharpening around the edges in the image without sharpening any non-edge areas:
Heres my image after sharpening it with a radius value of 1.2 pixels:
If youre working on a larger image, which you probably area if the image came out of your digital camera, youll most likely end up using a higher radius value, but again, dont go too far. Lower pixel values work best.
Theres a couple of things we can do now to fine-tune the sharpening, which well look at next.
Step 4: Change The Blend Mode To "Soft Light" Or "Hard Light" If Needed To Adjust Sharpening
Now that weve applied our sharpening to the image, one of the ways we can fine-tune it is by changing the blend mode of our duplicate Background layer. Right now, were using the "Overlay" blend mode, which is sort of the "average" amount of sharpening. If you want to increase the sharpening amount, go back up to the Blend Mode options in the top left corner of the Layers palette, click on the down-pointing arrow to the right of the word "Overlay" and change the blend mode to Hard Light:
If you want to reduce the amount of sharpening, change the blend mode from "Overlay" to Soft Light, again by clicking on the down-pointing arrow in the top left of the Layers palette and selecting "Soft Light" from the list:
For comparison, heres the same image using all three blend modes to adjust the sharpening. The image on the left is using Soft Light, the one in the middle is set to Overlay, and the one on the right is set to Hard Light:
The difference may not be easy to see on your monitor with these low resolution images, but if youre working on larger images, the difference between the three blend modes will be more apparent.
Step 5: Reduce The Sharpening Amount By Lowering The Layer Opacity
Another simple way to fine-tune the sharpening is by adjusting the duplicate layers opacity value. Lowering the opacity value will reduce the amount of sharpening. Youll find the Opacity option in the top right corner of the Layers palette, directly beside the blend mode options. Im going to set my blend mode to Hard Light and then lower the opacity of the layer to 80%:
Here, after lowering the opacity, is my final result:
Subscribe to:
Posts (Atom)


- Follow Us on Twitter!
- "Join Us on Facebook!
- RSS
Contact