Showing posts with label retouch. Show all posts
Showing posts with label retouch. Show all posts
By Dirk Metzmacher
You might have asked yourself now and then „How do I make a soft skin without destroying the pores?“. In this workshop I’ll show you how this kind of touch-up works, and how you can conserve the pores. This goes from basic retouch up to powdering the skin.

Basic retouch
Before we start softening the skin, you should perform a so-called basic retouch. This means that zits, moles and other blemishes are removed. How much you want to weaken things depends entirely on your personal taste, of course.
Before we start softening the skin, you should perform a so-called basic retouch. This means that zits, moles and other blemishes are removed. How much you want to weaken things depends entirely on your personal taste, of course.
Contrary to the Clone Stamp tool which transfers areas exactly as in the original, the Healing Brush tool works by cross-calculating brightness values and thus removing blemishes very cleanly, adapted to the surrounding area.
Skin powdering
Now we get around to doing the so-called skin “powdering”. Duplicate the layer with Layer > Duplicate Layers or Ctrl+J and give the new layer a Vivid Light blending mode.

Press Ctrl+I or use Image > Adjustments > Invert to invert the current layer. Whatever you may see on the screen now: Don’t get confused by that, we’re still on the right track even though it might look a bit funny.
Apply Filter > Blur > Gaussian Blur with a radius of about one pixel. Here you should choose a radius just small enough so you can barely see the pores anymore.
Next, use the High Pass filter which you can find under Filter > Other. With this one it’s a matter of taste how strongly you apply it. I usually keep the radius between 20 and 40 pixels.
This change should not be applied everywhere. Select Layer > Layer Mask > Hide All to create a black mask that hides all layer content for now.
Tip: You can also create a black mask by clicking on the Add Layer Mask button in the layer palette and holding the Alt key.

Now use a white foreground color to paint the changes back into the image, but only on the skin. Don’t start off with an opacity of 100%, but experiment a little with the strength instead. You’ll see how the skin becomes noticeably softer and the pores are kept intact.
Tip: If you select Filter > Convert for Smart Filters right after inverting the image, you can do all this retouching in a completely non-destructive way.
Read more »
You might have asked yourself now and then „How do I make a soft skin without destroying the pores?“. In this workshop I’ll show you how this kind of touch-up works, and how you can conserve the pores. This goes from basic retouch up to powdering the skin.
Basic retouch
Before we start softening the skin, you should perform a so-called basic retouch. This means that zits, moles and other blemishes are removed. How much you want to weaken things depends entirely on your personal taste, of course.
Before we start softening the skin, you should perform a so-called basic retouch. This means that zits, moles and other blemishes are removed. How much you want to weaken things depends entirely on your personal taste, of course.
Contrary to the Clone Stamp tool which transfers areas exactly as in the original, the Healing Brush tool works by cross-calculating brightness values and thus removing blemishes very cleanly, adapted to the surrounding area.
Skin powdering
Now we get around to doing the so-called skin “powdering”. Duplicate the layer with Layer > Duplicate Layers or Ctrl+J and give the new layer a Vivid Light blending mode.
Press Ctrl+I or use Image > Adjustments > Invert to invert the current layer. Whatever you may see on the screen now: Don’t get confused by that, we’re still on the right track even though it might look a bit funny.
Apply Filter > Blur > Gaussian Blur with a radius of about one pixel. Here you should choose a radius just small enough so you can barely see the pores anymore.
Next, use the High Pass filter which you can find under Filter > Other. With this one it’s a matter of taste how strongly you apply it. I usually keep the radius between 20 and 40 pixels.
This change should not be applied everywhere. Select Layer > Layer Mask > Hide All to create a black mask that hides all layer content for now.
Tip: You can also create a black mask by clicking on the Add Layer Mask button in the layer palette and holding the Alt key.
Now use a white foreground color to paint the changes back into the image, but only on the skin. Don’t start off with an opacity of 100%, but experiment a little with the strength instead. You’ll see how the skin becomes noticeably softer and the pores are kept intact.
Tip: If you select Filter > Convert for Smart Filters right after inverting the image, you can do all this retouching in a completely non-destructive way.

Unsharp Mask For Scanned Slides and prints
Due to the nature of how a scanner reads and interprets information from a slide, we are often required to adjust things somewhat in various image editing software to compensate for how the scanner delivers us the file. So I introduce to you, the Unsharp Mask filter in Adobe Photoshop.
Due to a phenomenon called spill-over the pixels are blurred somewhat during the process of the scan. This is normal. We can compensate for this in Photoshop.
However we want to only affect the lightness or brightness of the image not the entire image. This is the best way to affect the sharpness of the image without bringing out too much grain. In order to do this we must use channels.
We are going to use Lab color mode in order to accomplish this simple because it divides its channels (color info) into Lightness, a, and b.
Step 1
You will need a full color image from a scan. Remember do not use any of the scanners software to adjust anything, do it all in Photoshop.
The sharpening process should only be applied after you have completed all the other modifications you need to do...its the last step.

Step 2
Convert the image to Lab color.
Image --> mode --> Lab color
Step 3
Click on the Channels tab in the layers pallete.
You should see something similar to what is shown below.

Step 4
Select Lightness Channel
Click on the channel labelled Lightness. You will also notice the image goes to a greyscale. Thats normal.

Step 5
Apply Unsharp Mask
Go to Filter -- Sharpen -- Unsharp Mask
Follow the basic suggestions below:
Amount: 120% to 220% (image varies)
Radius: 1.0 to 1.2 pixels
Threshold: 0
When you have the results you like click OK.
Step 6
Compare
Below is a quick compare of the two versions in the lightness channel.

Step 7
Convert image back to RGB
Image --> mode --> RGB
Its done now. You should have seen some improvement. Althought the effects are similar if the filter is applied to the whole image, applying it to the brightess or lightness is really the best method.

Read more »
Due to the nature of how a scanner reads and interprets information from a slide, we are often required to adjust things somewhat in various image editing software to compensate for how the scanner delivers us the file. So I introduce to you, the Unsharp Mask filter in Adobe Photoshop.
Due to a phenomenon called spill-over the pixels are blurred somewhat during the process of the scan. This is normal. We can compensate for this in Photoshop.
However we want to only affect the lightness or brightness of the image not the entire image. This is the best way to affect the sharpness of the image without bringing out too much grain. In order to do this we must use channels.
We are going to use Lab color mode in order to accomplish this simple because it divides its channels (color info) into Lightness, a, and b.
Step 1
You will need a full color image from a scan. Remember do not use any of the scanners software to adjust anything, do it all in Photoshop.
The sharpening process should only be applied after you have completed all the other modifications you need to do...its the last step.
Step 2
Convert the image to Lab color.
Image --> mode --> Lab color
Step 3
Click on the Channels tab in the layers pallete.
You should see something similar to what is shown below.
Step 4
Select Lightness Channel
Click on the channel labelled Lightness. You will also notice the image goes to a greyscale. Thats normal.
Step 5
Apply Unsharp Mask
Go to Filter -- Sharpen -- Unsharp Mask
Follow the basic suggestions below:
Amount: 120% to 220% (image varies)
Radius: 1.0 to 1.2 pixels
Threshold: 0
When you have the results you like click OK.
Step 6
Compare
Below is a quick compare of the two versions in the lightness channel.
Step 7
Convert image back to RGB
Image --> mode --> RGB
Its done now. You should have seen some improvement. Althought the effects are similar if the filter is applied to the whole image, applying it to the brightess or lightness is really the best method.
This tutorial will show you how to use lighting effect to emphasize her face, skin and hair. Before that, some nice tips for retouching will be mentioned
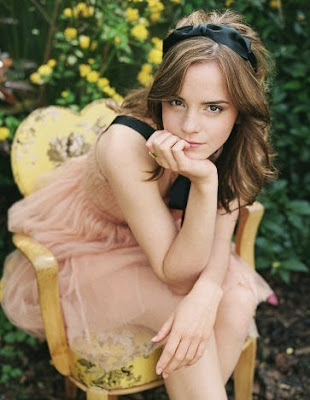
Before we start, lets have a look at what well be retouching:
Before:
And after:
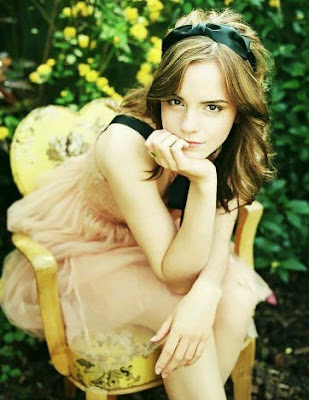
Download the original image and we are ready to go!
Step 1:
The original photo is a bit dark and her skin is not bright and lovely enough. In this case, we can use Channel Mixer tool to enhance the colors separately. You can find this tool at the bottom of Layers tab
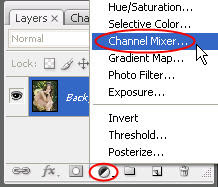
If you are new to this tool, I wish to explain more about it. As you knew, a photo is based on three main colors (in RGB mode): red, green and blue. With the Channel Mixer tool, you can manipulate these raw channels separately. Notice that when choosing Channel Mixer tool, you will see there are 3 options in the Output Channel drop-down box corresponding to 3 main colors. And you can also notice that with each main color, the slider of that color will always be set to 100%, by default. For example, when you choose Red from Output Channel, you can see the Red slider are at 100% (while Blue and Green are at 0%). And by moving these sliders left or right, you can decrease or increase the amount of that color in the corresponding Output Channel.
With this photo, we should mainly increase the amount of Green with the settings below:
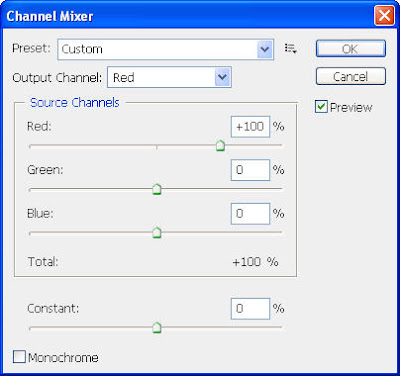
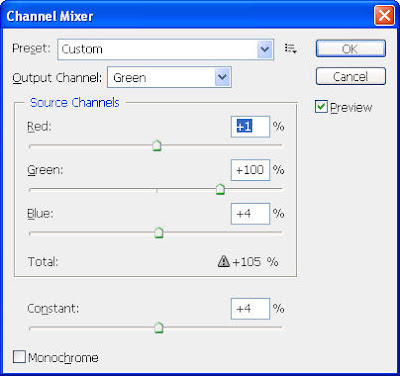
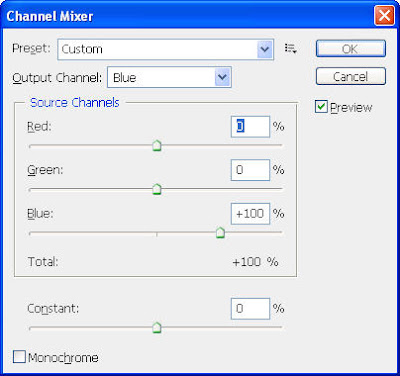
Our photo now looks better
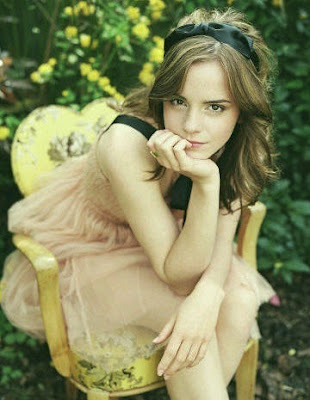
Step 2:
Press Ctrl-Alt-Shift-E to create a flatten image which is the result of the under layers. In this step, we will smooth her skin a bit by going to Filter>Blur>Surface Blur, set the Radius of 2 pixels and Threshold of 4 pixels
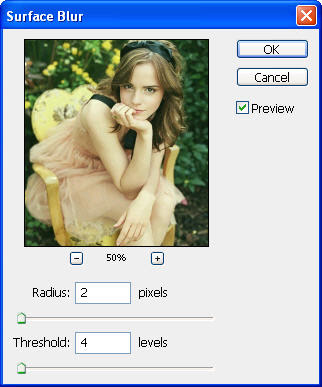
Maybe you will not see any big changes but lets have a closer look...
Before:
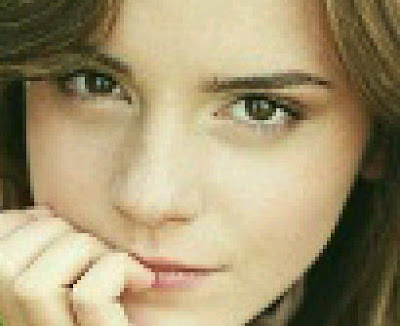
After blurring:
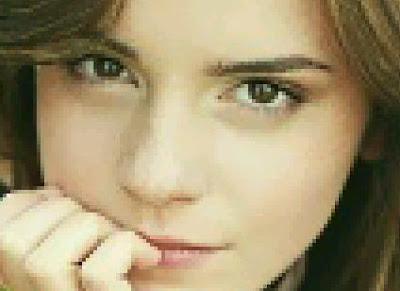
By using this tool with a small Radius and Threshold, you can make subtle changes without making it look fake
Step 3:
Go to Image>Adjustments>Curves to brighten our photo a bit
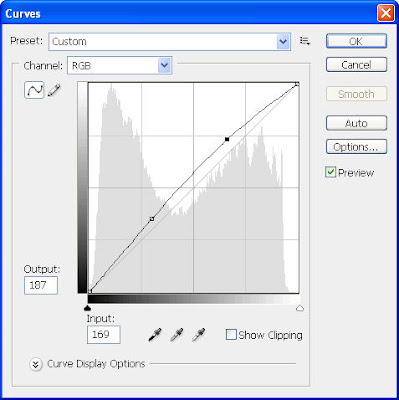
We are almost done, the photo now looks much better:
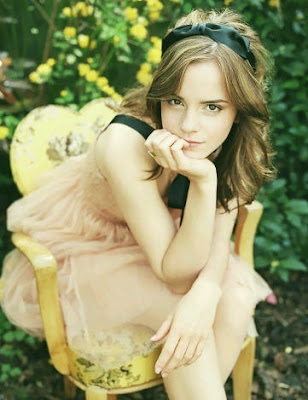
Step 4:
The last thing we need to do is to add lighting focus to emphasize her beautiful face. Press Ctrl-J to duplicate the current layer and go to Filter>Render>Lighting Effects and use these settings:
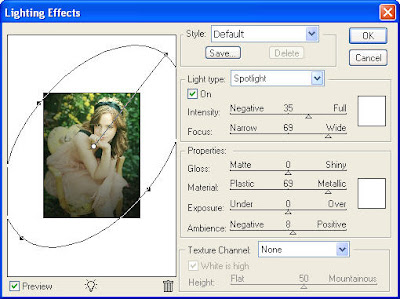
Then change the Blending mode of this layer to Soft Light to make the colors "softer". Lets have a look at the result again:
Retouching photo is fun! And with the Channel Mixer tool and Lighting Effects filter, we can greatly enhance the photo from its raw color channels and set focus on what we want without destroying the original image.


And here’s the final result.
Subscribe to:
Posts (Atom)


- Follow Us on Twitter!
- "Join Us on Facebook!
- RSS
Contact