Showing posts with label tool. Show all posts
Showing posts with label tool. Show all posts
Interactive Distortion Tool – Corel X3 Tutorial
In this tutorial we will show you how to use the interactive distortion tool for you to make designs for your envelopes, letters, etc in Corel X3.
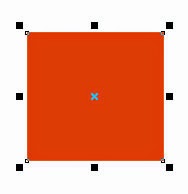.jpg)
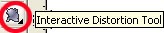
Then, select the Interactive distortion Tool:
After that select the down left corner of the rectangle and start releasing it to the top, look:
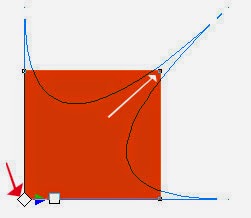
Keep releasing until you have the shape you desire:

Now you can apply this shape to letters, envelopes, etc.

Just use your imagination =)
Download the original source files from this tutorial in Zip format Here

Tuesday, May 19, 2015
better,
for,
how,
in,
making,
pse,
quick,
selection,
selections,
the,
to,
tool,
train
0
comments
How to train the quick selection tool for making better selections in PSE
Quick selection is a great tool for selecting objects in any image. It intelligently selects the object distinctly from the background by detecting the brightness, contrast and tonal changes along the objects and their backgrounds. It takes just a little mouse drag with in an object to select an background.
For example : for the image below I just dragged my mouse from point A to point B for selecting the whole apple instead of moving my mouse along the edges of the whole apple which we would require for other selection tools.
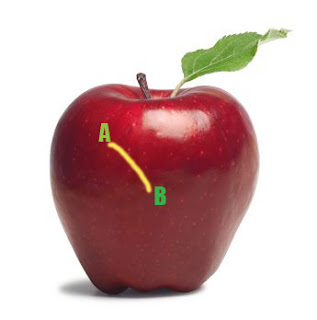
This is how my object was selected moving my mouse from point A to B (Please note I increased the brush size to 35 px from options bar after selecting the quick selection tool for making this selection) :

However in the above image, there is good contrast between the object to be selected and its background. So we did not need to train our quick selection tool. But for getting better results in minimum time when there is not much great color difference or contrast between our object and background, it is recommended that you train your quick selection tool.
So in an image like below, where there is not that great color contrast between yellow flower and its background, we would train our tool.

So if I move my quick selection tool from point A to B to select the yellow flower, here is what
I get as selected :
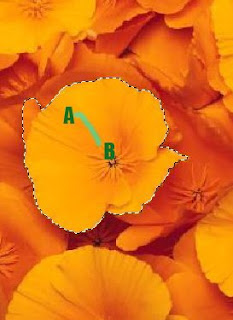
However I did not need this extra highlighted(green) part in my selection(as shown below) which was selected when I moved my mouse from point A to point B. But since there is a low contrast between the orange and the yellow here, this area too got selected.

So instead of selecting my flower in one go as shown above, I follow the steps below to get my needed selection :
1. Select a very small part of the yellow flower as shown after selecting Quick selection tool.

2. Now I will press Alt key and keeping it pressed, I click and drag my mouse over the area I did not want in the selection. So I brush my mouse over the green highlighted region shown in the second last image.
I also notice that as soon as I click Alt key my mouse cursor changes from "+" to "-" as it tell what area not to select.
Once I am done with that I leave the Alt key back and again move my mouse from point A to B as I did earlier and here is how I get my desired selection :

So here I have trained my quick selection tool not to select what areas of contrast. So if I had the similar background around the whole flower, then I would just drag my mouse once along the boundaries of the flower to tell my tool about the low contrast areas which I do not want to select.
Also keep in mind that if you have a large and random objects to be selected then you should keep subtracting the wrong selections you make as you sweep and not to defer the subtraction task in the end. This trains my tool at every step of selection and tell it what "not" to selection as it goes ahead.
I hope you find this tutorial helpful!
Read more »
For example : for the image below I just dragged my mouse from point A to point B for selecting the whole apple instead of moving my mouse along the edges of the whole apple which we would require for other selection tools.
This is how my object was selected moving my mouse from point A to B (Please note I increased the brush size to 35 px from options bar after selecting the quick selection tool for making this selection) :
However in the above image, there is good contrast between the object to be selected and its background. So we did not need to train our quick selection tool. But for getting better results in minimum time when there is not much great color difference or contrast between our object and background, it is recommended that you train your quick selection tool.
So in an image like below, where there is not that great color contrast between yellow flower and its background, we would train our tool.
So if I move my quick selection tool from point A to B to select the yellow flower, here is what
I get as selected :
However I did not need this extra highlighted(green) part in my selection(as shown below) which was selected when I moved my mouse from point A to point B. But since there is a low contrast between the orange and the yellow here, this area too got selected.
So instead of selecting my flower in one go as shown above, I follow the steps below to get my needed selection :
1. Select a very small part of the yellow flower as shown after selecting Quick selection tool.
2. Now I will press Alt key and keeping it pressed, I click and drag my mouse over the area I did not want in the selection. So I brush my mouse over the green highlighted region shown in the second last image.
I also notice that as soon as I click Alt key my mouse cursor changes from "+" to "-" as it tell what area not to select.
Once I am done with that I leave the Alt key back and again move my mouse from point A to B as I did earlier and here is how I get my desired selection :
So here I have trained my quick selection tool not to select what areas of contrast. So if I had the similar background around the whole flower, then I would just drag my mouse once along the boundaries of the flower to tell my tool about the low contrast areas which I do not want to select.
Also keep in mind that if you have a large and random objects to be selected then you should keep subtracting the wrong selections you make as you sweep and not to defer the subtraction task in the end. This trains my tool at every step of selection and tell it what "not" to selection as it goes ahead.
I hope you find this tutorial helpful!
Thursday, April 30, 2015
a,
arc,
cs6,
drawing,
heart,
illustrator,
in,
the,
tool,
with
0
comments
Drawing a heart with the Arc tool in Illustrator CS6
In this movie, Ill show you how to begin creating the heart outline using the Arc tool in Illustrator CS6 . Ive saved my changes as All guides.ai found inside the 04_line_art folder. Lets go ahead and switch to Arc tool, and its a pretty easy concept when you drag with a tool you can see that you create as I was saying before, a quarter ellipse. And you might imagine that this is going to serve as well for the first hump in our heart, but we are not going to start at this arbitrary location.
We are going to start right there at the intersection of the central vertical guide and the second horizontal guide down. So I will go ahead and press the Backspace key or the Delete key on the Mac, in order get rid of that bad arc. And now I will drag up on to the left, like so, while pressing the Shift key, and you want to drag until you snap to that guideline up there. And you kind of want to inch it back a little bit to the right so that the heads-up display says, a Width of 112 pts and a Height of 112 pts. And by virtue of the fact incidentally that we were pressing the Shift key were getting a perfect quarter circle. So you want to keep that Shift key down the entire time, and then you want to release your mouse button, and then release the Shift key.
In this Case Drawing a heart with the Arc tool in Illustrator CS6
Now you want to drag from that anchor point, so make sure that your cursor says the word Anchor on it. And you want to drag down into the left until you intersect with the first vertical guideline and the second horizontal guide. Now the arc will definitely go in the wrong direction just as you see on my screen. To flip it, what you do is you keep your mouse button down, and you just tap the F key. Then you go ahead and release the mouse button in order to create the second arc.
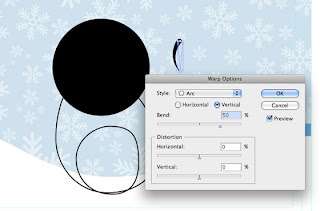
Next, we need to go ahead and draw the bottom portion of the heart, and you might be tempted to do one of these numbers, where you draw the outer lump here, and you press the F key in order to flip it, and then you draw a final arc, and you press F again, once to flip it, but that would result in one ugly looking heart. So thats not what we want. Lets go ahead and get rid of those path outlines by switching to the Black Arrow tool and notice, by the way, the Black Arrow has a keyboard shortcut of V, all you have to do is just tap the V key. And you might think of V as being an upside down arrow. So weve got the Black Arrow thats got an upside down arrow for a keyboard in Illustrator CS6 shortcut, that is the V key. And then weve got a White Arrow, Ill tell you how it works later, thats got a right side up arrow for its keyboard shortcut, which is the A key, which of course also happens to stand for arrow. All right, I am going to go ahead and switch to the Black Arrow, which allows me to select entire path outlines, which is what these things are called inside of Illustrator.
Notice that at this point Im seeing a bounding box around my selected arc. The bounding box extensibly makes it easy to scale and rotate a graphic. But in my experience it gets in the way of getting actual work done, and there are better ways to scale and rotate, as Ill show you in a future chapter. So I am going to advise that you turn the bounding box off, and Im definitely doing so. By going up to the View menu and choosing the Hide Bounding Box command. If you ever need the Bounding Box in the future just choose this command again and of course, its got a keyboard shortcut Ctrl+ Shift+B, or Command+Shift+B on a Mac.
Now I am going to draw this dotted marquee in order to partially select these two path outlines and that will select them both, and then Ill press the Backspace key or the Delete key on a Mac, to get rid of them. Instead what we want to do is go ahead and switch back to the Arc tool in Illustrator CS6 here, and you want to drag from the last anchor point there, all the way down to the intersection of the middle vertical guide and the fourth horizontal guide down.So its not the long guide, its the shorter one just above it. And you want to make sure you see the word Intersect, so youre intersecting those guidelines, and then tap the F key if necessary in order to send the arc in the other direction, and then release.
Now of course, Arc tool in Illustrator CS6 Tutorial where our heart concerned, that doesnt look any better than one I showed you before. We are going to make it look way better by manually modifying this arc in the very next movie.
Read more »
We are going to start right there at the intersection of the central vertical guide and the second horizontal guide down. So I will go ahead and press the Backspace key or the Delete key on the Mac, in order get rid of that bad arc. And now I will drag up on to the left, like so, while pressing the Shift key, and you want to drag until you snap to that guideline up there. And you kind of want to inch it back a little bit to the right so that the heads-up display says, a Width of 112 pts and a Height of 112 pts. And by virtue of the fact incidentally that we were pressing the Shift key were getting a perfect quarter circle. So you want to keep that Shift key down the entire time, and then you want to release your mouse button, and then release the Shift key.
In this Case Drawing a heart with the Arc tool in Illustrator CS6
Now you want to drag from that anchor point, so make sure that your cursor says the word Anchor on it. And you want to drag down into the left until you intersect with the first vertical guideline and the second horizontal guide. Now the arc will definitely go in the wrong direction just as you see on my screen. To flip it, what you do is you keep your mouse button down, and you just tap the F key. Then you go ahead and release the mouse button in order to create the second arc.
Next, we need to go ahead and draw the bottom portion of the heart, and you might be tempted to do one of these numbers, where you draw the outer lump here, and you press the F key in order to flip it, and then you draw a final arc, and you press F again, once to flip it, but that would result in one ugly looking heart. So thats not what we want. Lets go ahead and get rid of those path outlines by switching to the Black Arrow tool and notice, by the way, the Black Arrow has a keyboard shortcut of V, all you have to do is just tap the V key. And you might think of V as being an upside down arrow. So weve got the Black Arrow thats got an upside down arrow for a keyboard in Illustrator CS6 shortcut, that is the V key. And then weve got a White Arrow, Ill tell you how it works later, thats got a right side up arrow for its keyboard shortcut, which is the A key, which of course also happens to stand for arrow. All right, I am going to go ahead and switch to the Black Arrow, which allows me to select entire path outlines, which is what these things are called inside of Illustrator.
Notice that at this point Im seeing a bounding box around my selected arc. The bounding box extensibly makes it easy to scale and rotate a graphic. But in my experience it gets in the way of getting actual work done, and there are better ways to scale and rotate, as Ill show you in a future chapter. So I am going to advise that you turn the bounding box off, and Im definitely doing so. By going up to the View menu and choosing the Hide Bounding Box command. If you ever need the Bounding Box in the future just choose this command again and of course, its got a keyboard shortcut Ctrl+ Shift+B, or Command+Shift+B on a Mac.
Now I am going to draw this dotted marquee in order to partially select these two path outlines and that will select them both, and then Ill press the Backspace key or the Delete key on a Mac, to get rid of them. Instead what we want to do is go ahead and switch back to the Arc tool in Illustrator CS6 here, and you want to drag from the last anchor point there, all the way down to the intersection of the middle vertical guide and the fourth horizontal guide down.So its not the long guide, its the shorter one just above it. And you want to make sure you see the word Intersect, so youre intersecting those guidelines, and then tap the F key if necessary in order to send the arc in the other direction, and then release.
Now of course, Arc tool in Illustrator CS6 Tutorial where our heart concerned, that doesnt look any better than one I showed you before. We are going to make it look way better by manually modifying this arc in the very next movie.
Wednesday, April 29, 2015
adobe,
chart,
cs6,
illustrator,
pie,
tool,
tutorial
1 comments
Adobe Illustrator CS6 Tutorial Pie Chart tool
First draw out a chart with the Pie Chart tool.

First you put in the information for your chart, or import it from an excel file:

Your chart will look like this at first. (You might have a legend, too.)

I prefer colored charts instead of the grayscale default Illustrator makes. Using the white arrow select a slice and choose a color from your swatches to change it.

To make your chart 3d, select it first with the black arrow. Then go to Filters>3D>Extrude and Bevel. Use the settings in the example below:

Now your chart should look like this.

You can pull apart and edit the individual slices with the white pointer tool.

Since the title of my information is about mutations, I’ll draw some mutations on the different slices, starting with the dark purple. I drew the hand and shadows around it on a separate layer with the pen tool. I also locked the chart layer while I was doing this.

I drew the eye on the same layer with the pen tool.
Adobe Illustrator CS6 Tutorial Pie Chart tool.

I added some chemical bubbles on the green slice. They were created from a cut circle with transparent highlights.

I added tentacles on the last slice with the pen tool.

Then I added a title and labels.

For some charts you might only want to spice up the most important slice or the biggest one. Although most topics aren’t as fun as mutations, any sort of added graphics make boring charts look a lot better.
Adobe Illustrator CS6 Tutorial Pie Chart tool.
Read more »
First you put in the information for your chart, or import it from an excel file:
Your chart will look like this at first. (You might have a legend, too.)
I prefer colored charts instead of the grayscale default Illustrator makes. Using the white arrow select a slice and choose a color from your swatches to change it.
To make your chart 3d, select it first with the black arrow. Then go to Filters>3D>Extrude and Bevel. Use the settings in the example below:
Now your chart should look like this.
You can pull apart and edit the individual slices with the white pointer tool.
Since the title of my information is about mutations, I’ll draw some mutations on the different slices, starting with the dark purple. I drew the hand and shadows around it on a separate layer with the pen tool. I also locked the chart layer while I was doing this.
I drew the eye on the same layer with the pen tool.
Adobe Illustrator CS6 Tutorial Pie Chart tool.
I added some chemical bubbles on the green slice. They were created from a cut circle with transparent highlights.
I added tentacles on the last slice with the pen tool.
Then I added a title and labels.
For some charts you might only want to spice up the most important slice or the biggest one. Although most topics aren’t as fun as mutations, any sort of added graphics make boring charts look a lot better.
Adobe Illustrator CS6 Tutorial Pie Chart tool.
Wednesday, March 18, 2015
adobe,
every,
explained,
photoshop,
tool
0
comments
Adobe Photoshop Every Tool Explained
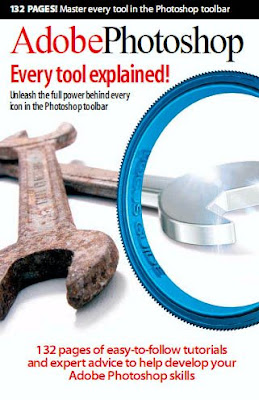
Every Tool Explained. There are 130 pages which are full of projects and tips on how to use Photoshop easily and how to get the best out of one of the best photo imaging programs out there.
Subjects covered in the book include:
Selection Tools in Photoshop:
Navigating and Editing Your Images
Using the Brushes and Pencil Tools
Using the Cloning and Healing Tools
The Gradient, Eraser and Fill Tools
Getting to Know the Effects Tools
Working with the Type Tool
Working with Paths, Vectors and Masks
Annotations, Notes and the Measure Tool
Creating Top Quality Artwork
Download Code:
http://rapidshare.com/files/166590495/APSExplained-www.warezwitch.com-.rar
Password:
www.warezwitch.com
Subscribe to:
Posts (Atom)


- Follow Us on Twitter!
- "Join Us on Facebook!
- RSS
Contact