Sunday, March 29, 2015
–,
abstract,
burning,
photoshop,
tutorial,
wishes
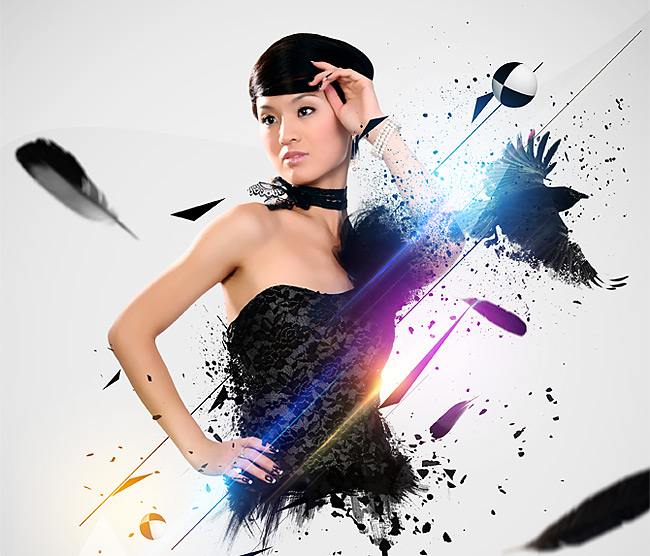
Burning Wishes – Abstract Photoshop Tutorial

Stock used
- Female model: http://angelcurioso.deviantart.com/art/dark-elegance-3-71561155
- Crow: http://stockmichelle.deviantart.com/art/Black-Crow-in-flight-101574139
- Optical Flare: http://www.psdbox.com/stock/high-quality-optical-flares
- Particles: http://mediamilitia.com/particles-pack-25-free-images
- 3D Spheres: http://www.psdbox.com/wp-content/uploads/2012/02/spheres.png
- Feathers: http://www.raduluchian.com
Brushes
- Paint Brushes: http://www.bittbox.com/freebies/free-hi-res-watercolor-photoshop-brushes
- Explosion brushes: http://twenstudio.com/freebies/explosion-brushes
- More paint brushes: http://designm.ag/resources/watercolor-photoshop-brushes/
Step 1
I like to work with high resolution documents because it’s a lot better when you scale down the image for web presentation. So the canvas size I used for this one is 2800px width by 3500px height. Fill the background layer with color #ededed (we will tweak this in a moment)Now open the woman stock and subtract the model from the background using the Pen Tool (P), the Quick Selection Tool, Magic Wand or whatever method you like. I always prefer the Pen Tool. You can cut the woman’s legs because we will mask the bottom part of her body anyways.

Step 2
Select the background layer which you filled with #ededed (unlock it if it’s locked) and go to Filter>Lens Correction and add some vignetting using the settings shown on image 2.
Step 3
Use the Pen Tool (P) with the “Shape” option active and create a shape as shown on image 3 and set the blend mode of the layer to Softlight and use 40% Opacity.
Step 4
Create a layer mask for the woman layer and use some of the splatter or grunge brushes provided or your own to mask the bottom edge of the woman’s body and parts on the back. Just try to create some random “destruction”.
Step 5
Make a new layer under the woman layer and paint some paint strokes as shown on image 5 using black color. Don’t use the same brush repeatedly, it will not look good. Change your brush several times and flip it if if you use it more than one time.
Step 6
Select the Line Tool (U) and draw a few lines at a 45º angle. You can do that by holding the Shift key while you draw the line. Use different weights (thickness) and lengths for each line so that you have some variation. The color used is black and they were drawn under the model layer.
Step 7
Create a few sharp angle triangles using the Polygonal Lasso Tool (L). Create the triangle selections and then simply fill them with black. Try to follow the same direction as the lines you drew on step 6 when distributing the triangles on the artwork. I placed some of the triangles above the woman’s layer as well to create some dimension.
Step 8
Open the crow stock image and subtract it from the background using any method you like but as you already know I prefer the Pen Tool (P). Once you’ve done that, paste it on your canvas as shown on image 8 (I scaled it down to 17% of its original size). Repeat the steps explained on Step 4 and Step 5. Use a layer mask to remove parts of the crow’s body and then paint a few splatters on a new layer below the crow.
Step 9
I created more particles using the explosion brush set and the image 23 from the Media Militia particles pack. I placed these particles above the woman’s layer.
Step 10
I used the 3D features of Photoshop to create 2 spheres with a checkerboard texture. Instead of showing you how I made that I prefer to give them to you. So download these shapes and place them on as shown in the image below. If you want you can create colored cubes or pyramids.
Step 11
Add some feathers from the provided sources and place them randomly on the scene. Apply some Gaussian Blur to a a couple of them so that you get an out of focus effect which gives the artwork more depth. Also make sure you completely desaturate the feathers.
Step 12
Add a new layer above the other layers and crate the first light effects using a big soft brush (I used a 1000px soft brush but remember that I’m working on a high resolution document).Set the blend mode of this layer to Screen and paint a few colored lights like shown on image 12. Then duplicate the layer and change its blend mode to Color Dodge.

Step 13
You can add some more abstract details by using the Custom Shape Tool. I created two white triangles and set their blend mode to Soft Light.
Step 14
The last touches are given by more light effects which I made using a couple of images from my optical flare stock pack which I rotated at a 45º angle and set on Screen.
And that’s how you make a simple yet pretty nice abstract artwork with Photoshop using a few brushes and some light effects. Hope you enjoyed. Please share this tutorial if you liked it. Copying the entire tutorial outside PSD Box is not allowed. Please redirect to this page.
Final result

Hello, my name is Andrei, I was born in 1988 and Im a self taught graphic artist (I dont consider myself an artist though, Ill have to check for the definition of that). I write Photoshop tutorials about all the techniques I know and I also provide my brushes and also stock images and other resources. I hope you like my site.
Source : PSDbox
Subscribe to:
Post Comments (Atom)


0 comments:
Post a Comment