MakeUp - Retouch Using Photoshop
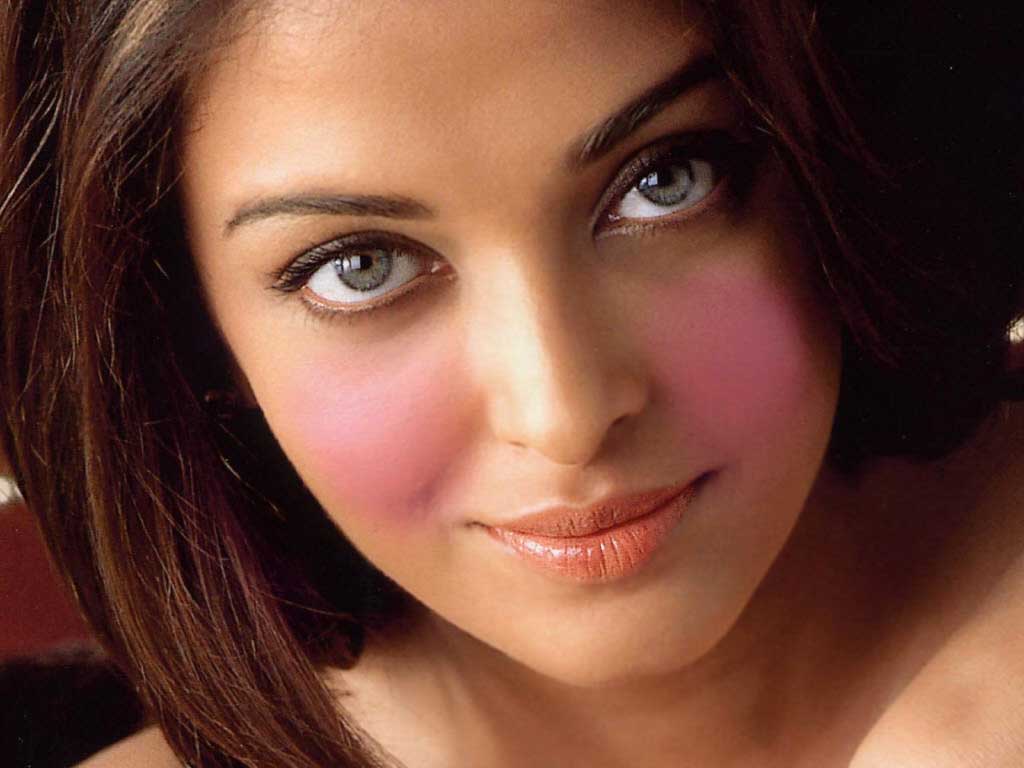
Final View
![Photo Retouch - Make-up Photo Retouch](https://blogger.googleusercontent.com/img/b/R29vZ2xl/AVvXsEje6hHkovol6IQkaSs3_z8i7H1Tc1yi2dMG2a-fQM_O28uS8L5Ntr3m5m2VqyEVqlPBK3Xg6RM0-nmcKyTxJpgcV0EWDhsBGcujVOa1u8QFWzDuAWUcJmUx7AjSTikn46gTnj3sGxcR37g/s1600/first.jpg)
Step 1
Take the picture to edit.
right click on Background Layer and create a duplicate layer.
Name it layer1 and press OK.
![Duplicate layer Duplicate layer](https://blogger.googleusercontent.com/img/b/R29vZ2xl/AVvXsEjclfej4m0mT2yqbBBGxNKFhGZkCDghPSV9ugTsQXlWhqC5t0F1LnOJwjFCEEHMahZHgW4GGbnobOhi8OB7y6hETvoBvvfGN2Saxoc0M8JlhBM_EyH_G9uTU5_y9hWWRIvCnoxkSDip_hw/s1600/6.jpg)
Step 2
Create the new Layer Layer--->New Layer(ctrl+shft+N)
Name it what you want.
![Name the layer Name the layer](https://blogger.googleusercontent.com/img/b/R29vZ2xl/AVvXsEjqze2gVJ2rKRhW8Xyff7EcK7PQpV0HqF8WTKHj_T8feSh6yKlObaJjVwfRjGAq7kw0cVbJxYr-_R5HSJXzrNxtzv33fKbI2_Kx6YQb9bOF43zr0XsWm4Q4URxS0K8BloA4dikCkZvmbbQ/s1600/2.jpg)
Select the Polygon lasso tool from tool box and select the part of cheeks to give redness to it.
![Select area Select area](https://blogger.googleusercontent.com/img/b/R29vZ2xl/AVvXsEgYeMXo5abnNVRSYJdyDYv_p5mdqeNLNesKQl-yQPlxo72655eapVklImCpCZqSFfXon8j42ZgSmq-_Z_66LGyHmYCy16daAq1sJzlCjbOiYmnyn4V5JVydSlubSJRu1uZeic6yRVVDn24/s1600/17.jpg)
Feel pink color in it by pressing Shft+f5 or go to Edit--->Fill.
![fill color option fill color option](https://blogger.googleusercontent.com/img/b/R29vZ2xl/AVvXsEiOmW8SwsmCD44wx9teDoDnvapxolyJN-WDwA748aiqc10us-wDeTojqoYBHEU_6vkmM_ybZ__xBqSKf4abRtn_MwT05RXgyDkNojL5RBYgbUIwU8TJHFLUFnrm75E-BbbJrQHUPtrFhus/s1600/3.jpg)
Use color(as shown above) and select pink color and click OK.
fill the color in both side cheeks by selecting some part of it as shown below.
![fill pink color makeup -fill pink color](https://blogger.googleusercontent.com/img/b/R29vZ2xl/AVvXsEioZlWe1R5hP1HH_mSgDiDMFbO4cct_VWtJRwpjHJKTLr9suMIicO518xjvYCL0EqwmHGf-OqSx2sRUSi0Ag_fPPfcp8DbOHsMtDzKx9pPxUrgDoo-tJjFjavr7DhkNOErrhOjq7Hfs4Oc/s1600/19.jpg)
Step3
Now go to filter--->Blur--->Guassion Blur.
and blur to the newly created layer..
![Gaussian Blur Gaussian Blur](https://blogger.googleusercontent.com/img/b/R29vZ2xl/AVvXsEgv45UieRBvA_WQfcTqaZgfaCFkXwi0B-zutN8xcxUPmkyJBOiw_7RsXnTl3k2_HPHcc0iI4JY-0NDT96CmAqbbNMIIEGXbGga4wd4rM3HsrArM-nvK6UXnwTvn_0_ET6peaajqTqTsRtE/s1600/4.jpg)
Remove the outside/spreded area of pink color by using smooth eraser.
(Because of blur, the color spreds and it go outside of object. remove it by eraser).
![Select Brush Select Brush](https://blogger.googleusercontent.com/img/b/R29vZ2xl/AVvXsEiofEcSHwIuiVycje42THjLOBRFWk_bybLuod46htDjysuYZ0hm4r4IrpojrCEhItgsQbRyrzSvVuSUcYYdb0Xhyphenhyphen1cVp-F-dl59s3FMrb9-IUEgZ8Tbz_b_PfY5OACYfEkuSiLnmPAKwWk/s1600/5.jpg)
now your image look like this.
![](https://blogger.googleusercontent.com/img/b/R29vZ2xl/AVvXsEgr78TfOXOtDMMHpCUXApnPHbYC3SDwtLV_90zQXQkqjWJ_XTriUtUEPuT_VW8h_aiuvXHCXJrfse-y0r_lQGmffl-tFuwtB2rcCQdsFOKczLDg0vS3xpbMmm4rQdbIp5qNi4KmBZCHkGs/s1600/9.jpg)
Step 4
Now select the Layer1 we created before(duplicate of original image).
and by selecting Polygon Lasso tool select the leaps as shown.
![Select Lips Select Lips](https://blogger.googleusercontent.com/img/b/R29vZ2xl/AVvXsEiws0Jpy1_h8Dv0KV3yqgnq0GPsjc1Hf5ik-25Q5kT_gMLfqtTW-0RUKkTyT6S6cmDPAqZf29sgSyWB64oCdffns3ypcifE9U9HaTIMSGMzhcqCjh2zSIx6UhAUAkPzwbCtOoNomaJqCeM/s1600/7.jpg)
Now open color balance window by pressing ctrl+B.
and increase the red color slowely.
![color balance color balance](https://blogger.googleusercontent.com/img/b/R29vZ2xl/AVvXsEjKOHigOQA8xIt2V2TbLioPiHG4i1S10gt90Z-PdnEke9ugQPZpPIZkLm88tX5co14yu9ym6xjhaFfYCipxlxHdEKlhn20HrE0-Udd85566QsXf2kTROCb9sRU45r0uB3tVT_WEY0oh8XQ/s1600/8.jpg)
After increasing red color your image seems like this.
![add red color to lips add red color to lips](https://blogger.googleusercontent.com/img/b/R29vZ2xl/AVvXsEjRzvMLf2FrNuhsoBKWJXaeSjPOWB5DDwpwcAeuHumInzbW_zCd6g_9f3J9aGAU9bFThF5IbQtj50s8orDZbwBUbbTzshgNQFFoQm8jLQanISJ6kSRD89tHn9y_1dzl5jVfRhNcfKoIKLM/s1600/9.jpg)
Step 5
Now select eyes by Lasso Tool.
![select eyes select eyes](https://blogger.googleusercontent.com/img/b/R29vZ2xl/AVvXsEjhVFfcsE6OAKAQVK7BqRxIJvANk6IE_brh0T8D88yE2cKXSU8yk0ztxodYMVBozrp9k_3JgTgE34dOg8_3lo4JoFnL8Xnydif6GkqkNzZhh2ZMWY-W4gTAhCdu2KSubqQa8sez7fXo1lg/s1600/18.jpg)
Now open Levels of image (Press ctrl+L).
select the green color.
![Open Levels of layer Levels of layer](https://blogger.googleusercontent.com/img/b/R29vZ2xl/AVvXsEh3usgaYAXZvHrH5HBssTd08nsucr0mgQgG7jC451hW2uCDMh_zsw6iKf1ILQJVESFE1mu2UyNAvYnCDrmmBOv6hyphenhyphenYFP237XbHFaXk65eT3fZtdkIJQhyphenhypheniEO8Gswu83mYt6aQTQdIxOYAQ/s1600/10.jpg)
Increase the brightness of selected area as shown.
![Adjust levels for green color Adjust levels for green color](https://blogger.googleusercontent.com/img/b/R29vZ2xl/AVvXsEhvNadofTCPG4DPAVg0MPhH58on_uVTwG8IElxstQRZloVeU9BaNRwrlnWdQczB_WP0ZCuhozRtgLoaOGXHDjmxfzoGYsq54ZqXpoTV1wLyr7SXsSzAq8Si5pGUGUYDzSekNHJdY6Kcwao/s1600/11.jpg)
Now select second eye and give same effect as above..
Step 6
Noe create new layer ctrl+shft+N .
Name it and create.
Now select the area of eye liner by lasso tool as shown below.
![select area for liner select area for liner](https://blogger.googleusercontent.com/img/b/R29vZ2xl/AVvXsEg76N-JSm2J9uC5hNyYeQkokYQ03Eb3oUjoQ35fsDEDUl67ciI6p6aL-IIn8k96iWueHc2f8Mld29a0t9BghAVH8ffi5QHJO3AESv2aNf1bSw9OlOVgZuRUWe8-qeI9QQtu2G1lJaakbu4/s1600/12.jpg)
Fill the Green Color in it by pressing shft+f5.
fill the green color to both the eyes.
![Fill it with green color Fill with green color](https://blogger.googleusercontent.com/img/b/R29vZ2xl/AVvXsEhVo89oDp9PySvqhyphenhyphenOMyGpQlTv-LfdE99vV-Q47LFMsUli2l8L4dhwBtxqaXdf0QzLwypJnCClzZBcYG54XSncY1lakjLuY8XdoUN7zpf4LGO0qAP3npvW1e1T_XhkzIS8NPD-UoIX4bLQ/s1600/13.jpg)
and go to Filter--->Blur--->Guassion blur and blur the Layer slowly.
![Blur the layer Blur the layer](https://blogger.googleusercontent.com/img/b/R29vZ2xl/AVvXsEi0RuZtqipfKJC86DfO4i86WOWyESYy1gVZGY7PrHbd-f_iid_qpr-Aeu8Cp6KllB3GOFcyaOaZDN8FwAmNNDJqkyfHaf2R7y6GPLBwR8TwSv-efJRABQWDd9VUCyb__LRXagWEHNgj-x0/s1600/14.jpg)
Now go to layer properties and change the layer type to Heu.
![Set layer mode to Hue Set layer mode to Hue](https://blogger.googleusercontent.com/img/b/R29vZ2xl/AVvXsEhqLNf2SI1yTDyZsqLUaY3nn9Drvpy7pOc_jvFl_6gLZ6SFp6S0PJe9zZqkfYsl7Hgxo2qh9unQz1G2DiqKamcFi7CH5ACgRW1eB9KixRpap_RhgQ_BBdnVQBB-9hVd02rbPF5MF4IkmYg/s1600/15.jpg)
Step 7
Now select the Layer1(Duplicate of original).
and select the Hairs by Lasso toos
![Select the hairs by lesso tool Select the hairs by lesso tool](https://blogger.googleusercontent.com/img/b/R29vZ2xl/AVvXsEiI-gMfuQtrjBCNy4XBuT6qhK8vNN35xMbuSeIpwgZ2xO2vt4GAmq4nFQbb9CWfHC0Qp8cvlElpdfVymVVV4vBYPTcoEWkIxmpZp29nHUc_2Z0hAbEPTTEI4zs4VW8hYAfjANyvIprad9A/s1600/16.jpg)
Press ctrl+B (color balance) and increase red color slowly.
![Makeup - final view Makeup photoshop tutorial](https://blogger.googleusercontent.com/img/b/R29vZ2xl/AVvXsEj0-dUnPnUzjbrWb_IZC6HnKKoqf8kbbg0D6K_wCUvZAJewz1qEpgXjQjS5_hRWorHVKoQ8xLfGXtMrOg2DUwx_g38s5FmVBtVZHJhjgQA0x_XeRsR7_rEoG4QDj8n8_XwuE-onsviZofI/s1600/final.jpg)
Done...!! :-)
Subscribe to:
Post Comments (Atom)
0 comments:
Post a Comment