Wednesday, March 18, 2015
beginners,
for,
gradient,
map,
photoshop,
tutorials
Photoshop Gradient Map Tutorials for Beginners
One of the most useful Photoshop adjustment layer is the Gradient Map that you can use to enhance your photos. You can use a gradient map as a non invasive method in which you can change the color map of your image, adding multiple color effects. Using Photoshop gradients(GRD files) you can create virtually unlimited number of color effects.
I will start this tutorial by saying that I am not a Photoshop master so I get a little confused sometimes; for example in this tutorial I will explain for all the Photoshop beginners a quick way to enhance a photo by using a Gradient Map. As you will see if you open the fill or adjustment layer tab we have to gradient options: the Gradient (Fill) and the Gradient Map; so the question is which one to choose and use? And of course what is the difference between the two of them. For the first question I will choose the first option, the Gradient (Fill) instead of the Gradient Map. For the second question I have no answer.
Gradient Map and Gradient Fill Adjustment Layers
A Gradient Map is in fact an adjustment layer that can be applied to a layer/multiple layers and to enhance the image result. Learn more about adjustment layers from this tutorial.
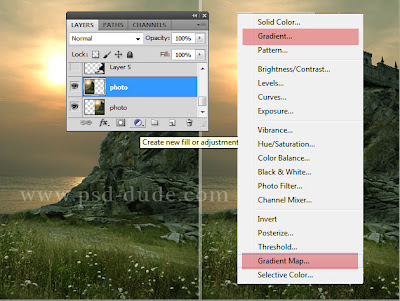 So lets start with a beautiful premade background. Add a Gradient adjustment like shown in the image.
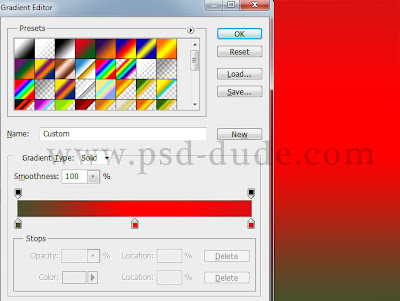
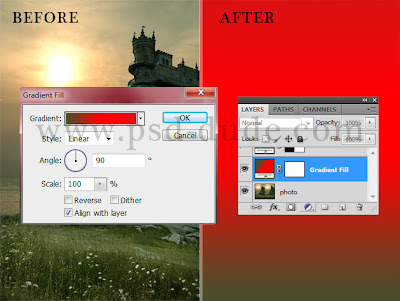 Click on the gradient to open the Gradient Editor; there you can change the existing gradient, create one yourself or you can load and use one of the many Photoshop gradients available for free on the internet.
 Now set the Blend Mode of the gradient map to Overlay and the opacity 45%
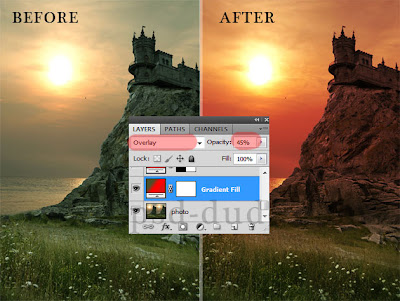 You can play with different gradients and you can obtain beautiful results in just a few minutes using Photoshop gradient map adjustments. In the same way you can use the Gradient Map instead of the Gradient (Fill) and see which of the results suits you best.
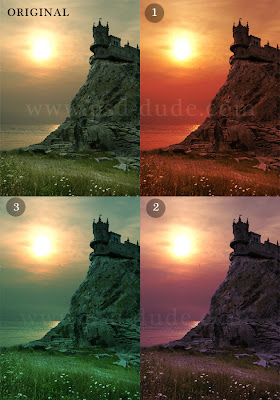
I will start this tutorial by saying that I am not a Photoshop master so I get a little confused sometimes; for example in this tutorial I will explain for all the Photoshop beginners a quick way to enhance a photo by using a Gradient Map. As you will see if you open the fill or adjustment layer tab we have to gradient options: the Gradient (Fill) and the Gradient Map; so the question is which one to choose and use? And of course what is the difference between the two of them. For the first question I will choose the first option, the Gradient (Fill) instead of the Gradient Map. For the second question I have no answer.
Gradient Map and Gradient Fill Adjustment Layers
A Gradient Map is in fact an adjustment layer that can be applied to a layer/multiple layers and to enhance the image result. Learn more about adjustment layers from this tutorial.


Subscribe to:
Post Comments (Atom)


1 comments:
Adobe Photoshop Tutorial
Starting with Color Maps
Color Map Versus Matte Painting
Making the UV Test Map
Diffuse Maps
Projection Method
Bump Map
Desaturating: Tolerable on Occasion
Grayscale
Simple Range Adjustments
Advanced Range Adjustments
Post a Comment