Monday, March 16, 2015
art,
illustration,
photo,
quick,
to,
vector
Photo to Illustration Quick Vector Art
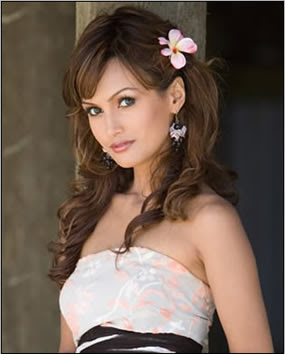
Step 1: First I will start with an image.
![](https://blogger.googleusercontent.com/img/b/R29vZ2xl/AVvXsEh84pH8H9H1N-Bi8SQSyyWGgK_zNbpuPnjZYOu8A4wdU7WcwHyxVkqqU4nH_WrPAZTo_dBLw4_TIpIZVyn254zrriwHL3zgqRX36D8JbXvMtP6XhMY9s747EwYkHXkU7e6Pj2GWsDJ6pTQu/s400/Vector-1.jpg)
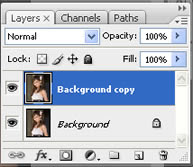
Step 2: Duplicate the Background layer.
![](https://blogger.googleusercontent.com/img/b/R29vZ2xl/AVvXsEj3zMyCXcleXXLGLefNbZaxhw3NLWnRLGEn-jKgZ_Z2UzEKnG5sgAUenb5k7VDvUNWKpJDIgk_Zp-bcfbS-03-S2bQ8soMkRGzZFqrQRbMUdYpC_inP2JhtQ02ZHm7ZWMh1Roowx6XEawmm/s400/Vector-2.jpg)
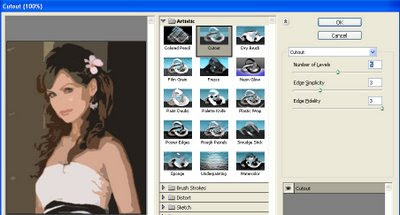
Step 3: Now apply the Cutout filter (Filter => Artistic => Cutout). On the left side the amount of detail in the vector can be controlled by adjusting the Number of Levels, Edge Simplicity and Edge Fidelity sliders. For this example I am using 5 levels, with the Edge Simplicity set to 3 and Edge Fidelity set to 3. Click OK.
![](https://blogger.googleusercontent.com/img/b/R29vZ2xl/AVvXsEjEazgdWEwSsjAxLHTeUhcwHzJnJNqN-PEQZWnN_XRgaqEt3udCh-3VsKnjmCvZM_flFnzQWsoAPT5r5Ud0AdqUaE-wsYTfpIv8S8ot0PbP2Noaw44UEmLcZ2iDcbXlmFEy10VGUthmD9S1/s400/Vector-3.jpg)
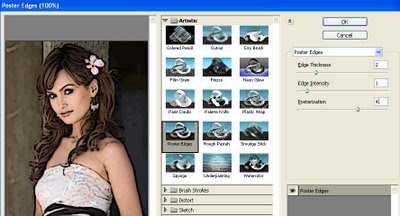
Step 4: You can trace the areas of color divided by the Cutout filter with the Poster Edges Filter. For this example the Edge Thickness is set to 2, Edge Intensity to 1 and Posterization to 4. Click OK.
![](https://blogger.googleusercontent.com/img/b/R29vZ2xl/AVvXsEgIkmPXQzsdHnzCMjoEz6PfTH28u2WVwiOKSGzdZP4mxi_rMQWOv4OnSOlT9BySytMPgOM3wsDnrOVis6Wn9qHUf6CTfDJ_qhfraArTuQ6wCOUQcc55X3Km4qaIwYMHiPOCAkPi_v6ZiNyr/s400/Vector-4.jpg)
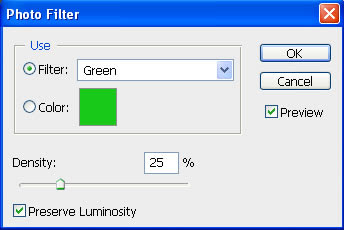
Step 5: The color can be changed subtly with a Photo Filter adjustment layer.
![](https://blogger.googleusercontent.com/img/b/R29vZ2xl/AVvXsEgxEaSrmiFQgznEAEV5nqWKr8smMX1UFBY6Nwz6FzabZI03fes7c-mHUqCv_ZMrxLIC6r3F28l44wcMaMS-MSm0A2hYA8F7v_lrKAZ8sc3douFMkYwB3g4w1INpptUauQZitddd5L-uOP4m/s400/Vector-5.jpg)
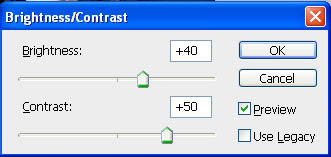
Step 6: And finally, to add to the colored effect, a Brightness/Contrast adjustment layer will help take away the natural highlights/shadows even more.
![](https://blogger.googleusercontent.com/img/b/R29vZ2xl/AVvXsEh9_Q0WFuKgOi_FuVTcXQM8oDlwKJjcE-SAfaXFZvULyQfNqPlVMZiS5HJBT_PVirY_BHOLqGvTO-GxSt16lafcm1Yy5fMR54xBddGLaBB-4VqEIxeSK8VOJ9BLeUjJeMbIkhR8x_4Hguu3/s400/Vector-6.jpg)
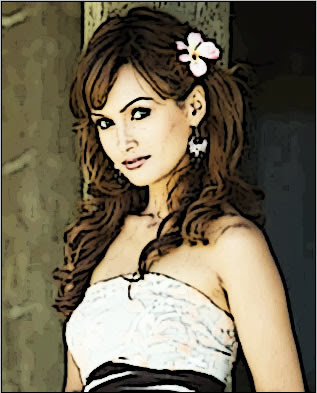
Step 7: Here is my final vector image:
![](https://blogger.googleusercontent.com/img/b/R29vZ2xl/AVvXsEi3i1vQK2evsfyl9fKJ60C0eppg6vfk4x4LD8mgOQAyRbpeSfQRjWsgew5DNGzuJs-2eiOW49WeX309fE-hzKxFpI8E2s0jTpPY7tVI5ZW8XGAHqJEmzdLPycIr1qCnzPZWokVRtHSrG0we/s400/Vector-7.jpg)
Subscribe to:
Post Comments (Atom)
0 comments:
Post a Comment