Sunday, March 15, 2015
image,
in,
photoshop,
select,
three,
to,
ways,
your
Three Ways to Select Your Image in Photoshop
This tutorial will introduce you to three very different and very simple ways to help select your image. Selection is the basis to running it all in Photoshop.
Method No.1. "Edit in Quick Mask Mode"
1. Open an image in Photoshop.

2. Select brush tool and set its size according to what you select on your image. For example, set the brush size to 8 pixels when you select something really tiny.
3. Foreground color must be black.
4. Before applying the brush to your image for selection, click on Edit in Quick Mask Mode. Now your brush is ready for selection. Notice that the areas you apply your brush to turn pink. If your selection goes out, you can fix it by first setting the foreground to white, and then using your brush tool to ‘erase off’ the unwanted selection. To continue your work, ensure that you reset the foreground color to black. To make it easier on your nerves, you might want to try zooming in and out on your image. It really helps.
5. To zoom in press CTRL +
6. To zoom out press CTRL -
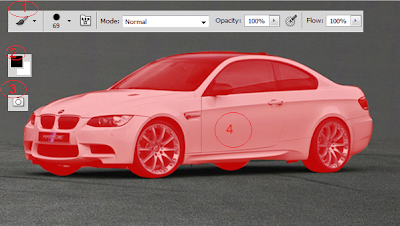
7. When you’re satisfied with the selection you’ve made, click on Edit in Quick Mask Mode again.
8. Press CTRL+SHIFT+ I

9. Now press CTRL + J. A new layer consisting of only what you’d selected will be created.
That’s method 1.

Method No. 2. "Quick Selection Tool"
1. Open an image in Photoshop.

2. Select Quick Selection Tool.
3. You can change the size of the selection tool according to what you select on your image. Also, you must take note of two more important features. These are the angle and the roundness of the selection tool. You can change these depending on your selection needs.
4. To fix a selection, or to deselect a selection, use the Subtract from selection tool.
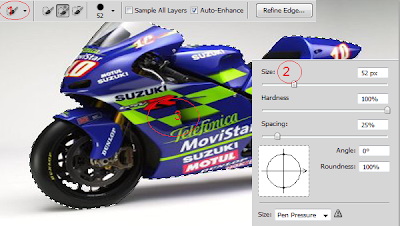
5. Press CTRL + J
That’s method 2.
Method No. 3. "Color Range"
1. Open an image in Photoshop.
Now I am going to select all flowers. For this image the best way of selection is Color Range.

2. Go to Select > Color Range.
3. Pick the Eyedropper tool and click on the red color on your image. To select the different shades of red on your image, make use of the Add to Sample tool.
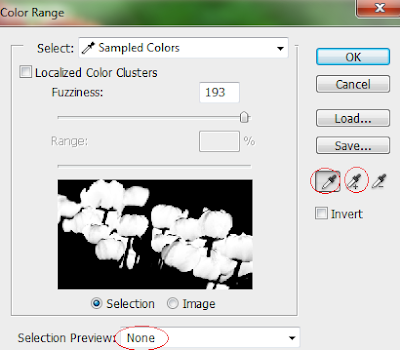
When you’re done, just click OK.

4. Press CTRL + J.
That’s method 3.
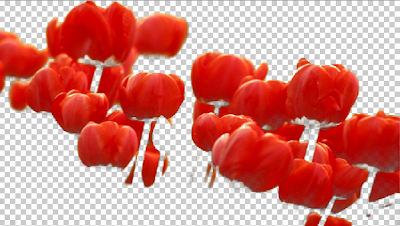 Now, to change the background of your layer with another image, you can simply load a new image and drag and drop it onto the selection layer.
Method No.1. "Edit in Quick Mask Mode"
1. Open an image in Photoshop.

2. Select brush tool and set its size according to what you select on your image. For example, set the brush size to 8 pixels when you select something really tiny.
3. Foreground color must be black.
4. Before applying the brush to your image for selection, click on Edit in Quick Mask Mode. Now your brush is ready for selection. Notice that the areas you apply your brush to turn pink. If your selection goes out, you can fix it by first setting the foreground to white, and then using your brush tool to ‘erase off’ the unwanted selection. To continue your work, ensure that you reset the foreground color to black. To make it easier on your nerves, you might want to try zooming in and out on your image. It really helps.
5. To zoom in press CTRL +
6. To zoom out press CTRL -

7. When you’re satisfied with the selection you’ve made, click on Edit in Quick Mask Mode again.
8. Press CTRL+SHIFT+ I

9. Now press CTRL + J. A new layer consisting of only what you’d selected will be created.
That’s method 1.

Method No. 2. "Quick Selection Tool"
1. Open an image in Photoshop.

2. Select Quick Selection Tool.
3. You can change the size of the selection tool according to what you select on your image. Also, you must take note of two more important features. These are the angle and the roundness of the selection tool. You can change these depending on your selection needs.
4. To fix a selection, or to deselect a selection, use the Subtract from selection tool.

5. Press CTRL + J
That’s method 2.
Method No. 3. "Color Range"
1. Open an image in Photoshop.
Now I am going to select all flowers. For this image the best way of selection is Color Range.

2. Go to Select > Color Range.
3. Pick the Eyedropper tool and click on the red color on your image. To select the different shades of red on your image, make use of the Add to Sample tool.

When you’re done, just click OK.

4. Press CTRL + J.
That’s method 3.

Subscribe to:
Post Comments (Atom)


0 comments:
Post a Comment