Photoshop Tutotials

STEP 1
Create a new document with a size of 500 x 500 px and using the Gradient Tool Bucket paint our background as shown below. ctt: do not need the exact same result like the image below important Middle oscillate between the color red so
STEP 2
Create a new layer (shift + ctrl + n) and create a rectangular columns as shown below. First by using the Rectangular Marquee Tool create a selection rectangle then using the Paint Bucket Tool fill it before the selection with black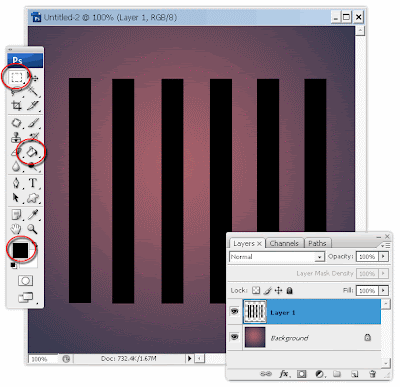
STEP 3
If it is double layer square pillar by pressing Ctrl + J on the keyboard and then open the Edit menu - Transform - Rotate 90 CW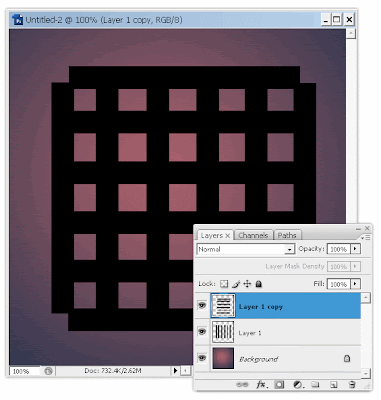
STEP 4
Combine its layer by pressing Ctrl + E on the keyboard
STEP 5
Furthermore activate Eliptical marquee tool and while holding down the shift key on the keyboard (to make a perfect circle) make a circle selection like Figure 1 below. Next open the filter menu - distrort - spherize set the Amount value is 100 and the Normal mode the picture will look like Figure 2 below
STEP 6
Then press Shift + Ctrl + i then the pattern will change the selection, then press the Del key on the keyboard then the remaining are round, and then press ctrl + d to remove the selection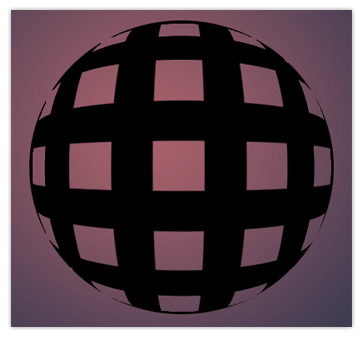
STEP 7
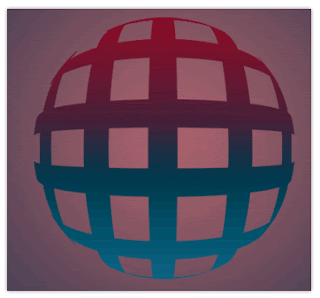
Next open the menu Layer - Layer Style - Gradient Overlay and set its properties as shown below and click OK
STEP 8
Then globe image will look like the image below
STEP 9
Her ball Duplicate Layer (ctrl + j) and press Ctrl + T and rotate about 45 degrees and then press enter if it fits. Well if it is changing its style and add layer via the Layer menu - Layer Style - Gradient Overlay settings for Inner Shadow also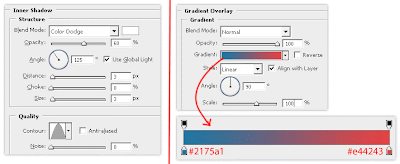 |
| Click To Zoom Image |
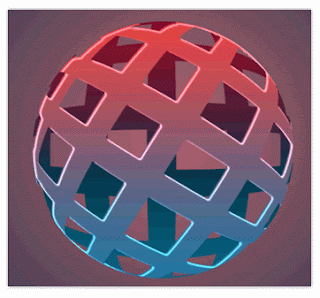
STEP 10
If the above step is done correctly then the picture will look like the image below
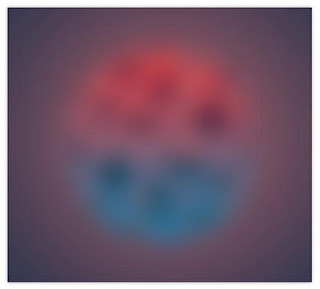
STEP 11
Press Shift + Ctrl + Alt + E it will create a new layer as Figure 1 below. Then go to Filter - Blur - Gaussian Blur radius insert 20 in the field and click OK then the ball was going to be blurred due to the blur effect earlier (fig 2 below). Next, change its Blending mode to Overlay and the Opacity to 60% of its picture will be shown in Figure 3 below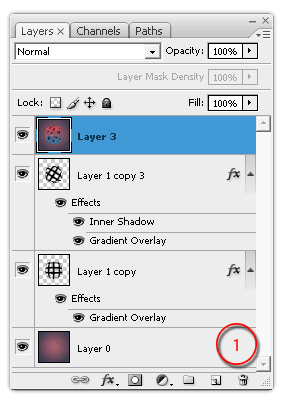

STEP 12
Duplicate the layer ball is in position 2 of the bottom by pressing ctrl + A then turn off its layer style 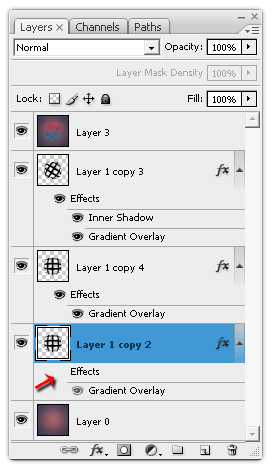
STEP 13
then press Ctrl + T to change the shape of the balls to be like the picture below 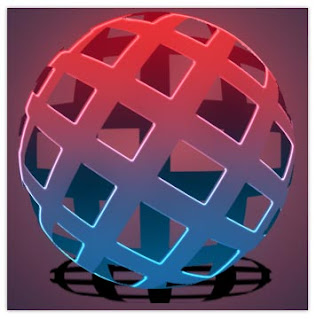
STEP 14
Then go to Filter - Blur - Gaussian Blur radius fill 9 on the field, and change its opacity to 30%
Subscribe to:
Post Comments (Atom)


0 comments:
Post a Comment